In this page
Execution sequence of Excel automations
Configure Excel automation rules
Configure the Excel callback rule
Configure the Excel export rule
Generate the "export" section for the Excel Automation API call
Get started
This page contains the basics of configuring Excel automation on the Jira Cloud platform. If you're about to create your first Excel automation rule, we recommend the following learning path:
- Learn the key concepts and basics of Jira Cloud automation.
- Learn about the execution sequence of Excel automations.
- Configure the Excel callback rule, a shared automation rule commonly used by all Excel automations.
- Configure your first Excel export rule, the automation rule that implements an actual Excel automation.
- Study the configuration reference for the complete list of configuration options.
Let's get started!
Execution sequence of Excel automations
Excel automations are implemented by integrating the Excel Automation API with Jira automation rules. The Excel Automation API is a secure REST API published by the Better Excel Automation for Jira Cloud app. You can connect to this from any Jira automation rule using the built-in Send web request action.
A complete automation requires a pair of automation rules, each with its well-defined responsibility:
- The Excel export rule is the rule that actually calls the Excel Automation API. It requests exporting the Excel spreadsheet file, and emailing or attaching that. It will not wait for the completion of the work, but let the API asynchronously do what was requested.
- The Excel callback rule is the rule that listens for the result. It is called "callback", because it is "called back" by the Excel Automation API with the result after the API completed the work requested. It writes the details of the result to its audit log for troubleshooting and auditing reasons, and switches to "Success"/"Some errors" state to reflect the state of the complete automation.
The execution sequence:
- The trigger of the Excel export rule kicks off the rule's execution. (Note that you can use any of the triggers to start Excel automations!)
- The Excel export rule sends a request to the Excel Automation API. (The request body specifies what to export to Excel and also what to do with the exported file.)
- The API validates the request and responds to the Excel export rule. The response includes an ID that identifies the request and the validation result (accepted/rejected).
- If the request was accepted, the API starts working on it asynchronously.
- The Excel export rule writes the response to its audit log.
- The Excel export rule ends.
- Meanwhile, the API exports the Excel file, and emails that to the requested recipients or attaches that to the requested issue.
- The API "calls back" by sending a request to the incoming webhook type trigger of the Excel callback rule. (The request body includes the original request ID and information about the result.)
- The trigger of the Excel callback rule kicks off the rule's execution.
- The Excel callback rule writes the request to its audit log. (Note that the request ID is the "link" between the matching Excel export rule and Excel callback rule in the audit log.)
- The Excel callback rule turns to "Success" state if the request body contains that the API successfully completed the work. It turns to "Some errors" otherwise.
- The Excel callback rule ends.
- The automation ends!
Configure Excel automation rules
In this section you can find step-by-step guides that ease building the two types of Excel automation rules.
Recommended order:
- Start with configuring the Excel callback rule. It should be configured first, because it will generate a unique webhook URL and a secret that will be necessary for configuring the Excel export rule.
- Having the webhook URL and the secret, continue with configuring the Excel export rule.
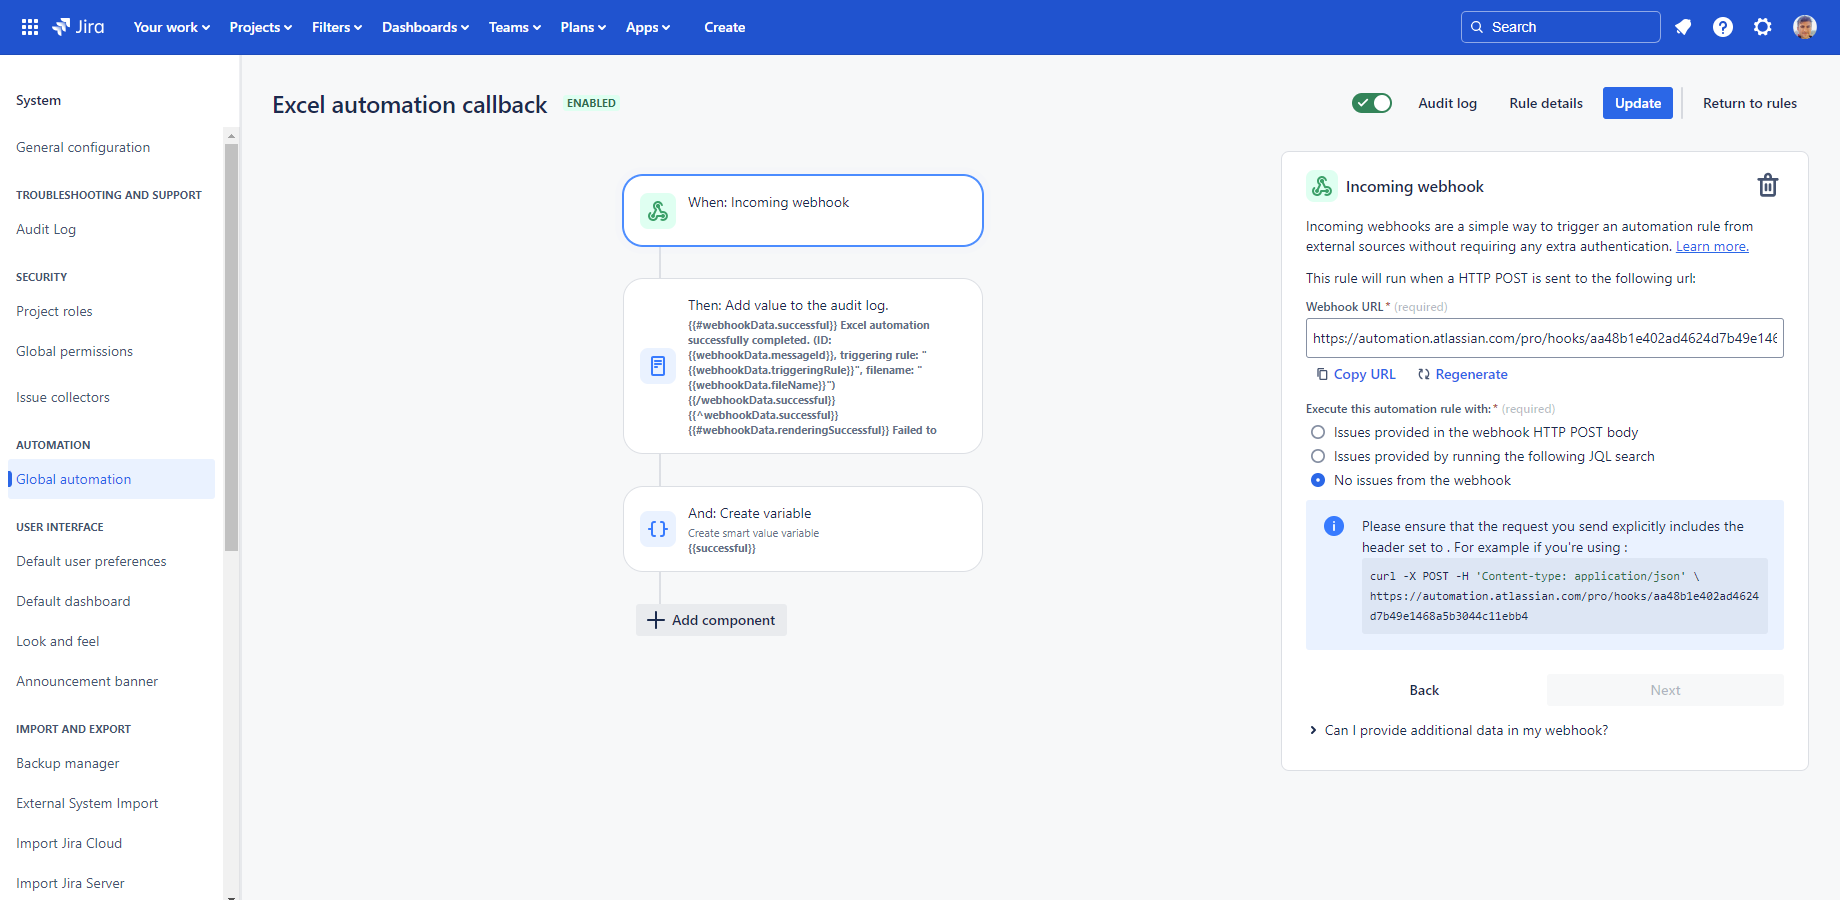
Configure the Excel callback rule
The Excel callback rule is a simple rule that can be triggered by a webhook URL. It does nothing else, but writes to the audit log and reflects the result of the work done by the Excel Automation API:
Configuration steps:
- Login to Jira as administrator.
- Go to Settings (cog icon "⚙" in the top right) → System (under Jira settings) → Global automation (in the left-bar under Automation).
- Click Create rule.
-
Select the Incoming webhook trigger.
- Note that this rule can be triggered by sending a request the unique URL shown at Webhook URL and authenticating the request with the token shown at Secret. Therefore, you will need these two values when configuring any future Excel export rule.
- If your Webhook URL starts with https://automation.atlassian.com/pro/hooks/..., your site is using the legacy Incoming webhook trigger. For those, there is no Secret shown. Therefore, you can completely omit the secret when configuring any future Excel export rule.
- From the Execute this automation rule with options, select No issues from the webhook.
- Click Next → THEN: Add an action.
- Select the Log action (not Log work!) and copy this to Log message (don't worry if it is long and hard to read):
{{#webhookData.successful}} Excel automation successfully completed. (ID: {{webhookData.messageId}}, client: "{{webhookData.client}}", filename: "{{webhookData.fileName}}") {{/webhookData.successful}} {{^webhookData.successful}} {{#webhookData.exportSuccessful}} Failed to execute action with the Excel document: {{webhookData.actionResult}} (ID: {{webhookData.messageId}}, client: "{{webhookData.client}}", filename: "{{webhookData.fileName}}") {{/webhookData.exportSuccessful}} {{^webhookData.exportSuccessful}} Failed to render the Excel document! (ID: {{webhookData.messageId}}, client: "{{webhookData.client}}") {{webhookData.message}} {{/webhookData.exportSuccessful}} {{/webhookData.successful}} - Click Next → THEN: Add an action.
-
Select the Create variable action and:
- Enter "successful" to Variable name.
-
Copy this expression to Smart Value:
{{#=}} 1 / {{webhookData.successful}} {{/}}Note that the expression will evaluate to 1 if the original Excel export rule was successful, or will cause a division-by-zero error and make the Excel callback rule fail if the original Excel export rule failed. This trick is there to have the callback rule's "Success"/"Some errors" status reflect the result of work done by the Excel Automation API.
- For self-verification, compare the rule in the editor to this screenshot. (They must contain the same components in the same layout, but identifiers can be different.)
- Click Turn on rule at the top.
- Enter "Excel automation callback" to Rule name. (You can use any name as long as it is intuitive.)
- Click Turn on rule again → Return to rules.
- You're done!
Notes:
- Consider the Excel callback rule as a shared resource: a single Excel callback rule can be used by all your Excel export rules! It contains no logic that is specific to a concrete automation, therefore it is perfectly reusable. (If you prefer a separate Excel callback rule dedicated to each Excel export rule, that model also works.)
- Although this guide is written to implement the "bare minimum" callback rule, you can add further actions or conditions to customize or refine its behaviour.
Configure the Excel export rule
After the Excel callback rule has been configured, see the step-by-step guides for specific automations:
Generate the "export" section for the Excel Automation API call
While creating an Excel export rule, you will notice that every rule requires sending a precisely-crafted request to the Excel Automation API. The request body contains a section named "export", which specifies the identifiers of the Excel view, saved filter, Scrum board, etc., depending on what data you want the automation rule to re-export and process.
Manually collecting the identifiers may be time-consuming and error-prone, but there is an easier way! Basically, after manually exporting the data, a ready-made YAML fragment will be generated for you with all required identifiers:
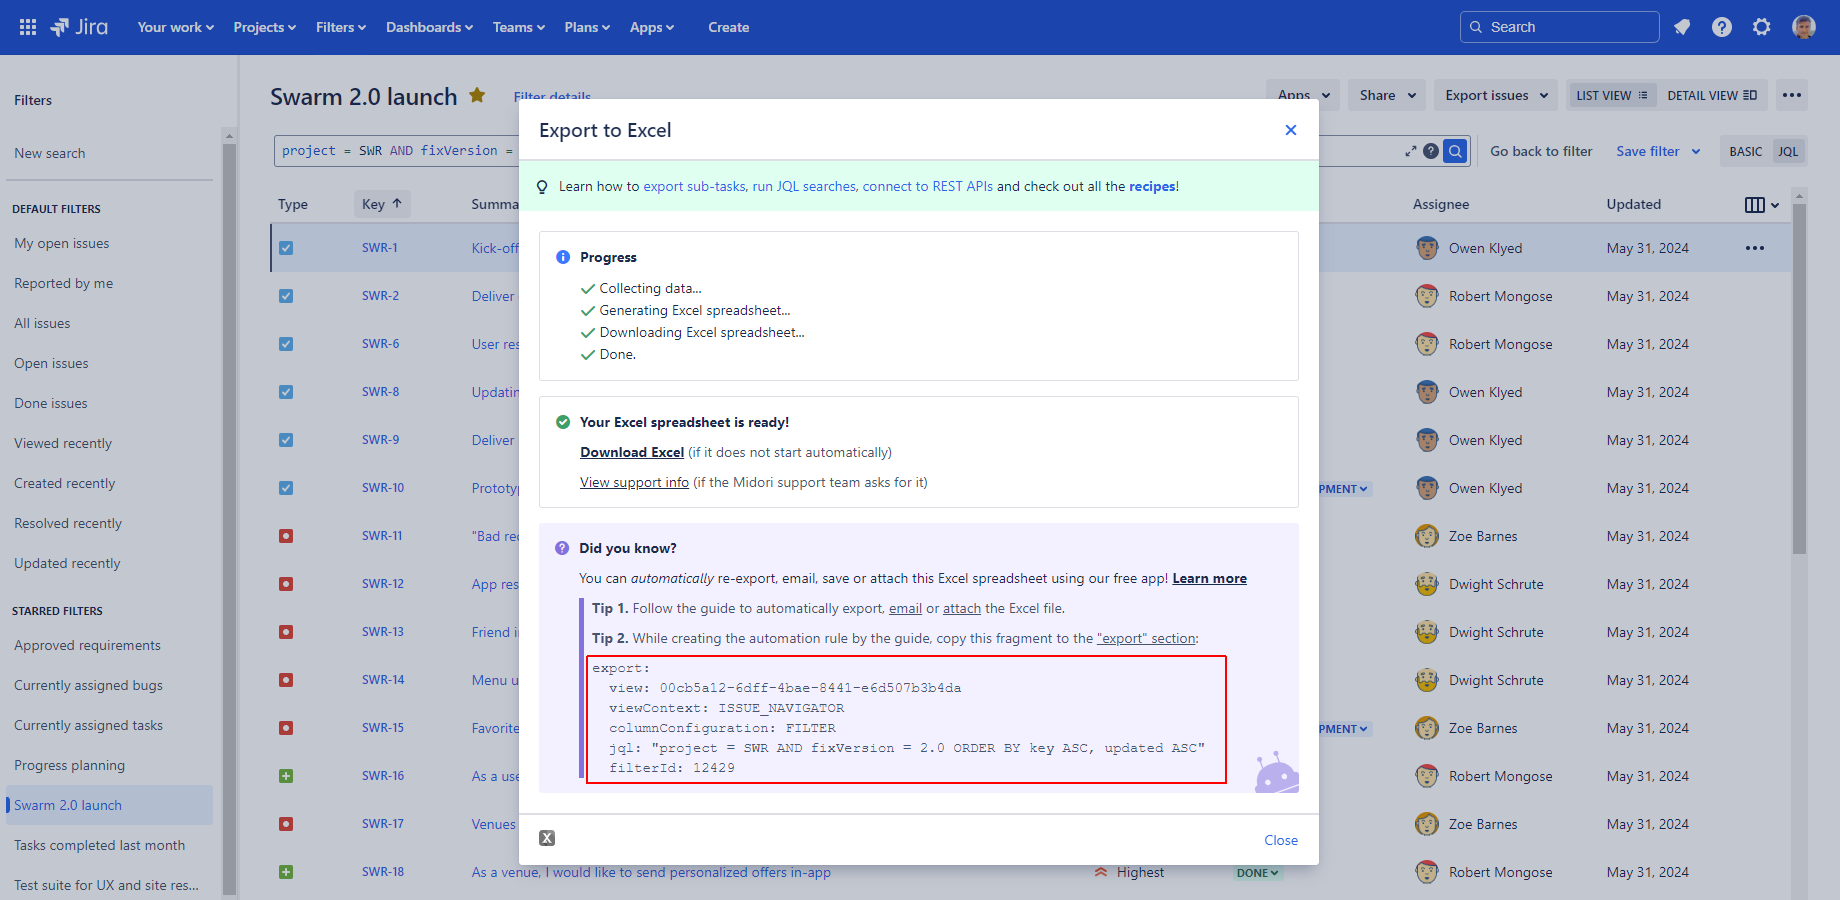
You can then simply copy this fragment back to the request body!
Steps:
-
Go to the data you want the automation rule to export in the future.
(It can be a single issue, issues resulted from a JQL search, issues resulted from a saved filter, issues from a Scrum board, etc.) - Export the data choosing the Excel view you want the automation rule to use in the future.
- Ignore the exported file.
- Click View Excel automation tips at the bottom part of the dialog.
- Copy the YAML fragment back to the export: section of the request body!
Note that this mini-guide is referenced from the step-by-step guides of each automation rule.
Questions?
Ask us any time.