
In this page
Excel Export Center
Direct Excel exports
Location of the Excel export links
Work with the Excel export file
Configure Excel exports
Manage Excel views (export types)
Add a new Excel view
Edit an existing Excel view
Delete an existing Excel view
Reorder Excel views
Restore the default Excel views
Manage Excel resources (Excel templates and Groovy scripts)
Add a new Excel resource
Edit an existing Excel resource
Delete an existing Excel resource
Restore the default Excel resources
Next step
Export Jira work items to Excel
The Better Excel Exporter for Jira Cloud app enables users to create professional Excel files from work items, filters, and other Jira data. The whole process is intuitive and takes just a few clicks.
You can start Excel exports in multiple ways, explained in the next sections.
Excel Export Center
The Excel Export Center is a central screen that allows you to choose the work item, filter, sprint, backlog to export. This is useful when you want to quickly start from a central location without navigating to the object.
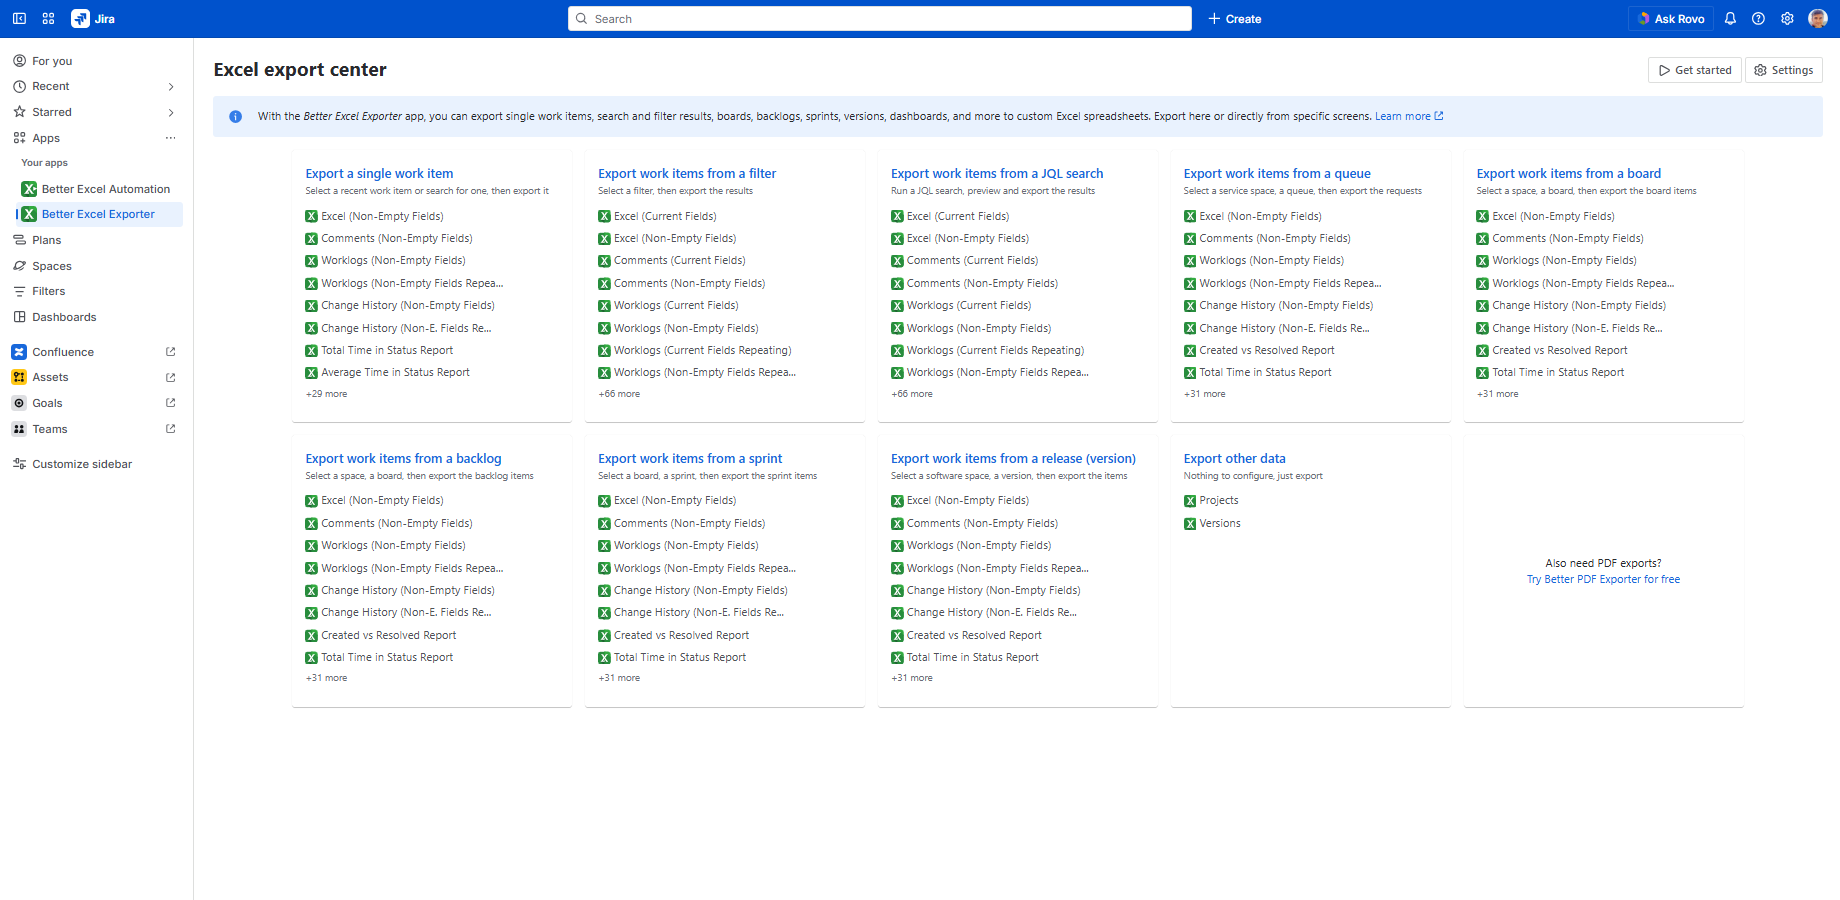
To start an export from the Excel Export Center:
- Go to the Jira left-bar → Apps section → Better Excel Exporter.
- Click on the card that specifies what type of data you want to export (work item, filter, board, etc.).
- Select the object in the dialog. You can see all objects of the selected type or search by name or key.
- Select the Excel view that produces your desired output.
- Wait for the file to be downloaded to your computer.
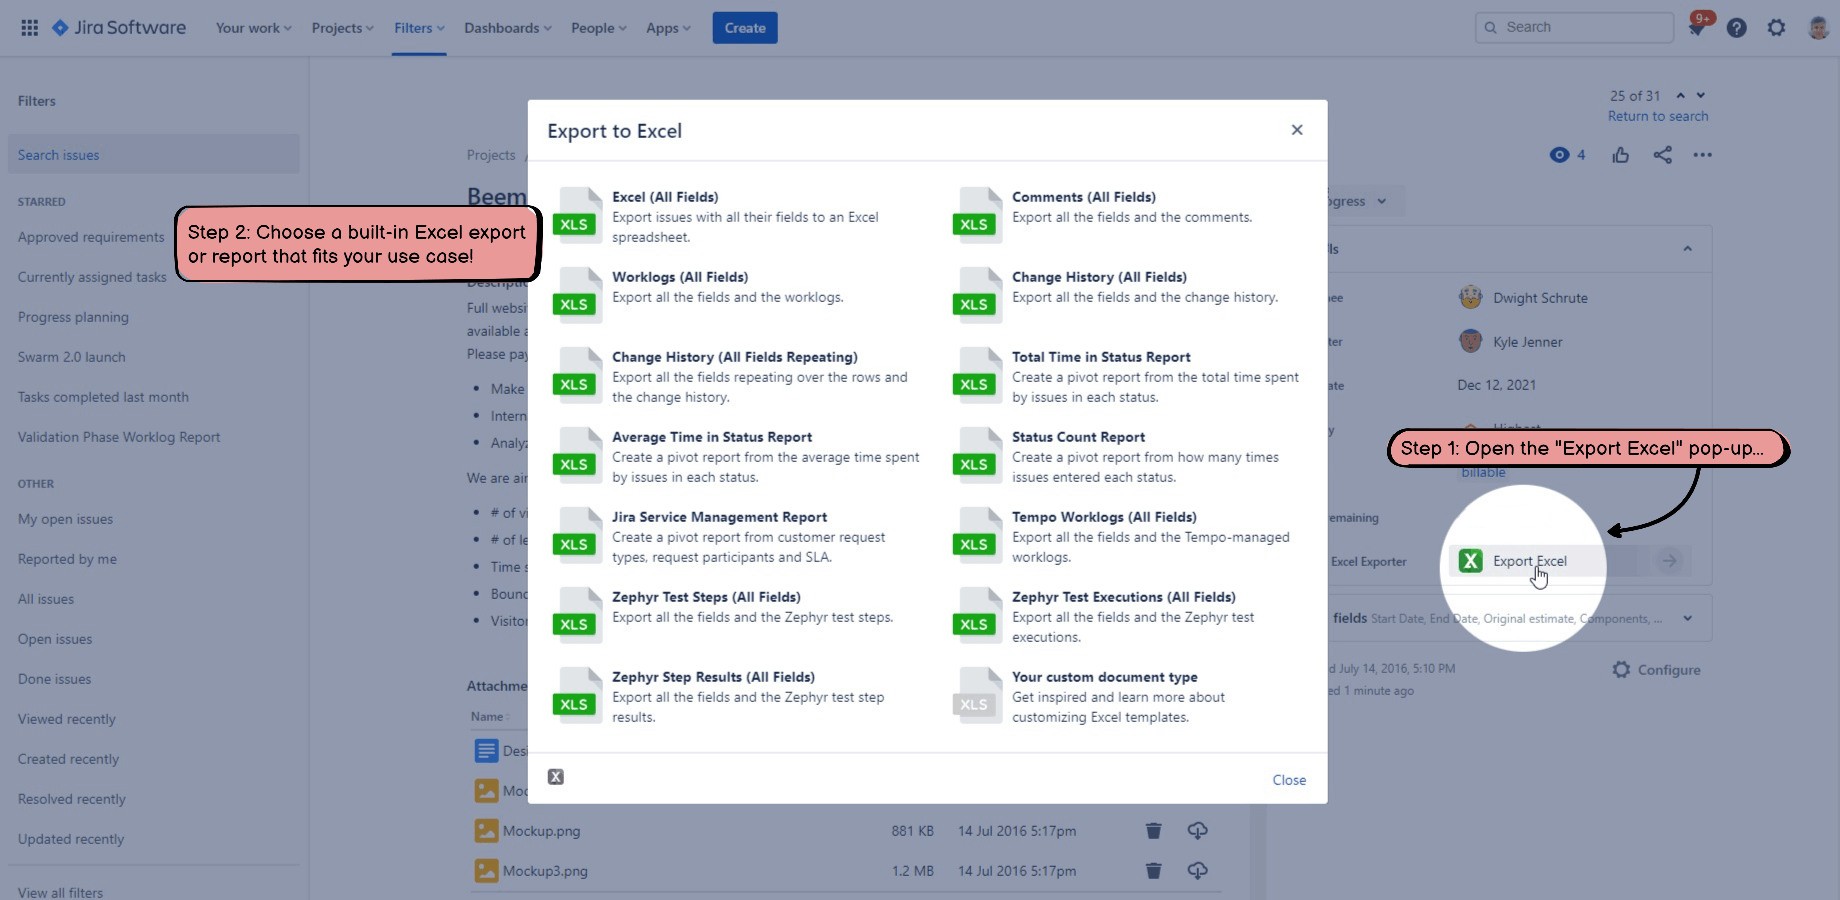
Direct Excel exports
Direct exports are seamlessly integrated into the Work Item Details, Filter Results, Board, and other Jira screens. This is useful if you want to review the object before exporting it.
To start a direct Excel export:
- Go to the object to export (work item, filter, board, etc.).
- Click the export link on the screen. (See the next section for the exact location of the link.)
- Select the Excel view that produces your desired output.
- Wait for the file to be downloaded to your computer.
Location of the Excel export links
The following table summarizes the locations of the export links on various screens.
| Excel Export Center link location | Equivalent direct export link location |
|---|---|
| "Export a single work item" card on the Excel Export Center screen. |
"Better Excel Exporter" section on the Work item View screen.
|
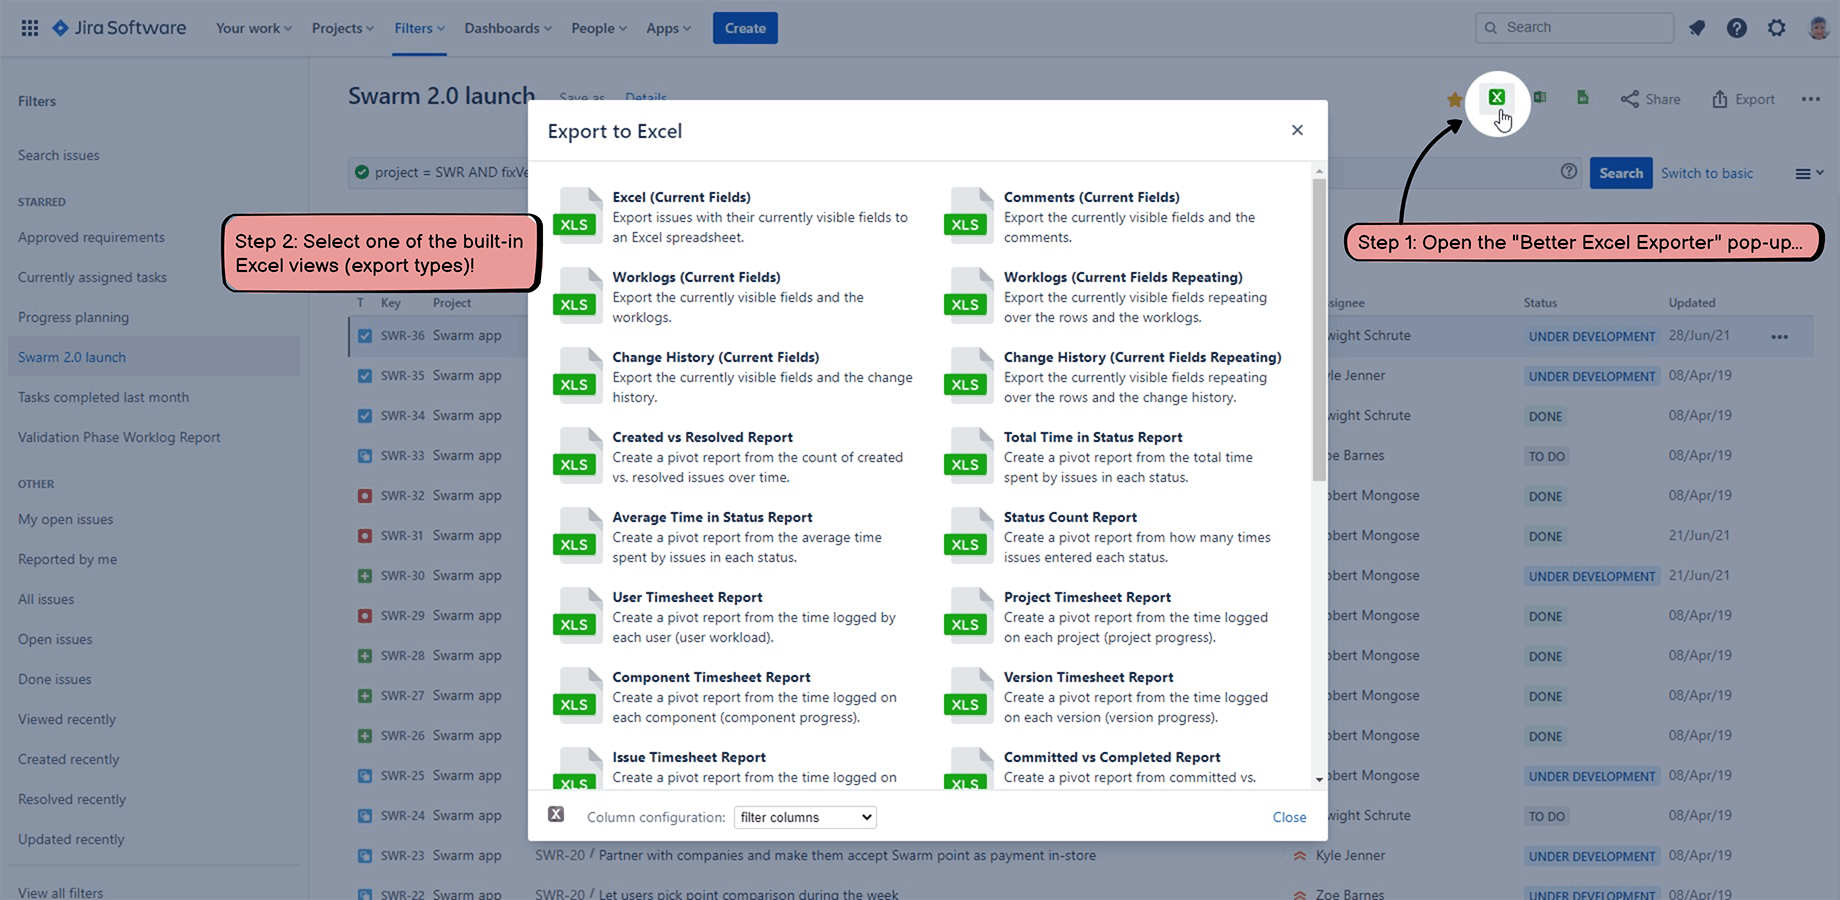
| "Export work items from a filter" card on the Excel Export Center screen. |
"App" menu → "Export Excel" on the top of the Filter screen.
|
| "Export work items from a JQL search" card on the Excel Export Center screen. |
"App" menu → "Export Excel" on the top of the Search screen.
|
| "Export work items from a queue" card on the Excel Export Center screen. | Direct exports are not supported due to Atlassian Forge technical limitation JSDCLOUD-17970. |
| "Export work items from a board" card on the Excel Export Center screen. |
"Export" menu → "Export Excel" on the top of the Board screen.

|
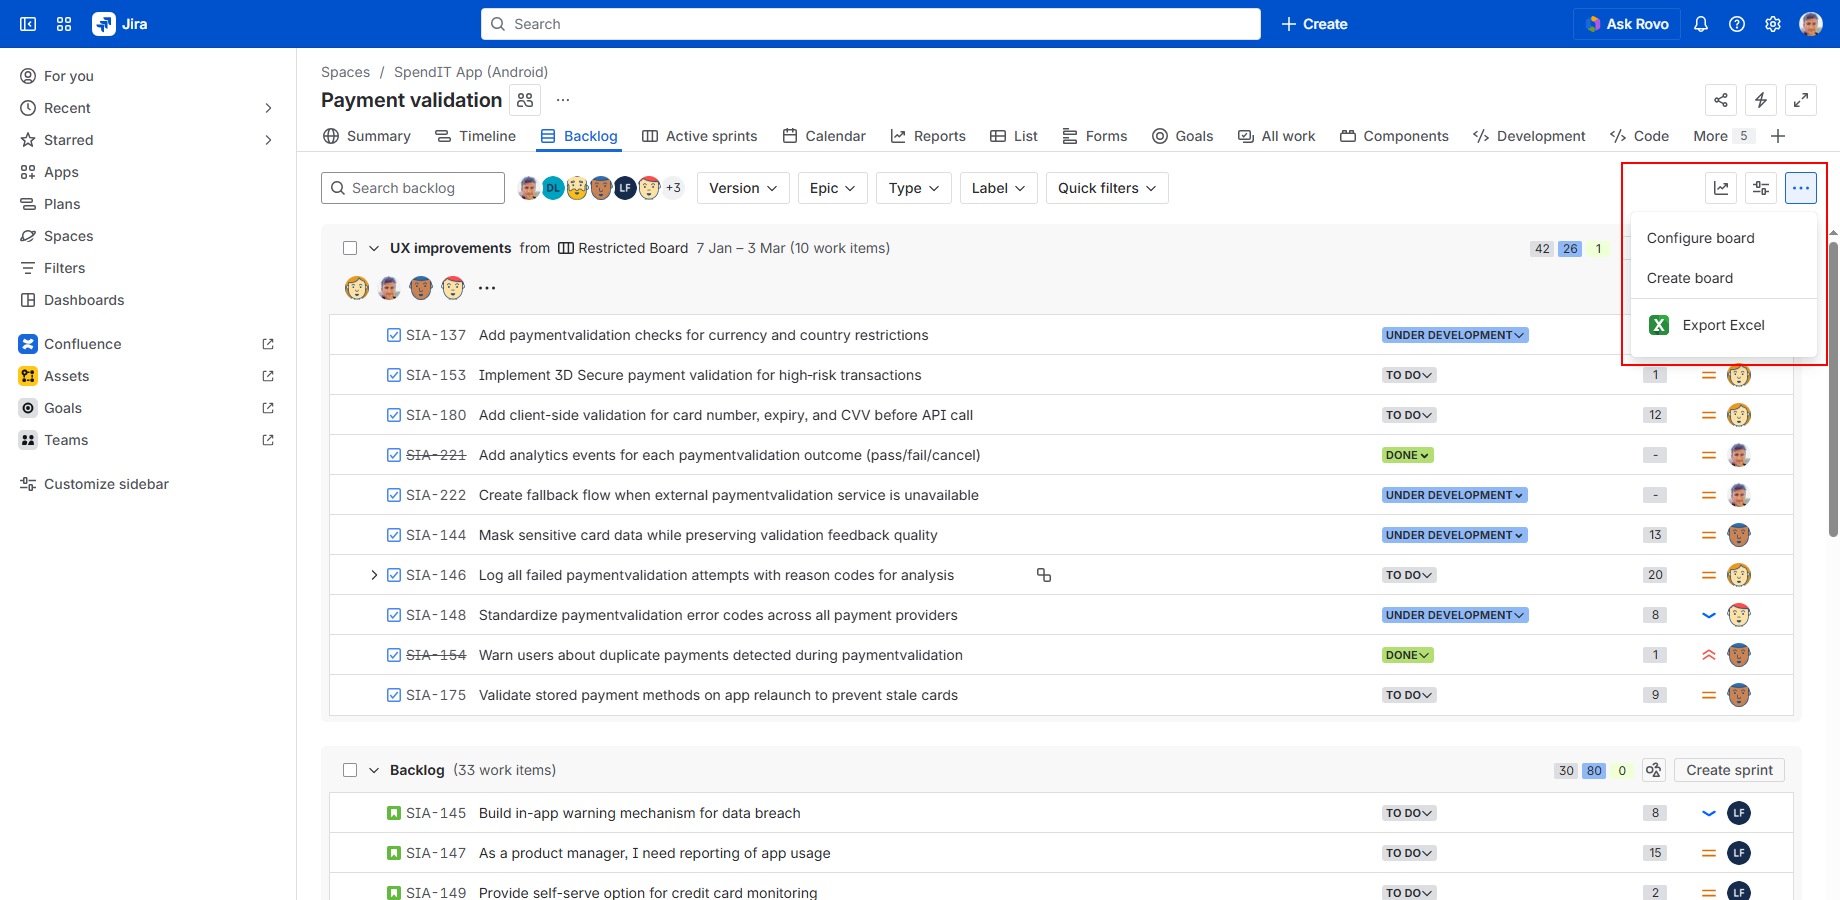
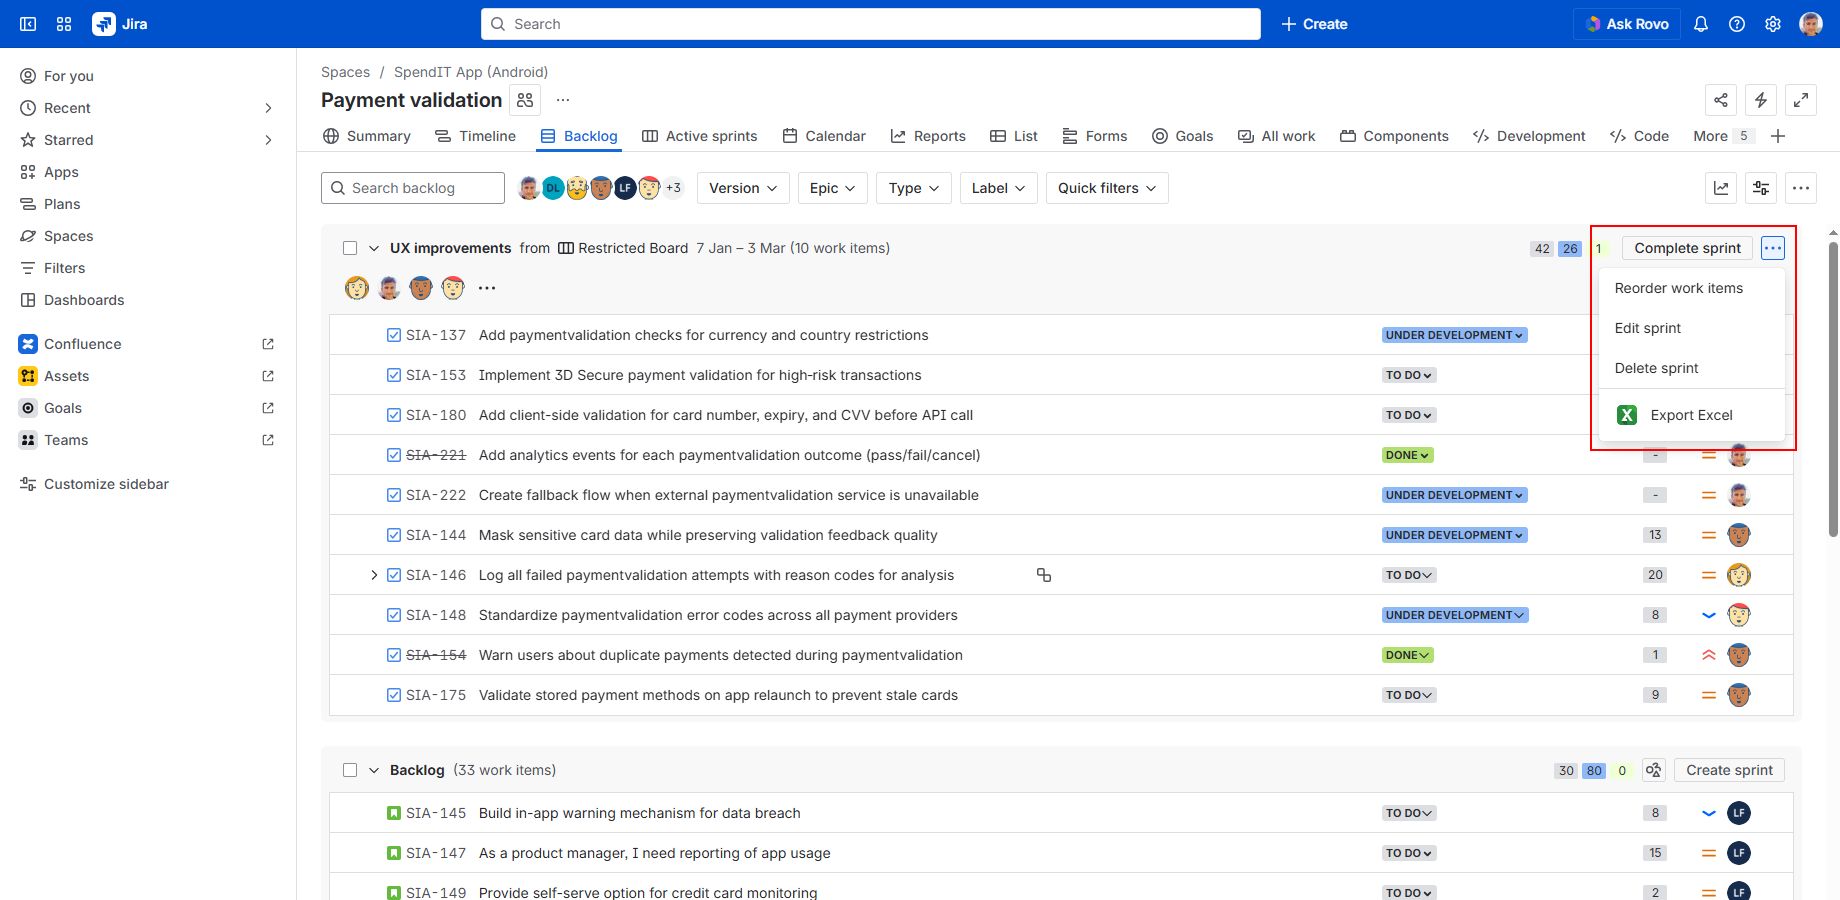
| "Export work items from a backlog" card on the Excel Export Center screen. |
"..." menu → "Export Excel" on the top of the Backlog screen.
|
| "Export work items from a sprint" card on the Excel Export Center screen. |
"..." menu → "Export Excel" at the sprint on the Backlog screen.
|
| "Export work items from a version (release)" card on the Excel Export Center screen. | Direct exports are not supported due to Atlassian Forge technical limitation ECO-1140. |
Work with the Excel export file
After the app generated the Excel spreadsheet, it will automatically download the file to your computer.
You can open it in Microsoft Excel to view, modify, and analyze your data interactively. All other spreadsheet applications that support the XLSX fileformat, such as OpenOffice Calc, LibreOffice Calc, Google Sheets, Numbers, are supported as well.
Configure Excel exports
There are two components to configure Excel exports:
- Excel views (also called "export types")
- Excel resources
The app supports multiple Excel views. Different Excel views generate Excel exports using different templates and different Groovy scripts. That way you can set up separate views to export work item lists, worklogs, change history, "Created vs. Resolved" Excel reports, and other Excel spreadsheets.
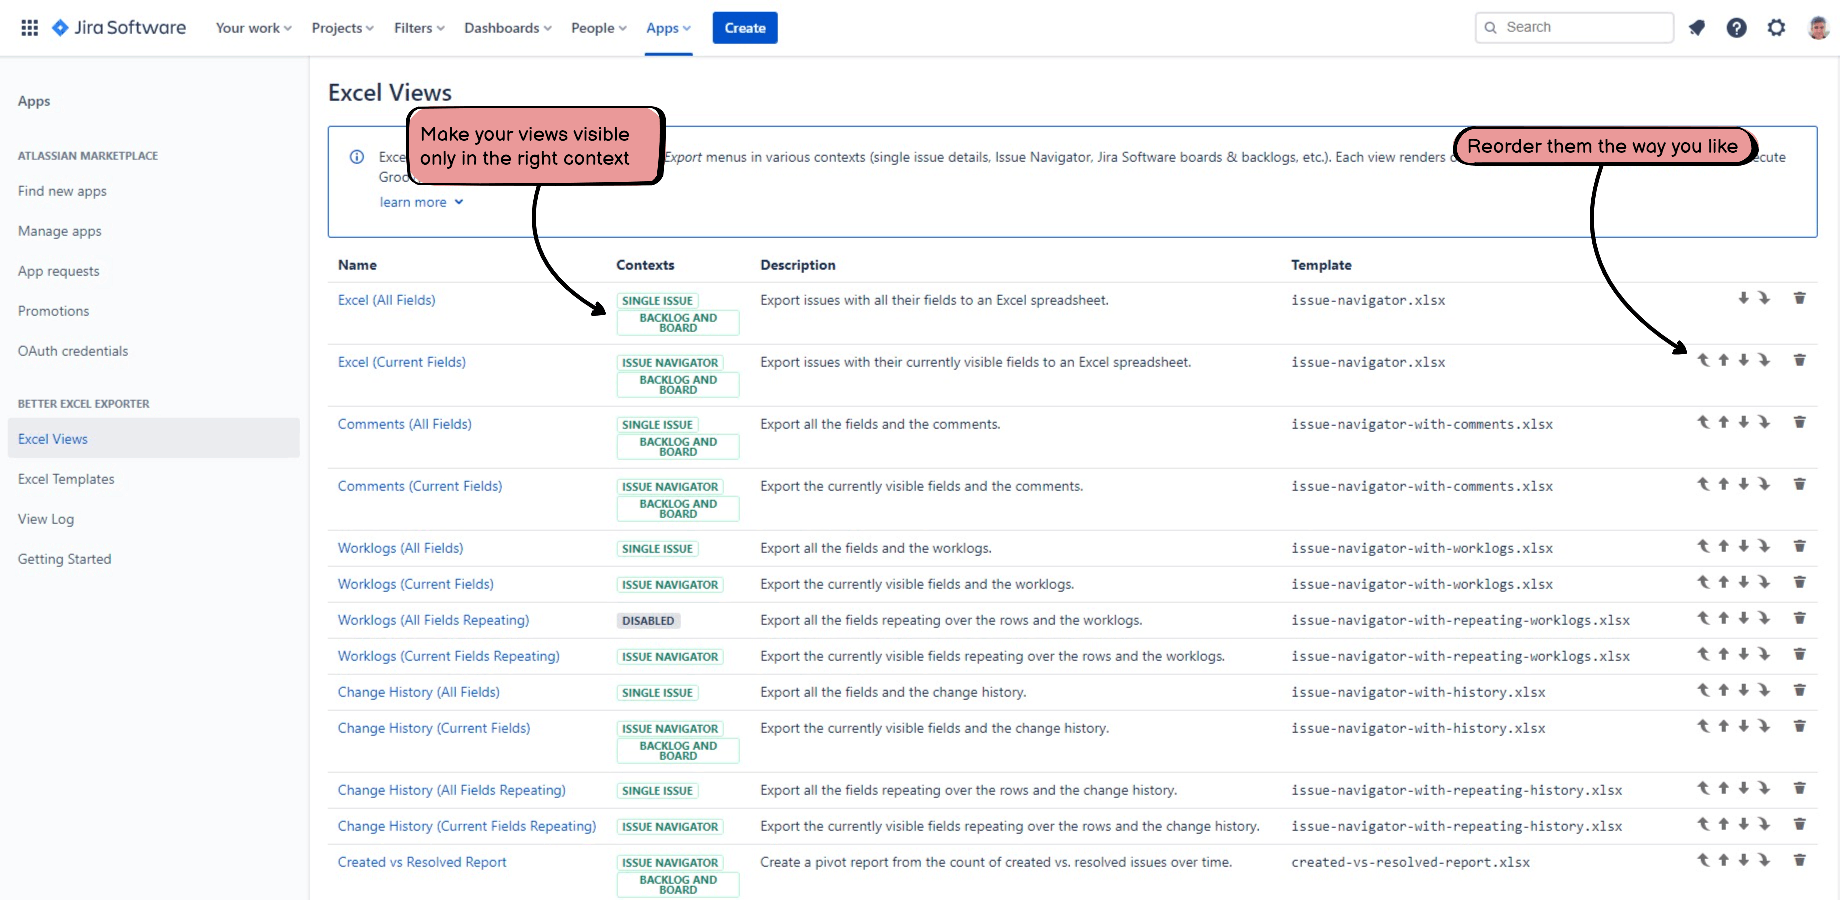
Manage Excel views (export types)
You can manage the Excel views on the Excel Views screen, where you can add, edit, delete, and reorder them.
To access this screen, go to Apps (on the left-bar) → Better Excel Exporter for Jira → Settings (button in the top right) → Excel Views. It requires Jira administrator permissions for obvious reasons.
Add a new Excel view
You can add a new Excel view by clicking the button beside the list and filling the form with the view's properties.
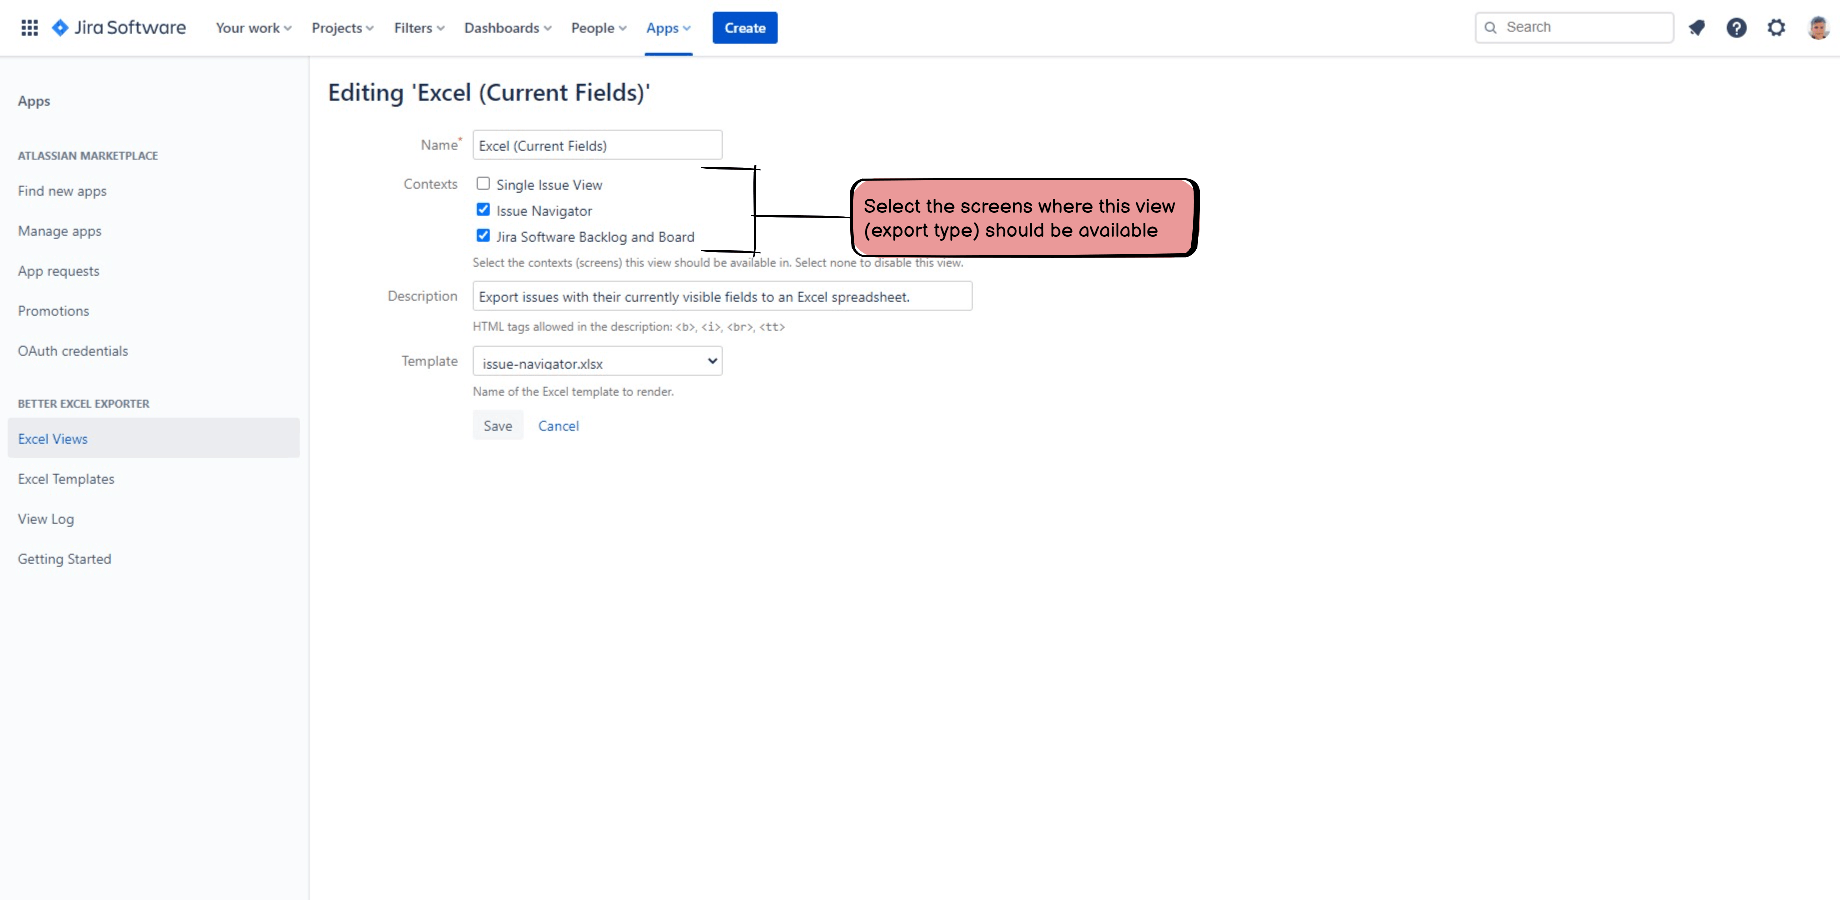
Each Excel view has the following properties:
- Name: it appears in the Export pop-up.
- Description: it explains the purpose of the view. It appears under the name in the Export pop-up.
-
Enabled contexts: the screens where this view will be offered as an export option.
- Work item views
- Search, filters and work item lists
- Export center > Queues
- Boards and backlogs
- Releases
- Export center > Dashboards
- Export center > Other data
- Excel template: the template file that will be used to generate the exported Excel spreadsheet for this view. Template files can be shared between multiple views. For example, a Monthly SLA Report and a Weekly SLA Report can use the same Excel template, with differences in the template logic.
Edit an existing Excel view
You can edit the view's properties by clicking its name in the list.
Delete an existing Excel view
You can delete a view by clicking the "delete" action in the list.
Reorder Excel views
You can change the display order for the Excel views in the list, which will also be reflected in the Export pop-up. To reorder views, click and drag a view to a new position in the list.
Restore the default Excel views
You may want to restore the default Excel views in the following exceptional cases:
- You broke or deleted some views, or created new ones that are no longer needed, and now want to start over from a clean state (factory defaults).
- You never customized the views, and you want to upgrade to the latest version without manually performing all the upgrade steps. Restoring guarantees that you will get the views that are 100% consistent with your current app version. For details, see the Version History.
You can restore the default views by opening the "..." menu above the list and clicking Reset default views.
Important: use this feature carefully, as there is no undo.
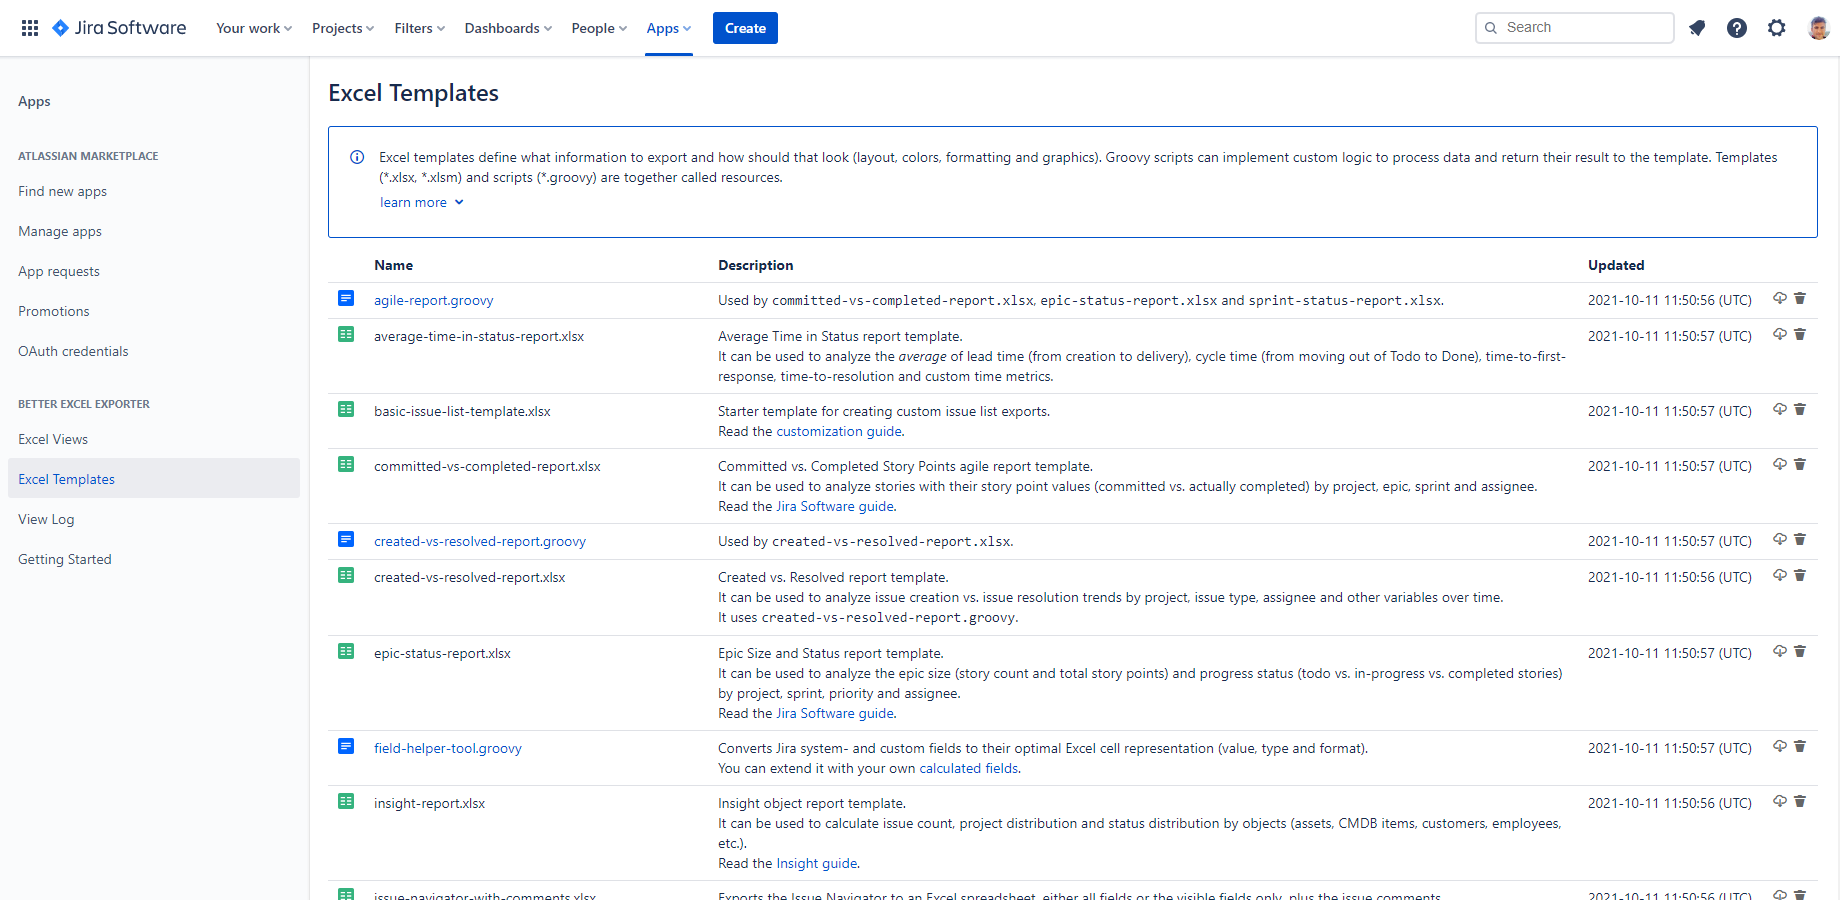
Manage Excel resources (Excel templates and Groovy scripts)
As written above, Excel views render the export files from Excel templates, optionally running Groovy scripts. Template and script files, used by the rendering process, are together called "resources".
You can manage the Excel resources on the Excel Templates screen, where you can add, edit, and delete them.
To access this screen, go to Apps (on the left-bar) → Better Excel Exporter for Jira → Settings (button in the top right) → Excel Templates. It requires Jira administrator permissions for obvious reasons.
Add a new Excel resource
You can add a new Excel resource by clicking the button beside the list and filling the form with the resource's properties.
Each Excel resource has the following properties:
- Name: if it is a template, it is used when choosing the template for a Excel view. If it is a script, it is used when executing a script from a template (by name).
- Description: it explains the purpose of the resource.
- Content: the actual content of the resource.
There are two types of resources by their content:
- Excel templates are binary files. They are actual Excel files (in XLSX/XLSM/XLS format) that contain template expressions in their cells. You can create template files in Microsoft Excel, and upload them to the resource when creating a new resource.
- Groovy scripts are plain text files. You can conveniently edit them in the online editor. The editor offers syntax highlighting, collapse/expand block, and other useful features.
Edit an existing Excel resource
You can edit the resource properties by clicking its name in the list.
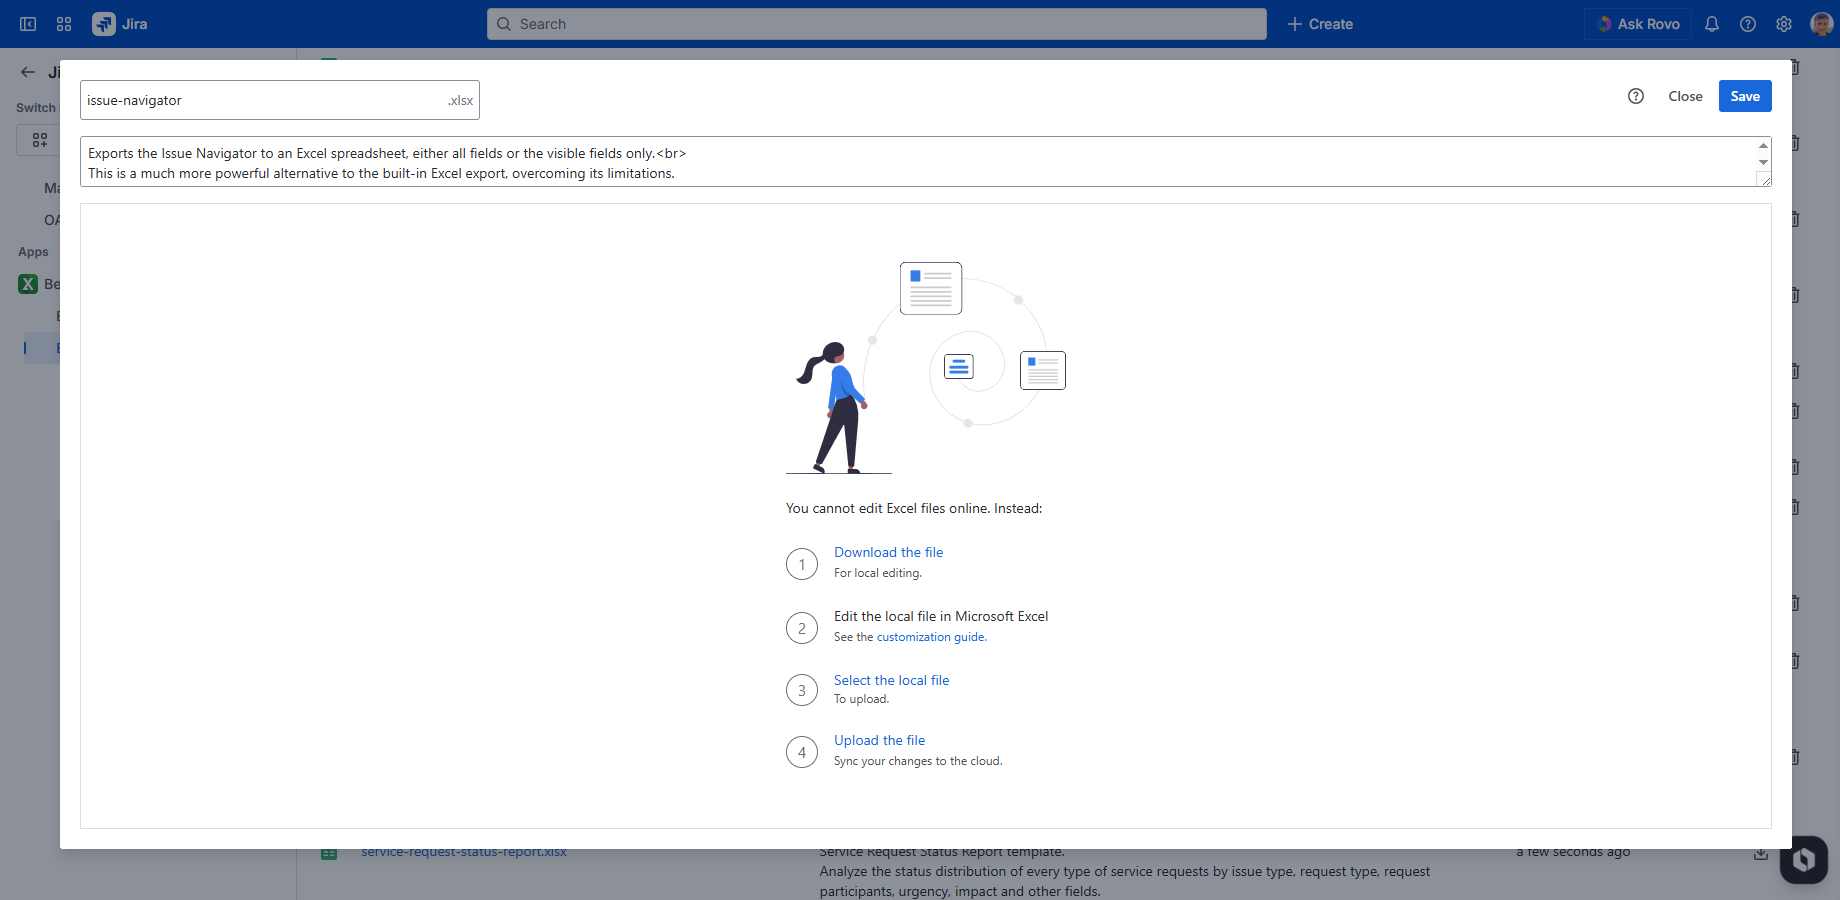
Being binary resources, you can edit Excel files in Microsoft Excel:
- Open the resource for editing.
- Download the file.
- Edit it in Microsoft Excel.
- Upload the modified file.
- Save the resource changes.
Delete an existing Excel resource
You can delete a resource by clicking the "delete" action in the list.
Restore the default Excel resources
Similarly to restoring the default views, you can also restore the default resources. Again, use it in exceptional situations and use it carefully.
You can restore the default resources by opening the "..." menu above the list and clicking Reset default resources.
Important: use this feature carefully, as there is no undo.
Next step
Next step: customizing your Jira Excel templates.
Questions?
Ask us any time.