
In this page
Release notes
6.2.0
Assets integration now works out-of-the-box
Insight to Assets rename
Updating custom templates and scripts
Upgrading from 6.1.0
6.1.0
Support for Jira Service Management queues ("queue" context)
New quick export options in the Excel Export Center
Upgrading from 6.0.1
6.0.1
Migration to Forge
"Excel export center" screen
"Other data" context
Upgrading from 5.2.0
5.2.0
Support for the "Comments" field
Upgrading from 5.1.0
5.1.0
Support for development information
Support for Jira Misc Custom Fields (JMCF)
Upgrading from 5.0.0
5.0.0
Atlassian Government Cloud
Upgrading from 4.8.0
4.8.0
Support for the "All work" screen
Support for the "Release" screen
Support for versions (releases) exports
Upgrading from 4.6.0
4.6.0
Support for Xray
Upgrading from 4.5.0
4.5.0
Support for Zephyr (formerly Zephyr Scale) and Zephyr Essential
Upgrading from 4.4.0
4.4.0
Improvements
Upgrading from 4.3.0
4.3.0
Support for Tempo v4 REST API
Upgrading from 4.2.0
4.2.0
Support for Jira Product Discovery
Support for Atlassian teams
Improvements
Bugfixes
Upgrading from 4.0.0
4.1.0
Support for themes (light and dark mode)
Upgrading from 4.0.0
4.0.0
Improved sandboxing
Upgrading from 3.5.0
3.5.0
Early compatibility with the deprecation of the "Epic Link", "Parent Link" and other fields
Upgrading from 3.4.0
3.4.0
Zephyr Squad reports
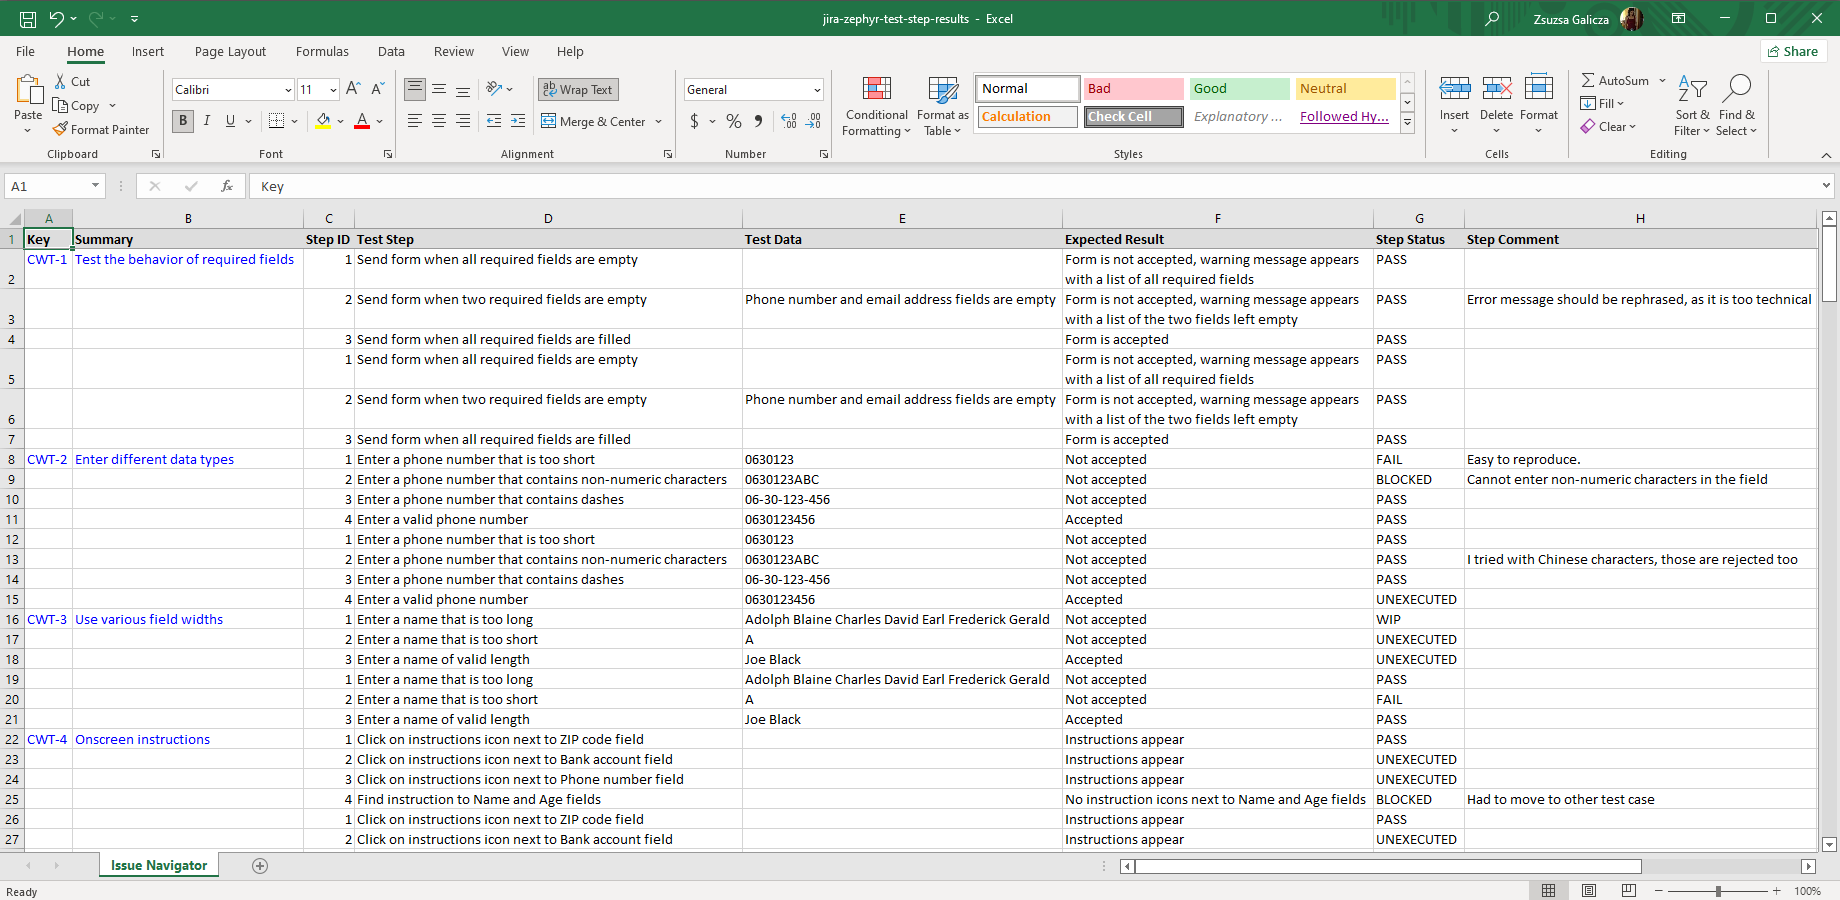
New views: Zephyr Squad test step results with test step details
Upgrading from 3.3.0
3.3.0
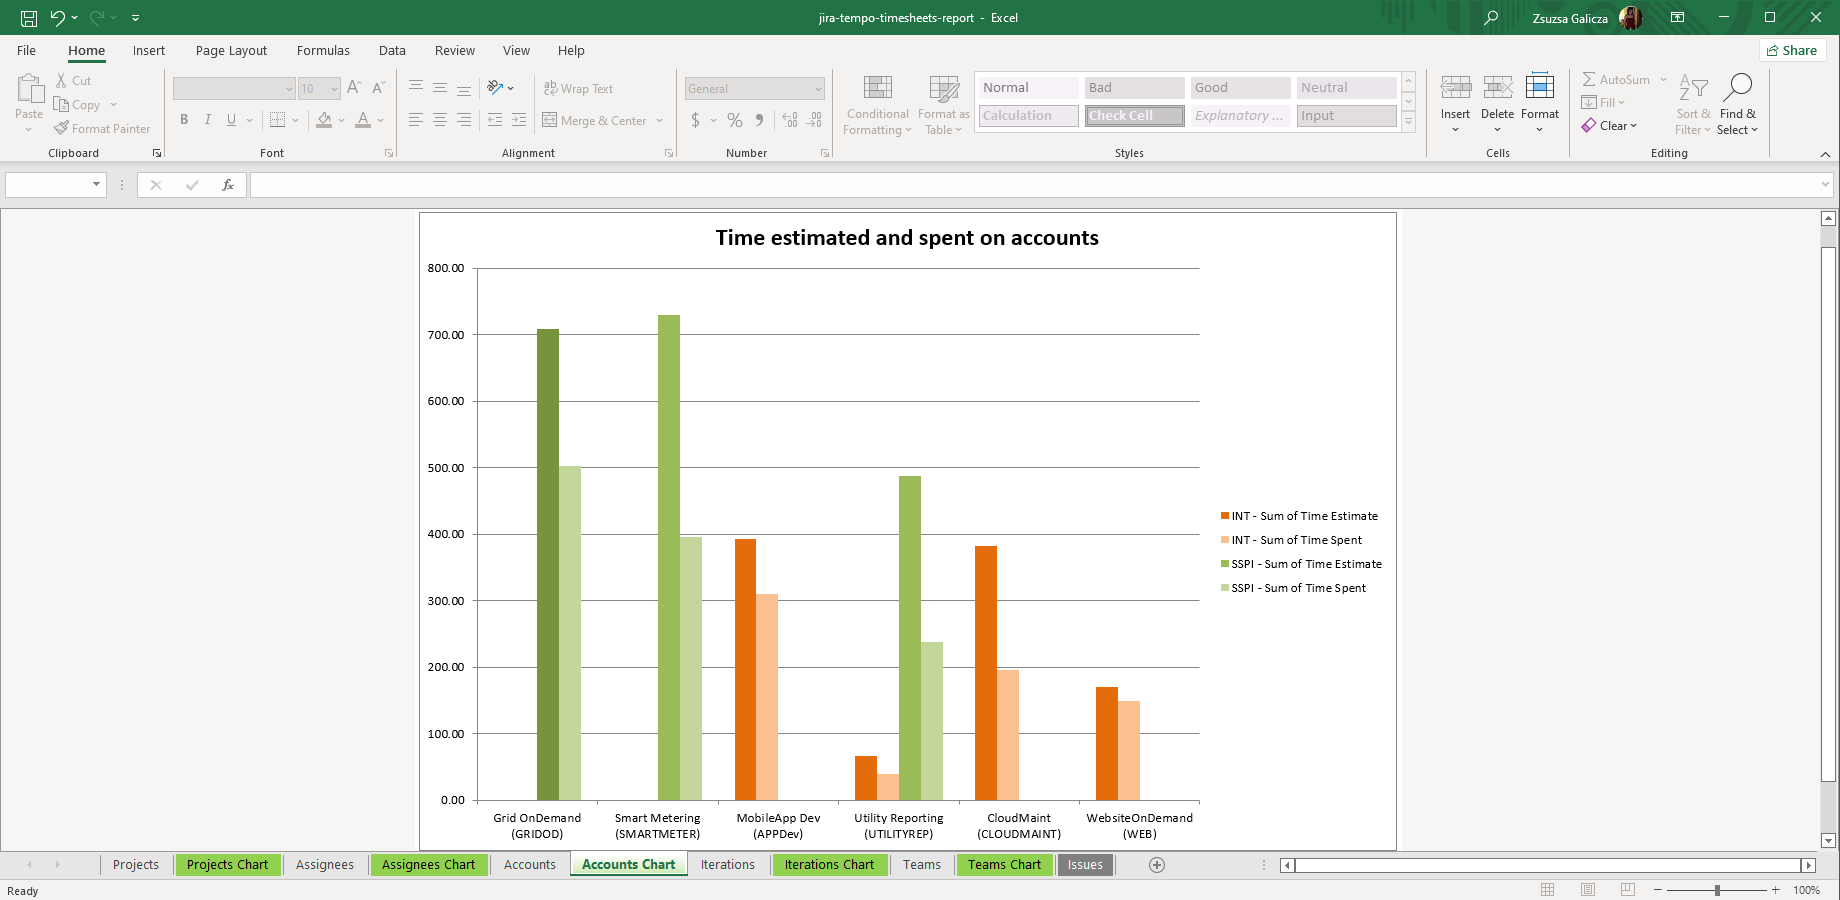
Tempo Timesheets reports
Better Excel Exporter is a Cloud Fortified app!
Upgrading from 3.2.0
3.2.0
"Non-empty fields" export mode
Dynamic (value-based) field formats
Upgrading from 3.1.0
3.1.0
Better Excel Exporter for Jira Cloud is now generally available on the Atlassian Marketplace!
0.7.0
Early Access Program for Better Excel Exporter Cloud
Version history
| Version | Date | Notes | |
|---|---|---|---|
| 6.2.0 | 03/07/2026 | Assets integration overhaul. | Release Notes & Upgrade Guide |
| 6.1.0 | 23/02/2026 | Support for Jira Service Management queues ("queue" context). 4 new Excel Export Center quick export options. | Release Notes & Upgrade Guide |
| 6.0.1 | 19/01/2026 | Migration to Forge. "Excel export center" screen. "Other data" context. | Release Notes & Upgrade Guide |
| 5.2.0 | 10/10/2025 | Support for the "Comments" field. | Release Notes & Upgrade Guide |
| 5.1.0 | 01/09/2025 | Support for development information. Support for Jira Misc Custom Fields (JMCF). | Release Notes & Upgrade Guide |
| 5.0.0 | 21/08/2025 | Support for Atlassian Government Cloud. | Release Notes & Upgrade Guide |
| 4.8.0 | 03/07/2025 | Support for the "All work" screen. Support for the "Release" screen. Support for project release (project version) exports. | Release Notes & Upgrade Guide |
| 4.6.0 | 20/06/2025 | Support for Xray. | Release Notes & Upgrade Guide |
| 4.5.0 | 18/06/2025 | Support for Zephyr (formerly Zephyr Scale). Support for Zephyr Essential. | Release Notes & Upgrade Guide |
| 4.4.0 | 09/01/2025 | Support for 3 new Jira custom field types. Average calculation for 2 Jira Product Discovery custom field types. | Release Notes & Upgrade Guide |
| 4.3.0 | 25/11/2024 | Support for Tempo v4 REST API. | Release Notes & Upgrade Guide |
| 4.2.0 | 28/03/2024 | Support for Jira Product Discovery. Support for Atlassian teams. | Release Notes & Upgrade Guide |
| 4.1.0 | 07/01/2024 | Support for themes (light and dark mode). | Release Notes & Upgrade Guide |
| 4.0.0 | 26/05/2022 | Improved sandboxing. | Release Notes & Upgrade Guide |
| 3.5.0 | 05/04/2022 | Early compatibility with the deprecation of the "Epic Link", "Parent Link" and other fields. | Release Notes & Upgrade Guide |
| 3.4.0 | 28/03/2022 | Zephyr Squad reports. | Release Notes & Upgrade Guide |
| 3.3.0 | 23/02/2022 | Tempo Timesheets reports. Cloud Fortified. | Release Notes & Upgrade Guide |
| 3.2.0 | 27/01/2022 | "Non-empty fields" export mode. Dynamic (value-based) field formats. | Release Notes & Upgrade Guide |
| 3.1.0 | 17/11/2021 | Generally available version with commercial support. | Release Notes & Upgrade Guide |
| 0.7.0 | 24/08/2021 | Invite-only Early Access release. | Release Notes & Upgrade Guide |
Release notes
6.2.0
This release overhauls the Assets integration.
Assets integration now works out-of-the-box
From this version, you can export your Assets-managed custom fields with Better Excel Exporter without any prior configuration. However, you can still define the export format manually.
Insight to Assets rename
Atlassian renamed Insight to Assets in 2022, but Better Excel Exporter's default resources kept the old name in file names, variable names and comments. From this release, the app's default resources reflect the current name everywhere. This is also the first step of a bigger terminology and integration name update that's coming in a future release.
Updating custom templates and scripts
This release introduces several changes that might break your custom templates and scripts. Here are the most important ones. The old code will keep working for a while, but we recommend updating your templates as soon as possible.
| Old code | New code | Explanation |
|---|---|---|
insightInJiraServiceManagementClient |
assetsClient |
If you are creating the client in the default Groovy script, but use it in your other Groovy scripts, update all references to the new one. |
${insight.getInsightInJiraServiceManagementObjects(...)} |
${assets.getAssetsObjects(...)} |
If you use the client in your custom Excel template, update the object name and method call as well. |
apiClientFactory.createInsightInJiraServiceManagementClient(...) |
apiClientFactory.createAssetsClient(workspaceId) |
If you are creating the client in your own Groovy script, update it to use the new method that only requires the workspaceId. |
exportInsightObject... |
exportAssetsObject... |
The variables that control the export format have been changed as well. |
Upgrading from 6.1.0
Besides updating the app version, you also have to update a Groovy script. It takes about 30 seconds.
Steps:
- Update your app version through the Connected apps screen of your Atlassian site's administration interface.
- Download the ZIP that contains the latest template files: better-excel-exporter-for-jira-cloud-6.2.0-templates.zip, and extract it.
- Login to Jira as administrator, go to Apps → Manage your apps → Excel Templates (under Better Excel Exporter).
- Upgrade the field-helper-tool.groovy template file:
- If you haven't made any changes in the original field-helper-tool.groovy file, then just upload the new template (the one you just downloaded) and you are done.
- If you made changes to the original field-helper-tool.groovy, you will need to migrate those to the new template.
- In case of an .xlsx file, check the current modifications made to the previous original version of the template, then re-apply them to the new version.
- In case of a .groovy file:
- Open the file from the directory where you extracted the ZIP.
- If you haven't made any changes in the original file, then just copy-paste the content of the new template (the one you just downloaded) to the editor, save it and you are done.
- If you made changes to the original, you will need to migrate those to the new template. This should be done by comparing the content of your current file with the new one, and merging all changes you made in the former to the latter. Use a visual merge tool (like WinMerge or Eclipse's compare and merge editor), and it should be trivial.
- Enjoy!
6.1.0
This release introduces a new view context to support Jira Service Management queues. It also adds 4 quick export options the Excel Export Center.
Support for Jira Service Management queues ("queue" context)
To address a popular feature request, a new context has been added to support exporting service requests from Jira Service Management queues.
When you enable this context for a view, the view becomes available on the Excel Export Center screen under the "queue" card:
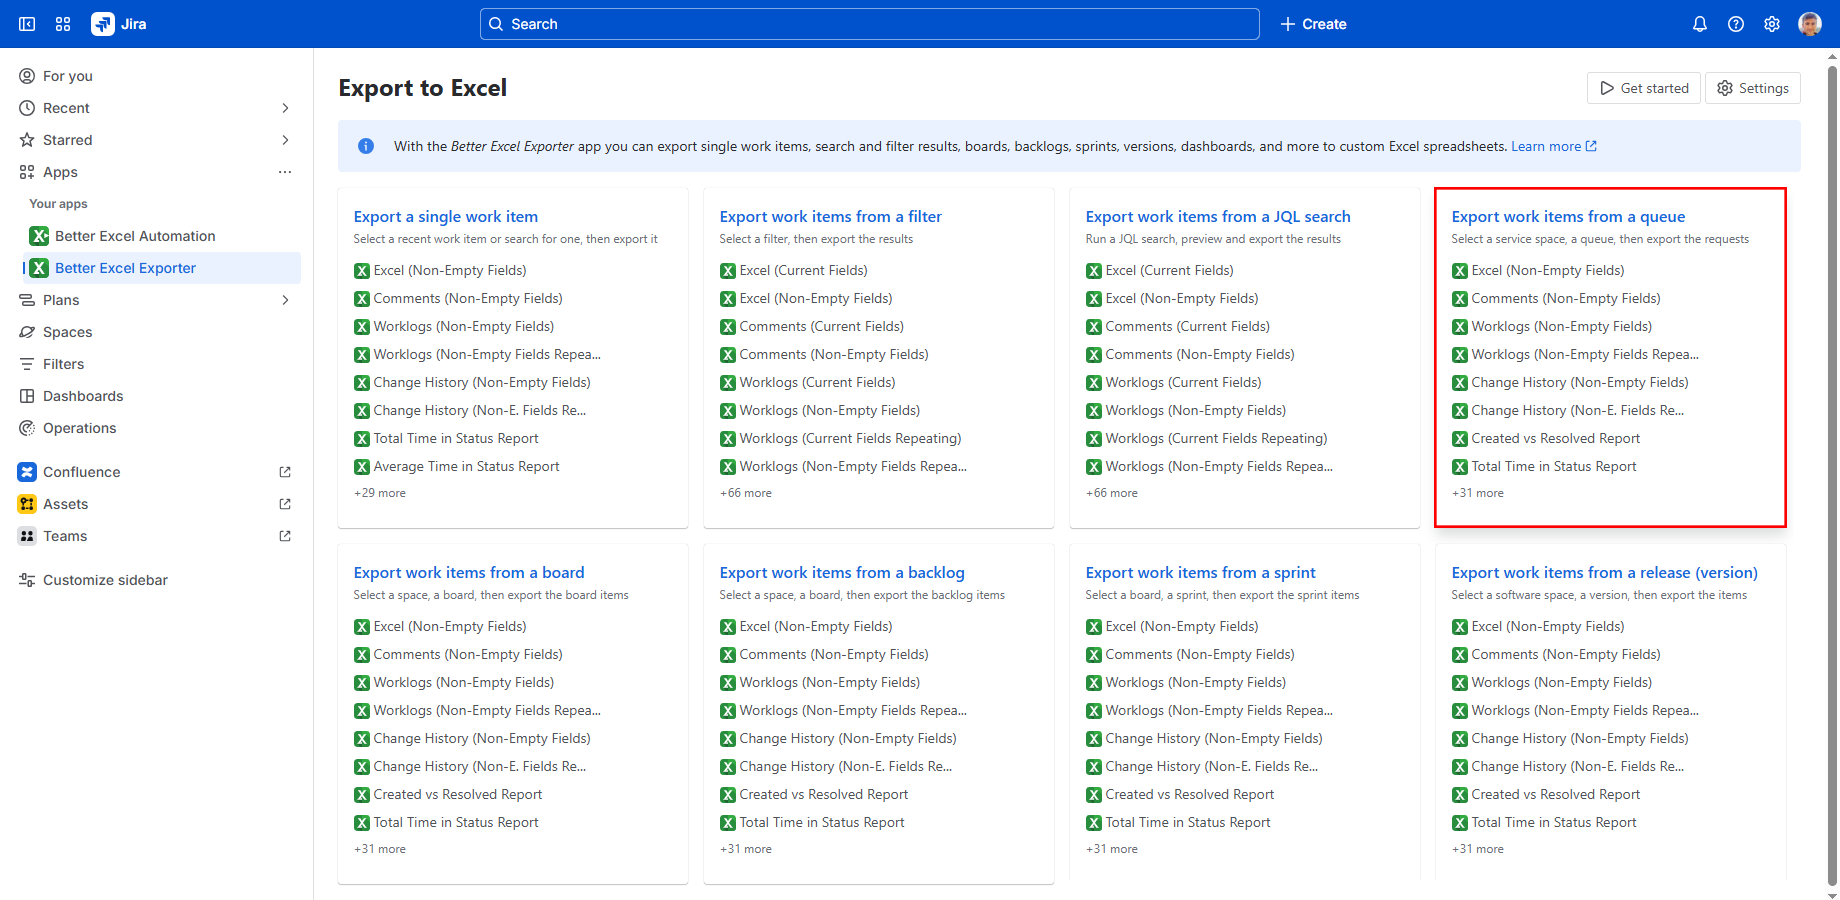
Exporting requests directly from the Queue screen is currently not possible due to a known limitation in Atlassian Forge (JSDCLOUD-17970). As soon as Atlassian provides the required extension point in Forge, we will integrate Excel exports directly into that screen.
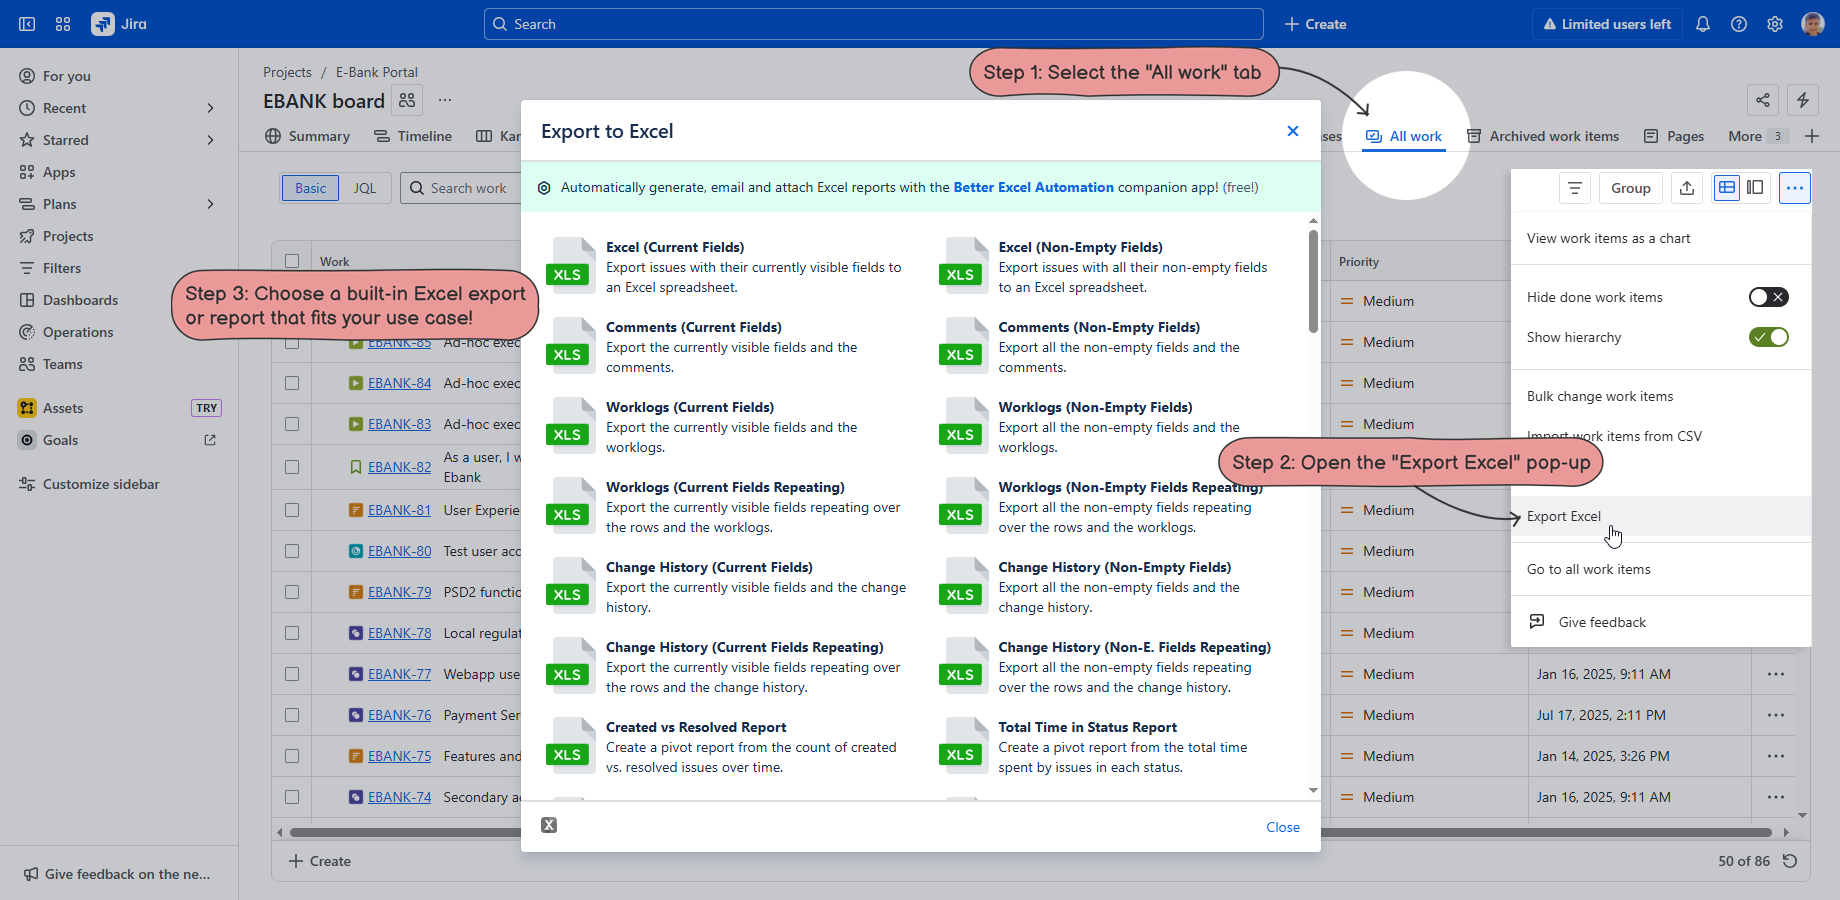
New quick export options in the Excel Export Center
We’ve expanded the Excel Export Center with four new quick export cards:
- Export work items from a JQL search: Run an ad-hoc JQL search and export the results instantly.
- Export work items from a queue: Select a JSM space and a queue, and export all requests from it.
- Export work items from a backlog: Select a board and export all work items in its backlog.
- Export work items from a sprint: Select a board and export work items from any active, future, or closed sprint.
Upgrading from 6.0.1
Besides updating the app version, due to the introduction of the queue context, you have to upgrade your Excel views.
Steps:
- Update your app version through the Connected apps screen of your Atlassian site's administration interface.
- Login to Jira as an administrator, then go to Marketplace apps → Better Excel Exporter → Excel views.
-
To enable the "Excel (Non-Empty Fields)" view for the other data context:
- Click the "Excel (Non-Empty Fields)" view.
- Check the "Export center > Queues" option at Enabled contexts, and uncheck everything else.
- Click Save.
- Repeat the previous step for the "Comments (Non-Empty Fields)", "Worklogs (Non-Empty Fields)", and all other views enabled for the "Work item views" context.
- Enjoy!
6.0.1
This release migrates the app to Forge, Atlassian's serverless app development platform. It introduces a new screen that provides a global entry point to the export feature, as well as a new Excel export context for global data.
Migration to Forge
A bit of history. Several years ago, when we started developing the cloud version of the Better Excel Exporter app, Forge did not exist. We used Connect, the official framework offered at that time by Atlassian to develop apps for Jira Cloud. Today, Forge is the primary platform for Jira Cloud apps. (You may want to read the Connect to Forge comparison by Atlassian.)
We are now incrementally migrating Better Excel Exporter to Forge through multiple releases. In this release:
- We rebuilt the user interface using Forge components. We also used this as an opportunity to modernize the UI/UX. Although you may notice changes here and there, the overall app experience will remain familiar.
- Security was converted to Forge authentication. (This change is not directly visible to the end-user.)
Also note that this release is the first step for the app to meet the strict data security requirements of the Runs on Atlassian program. We will continue working on that in the next releases. Stay tuned!
"Excel export center" screen
A new screen is now available via the Better Excel Exporter link in the Jira left sidebar under Apps. This screen provides a globally accessible entry point to the Excel export feature.
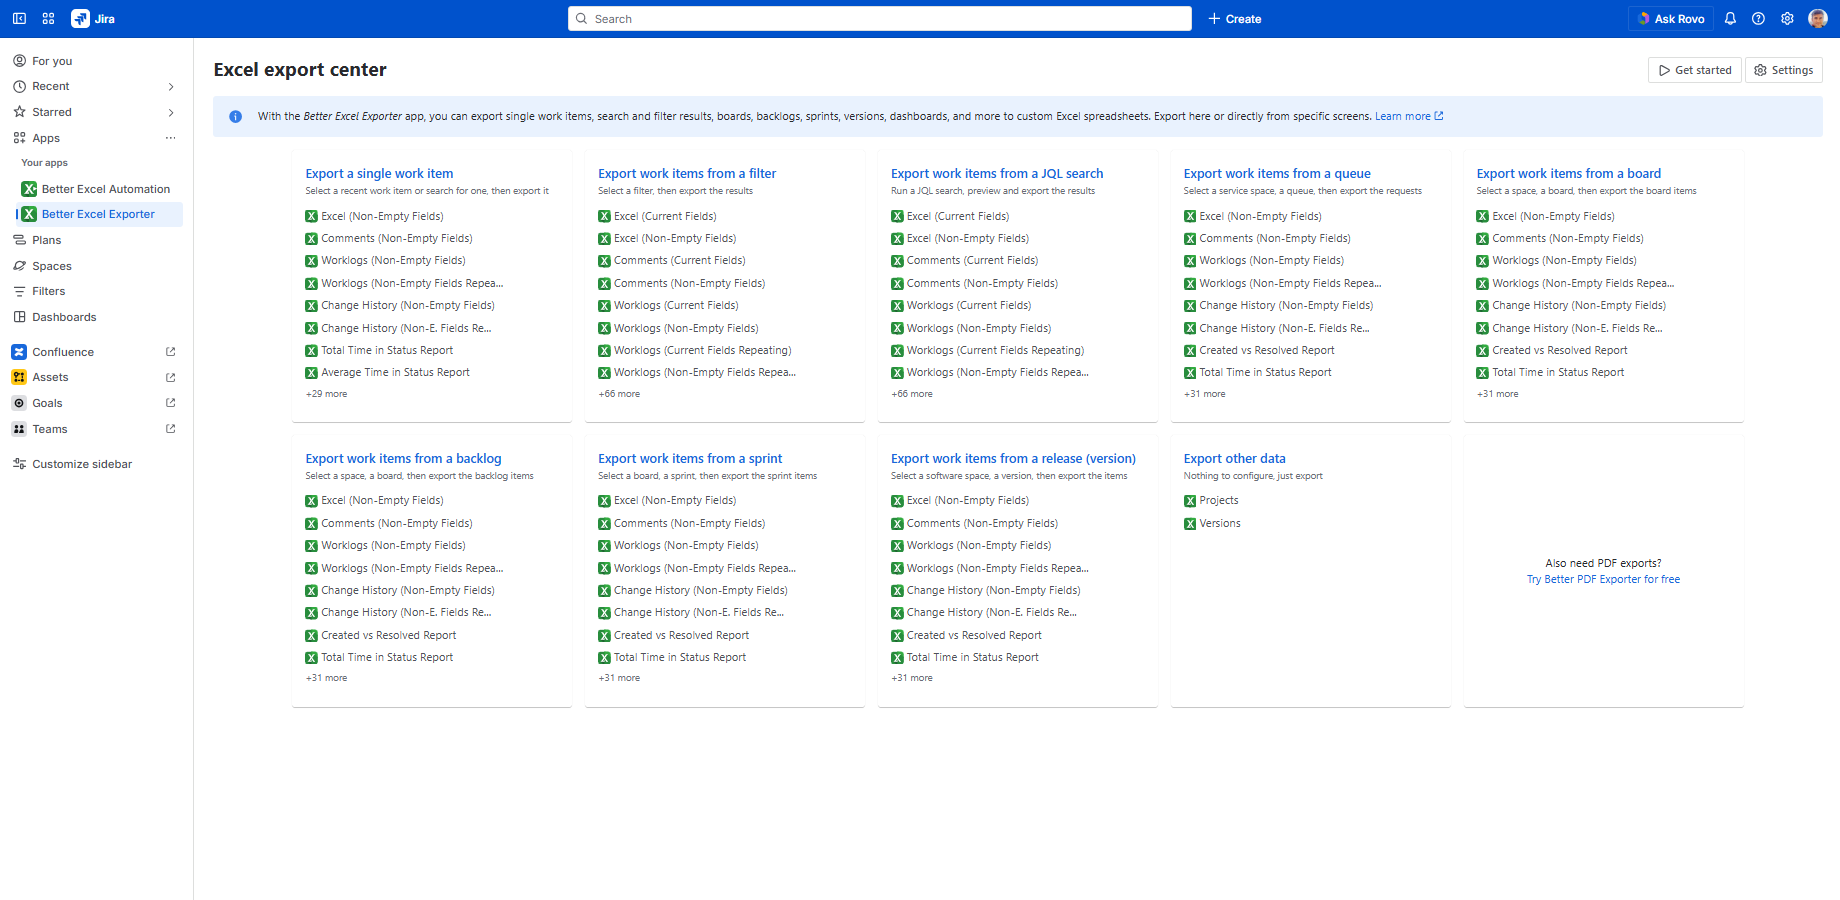
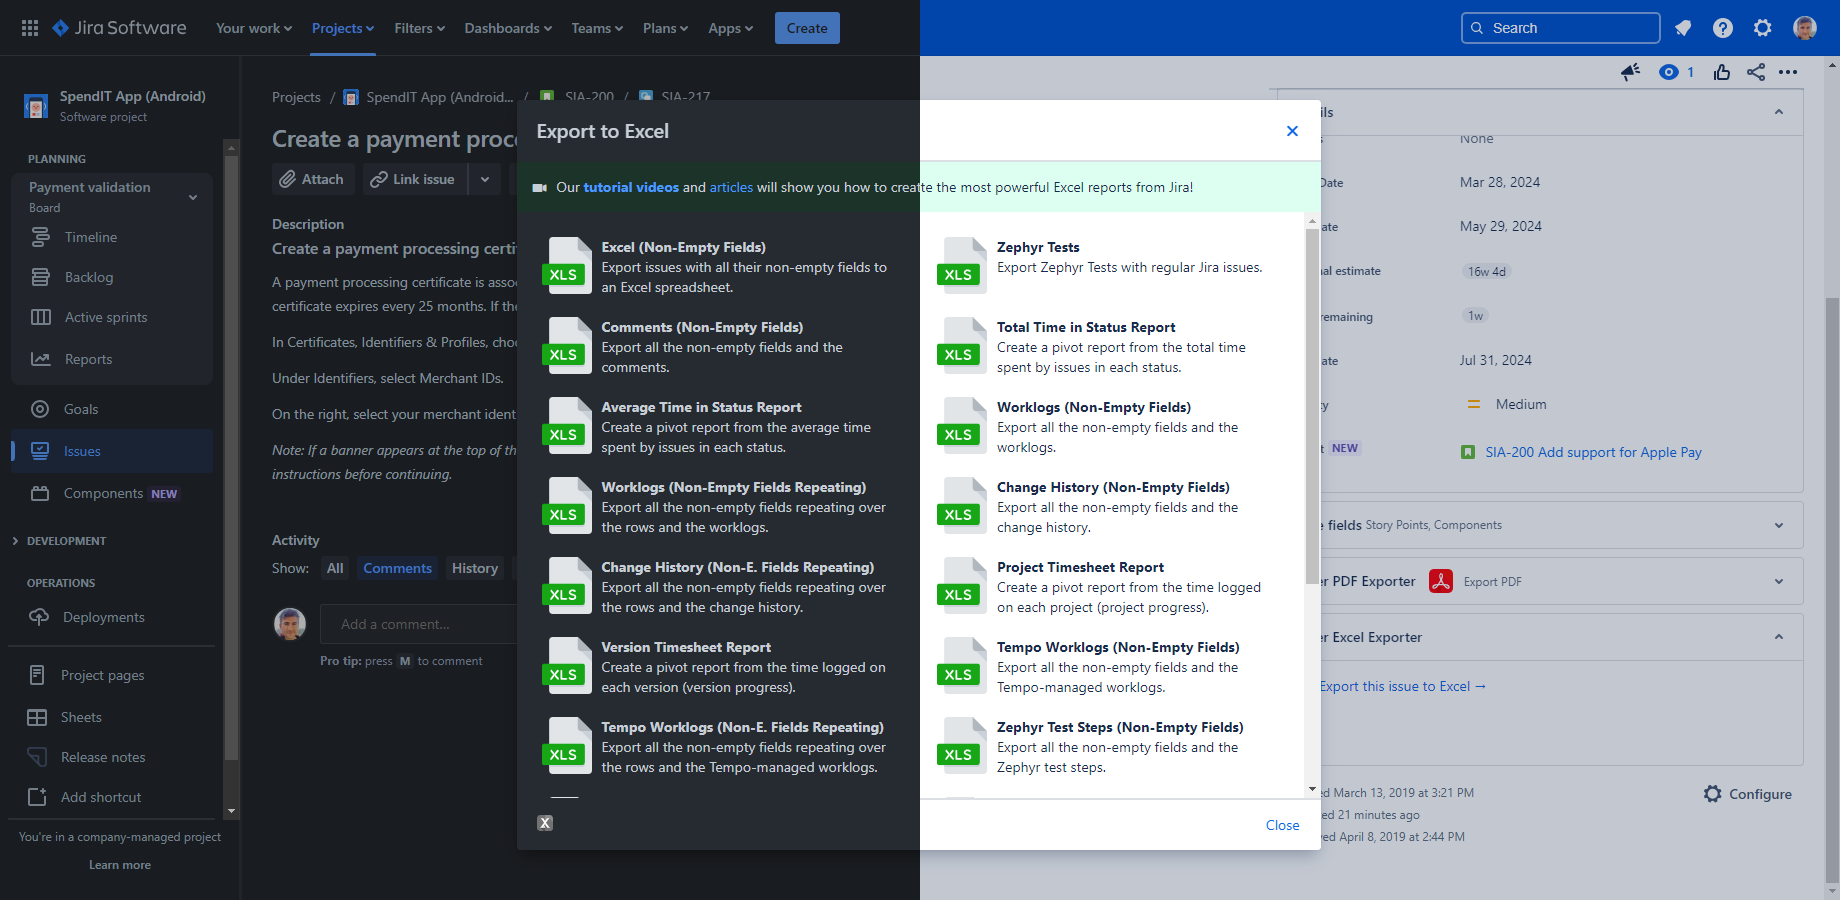
On the new screen, available Excel views are organized into cards based on their supported contexts. For example, the first card lists all Excel views that can be used to export individual work items. Selecting a card lets you proceed with the export using the same popup workflow familiar from previous versions of the app.
We are confident that this more convenient, centralized access will save time for frequent users and make recurring export tasks faster.
"Other data" context
A new context is now available for exporting "other data" to Excel. Use this context when the Excel view exports data that is not directly related to work items, but rather to projects, users, or other global entities.
When you enable this context for a view:
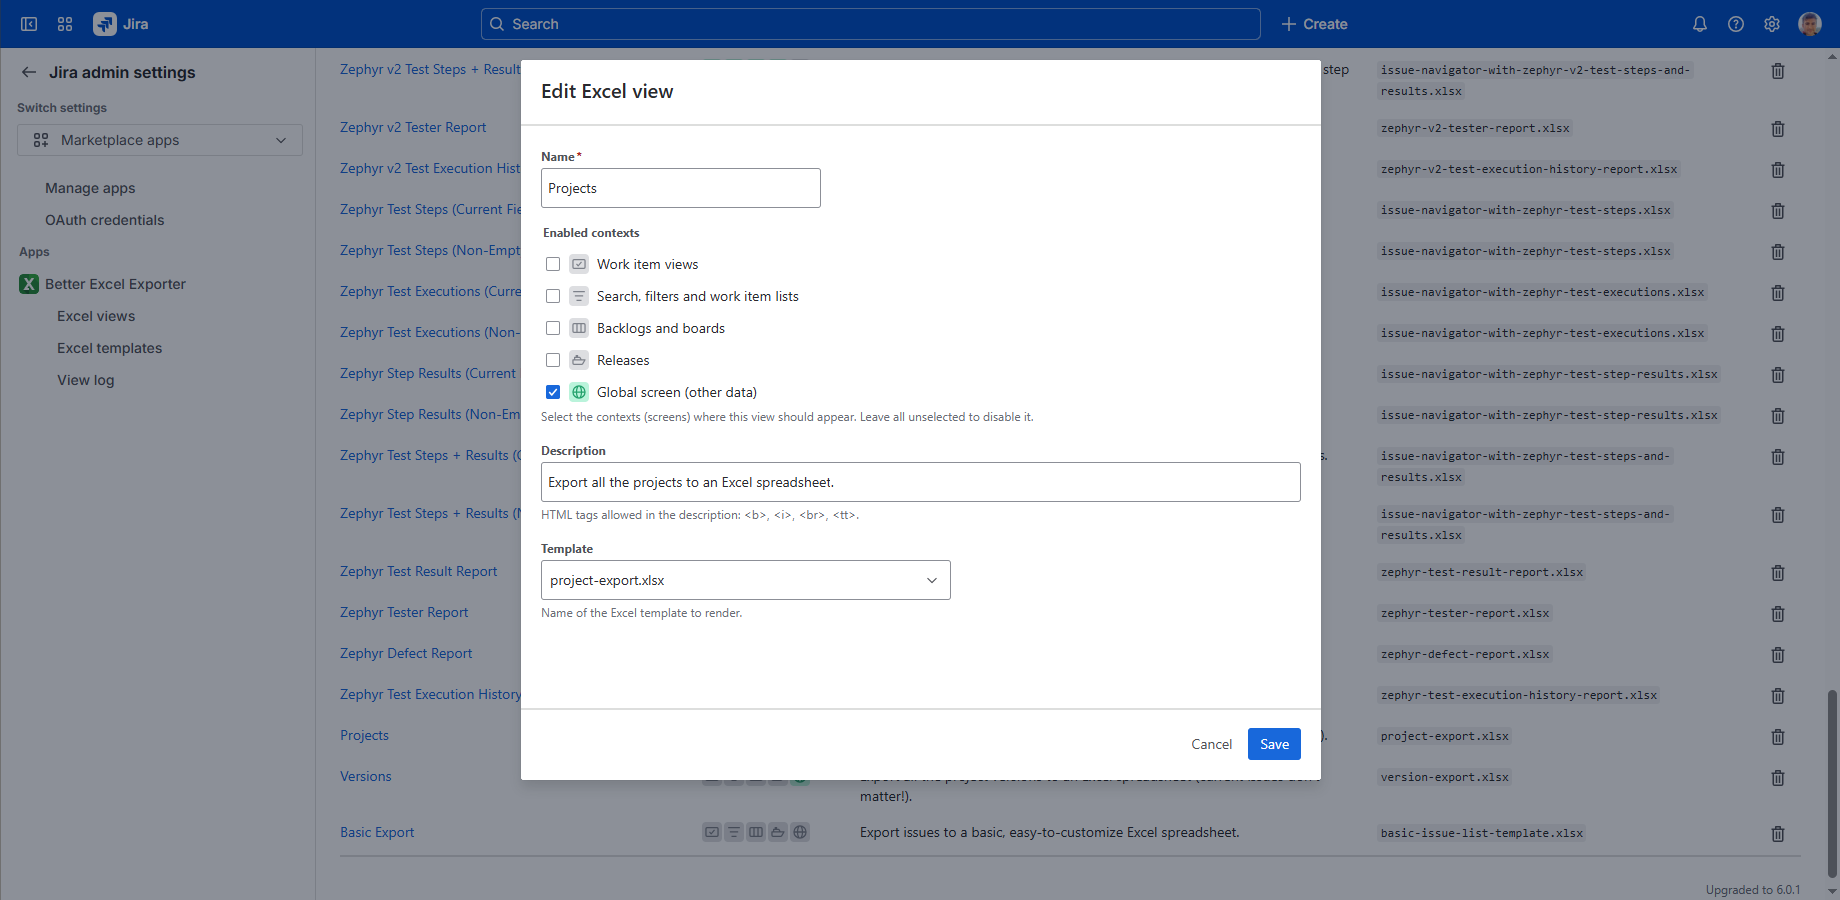
... then the view will be available on the Excel Export Center screen, "other data" card:
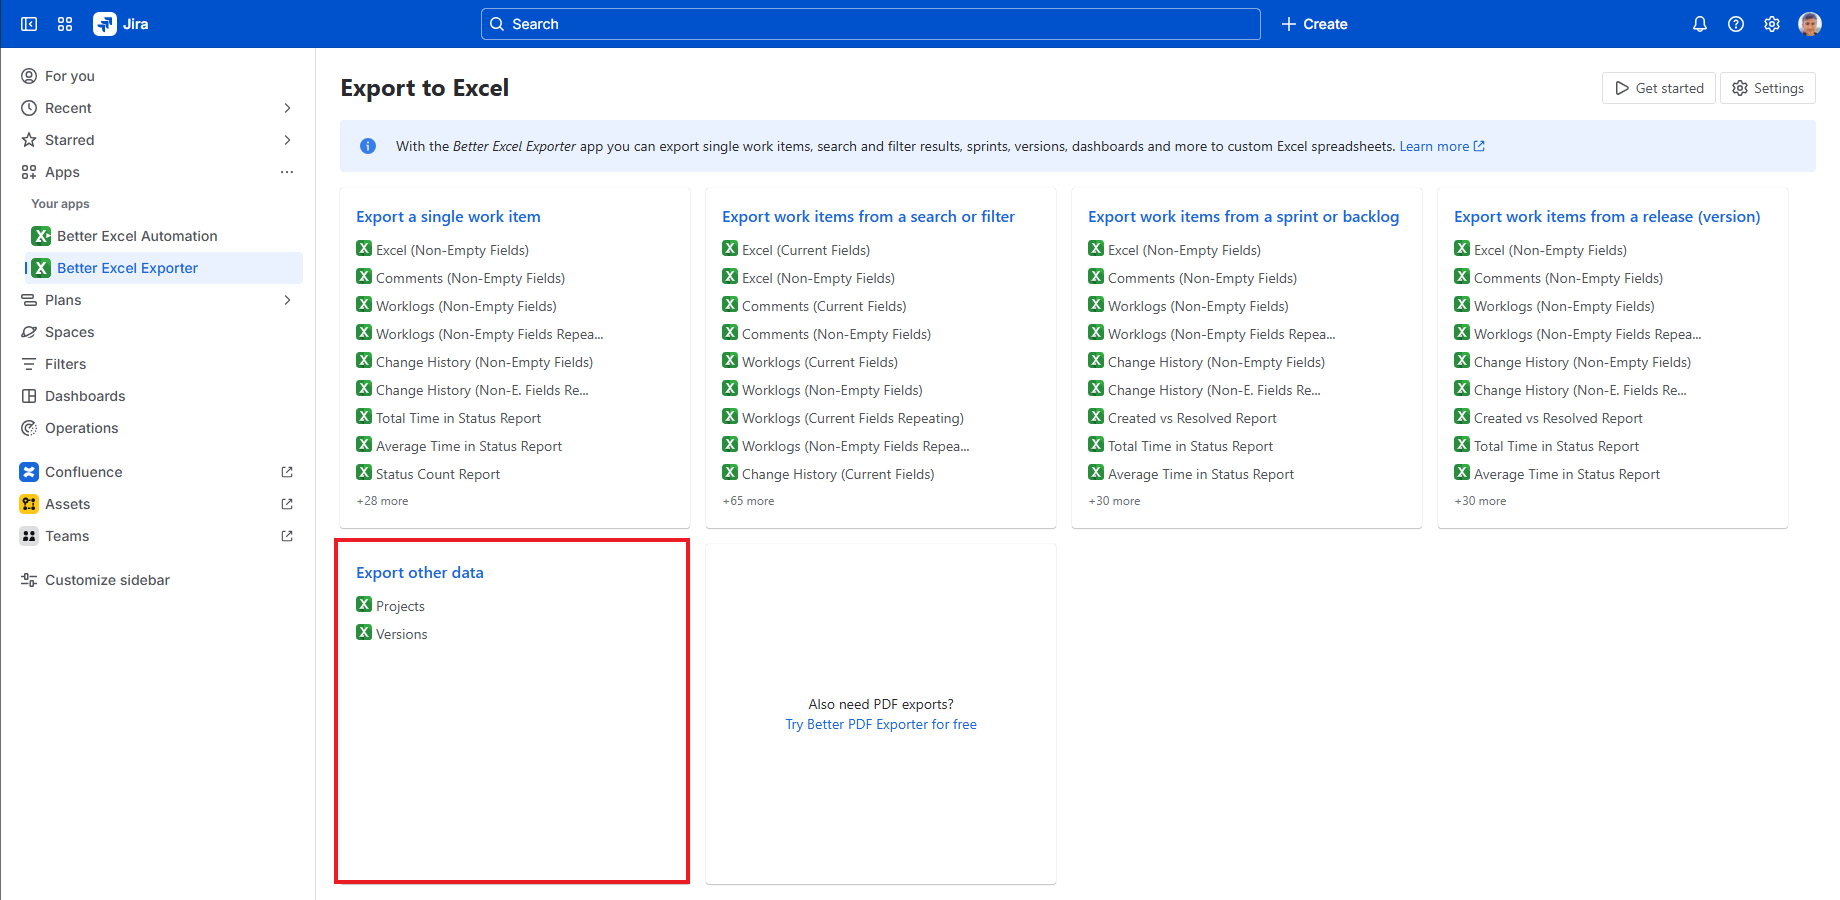
In previous app versions, Excel views of this type required enabling the "Issue Navigator" context. While this worked, it was not always intuitive. The new global context provides a clearer, more logical option for these views. As outlined in the upgrade guide below, we recommend reviewing your existing Excel views and considering switching some of them to this new context.
Upgrading from 5.2.0
Besides updating the app version due to the introduction of the other data context, you have to upgrade your Excel views.
Steps:
- Update your app version through the Connected apps screen of your Atlassian site's administration interface.
- Login to Jira as an administrator, then go to Marketplace apps → Better Excel Exporter → Excel views.
-
To enable the "Projects" view for the other data context:
- Click the "Projects" view.
- Check the "Export center > Other data" option at Enabled contexts, and uncheck everything else.
- Click Save.
- Repeat the previous step for the "Versions" view.
- Repeat the previous step for all other Excel views that you want to enable for the "other data" context.
- Enjoy!
5.2.0
This version adds support for a new field type.
Support for the "Comments" field
From this version, you can export the Comments field that shows the number of comments on a work item to Excel spreadsheets.
Upgrading from 5.1.0
You only need to update a Groovy script. It takes less than a minute.
Steps:
- Download the ZIP that contains the latest template files: better-excel-exporter-for-jira-cloud-5.2.0-templates.zip, and extract it.
- Login to Jira as administrator, go to Apps → Manage your apps → Excel Templates (under Better Excel Exporter).
- Upgrade the field-helper-tool.groovy template file:
- If you haven't made any changes in the original field-helper-tool.groovy file, then just upload the new template (the one you just downloaded) and you are done.
- If you made changes to the original field-helper-tool.groovy, you will need to migrate those to the new template.
- In case of an .xlsx file, check the current modifications made to the previous original version of the template, then re-apply them to the new version.
- In case of a .groovy file:
- Open the file from the directory where you extracted the ZIP.
- If you haven't made any changes in the original file, then just copy-paste the content of the new template (the one you just downloaded) to the editor, save it and you are done.
- If you made changes to the original, you will need to migrate those to the new template. This should be done by comparing the content of your current file with the new one, and merging all changes you made in the former to the latter. Use a visual merge tool (like WinMerge or Eclipse's compare and merge editor), and it should be trivial.
- Enjoy!
5.1.0
This version adds support for development information and Jira Misc Custom Fields.
Support for development information
From this release, you can export development information stored in the Development field. This field contains aggregated data (number of commits, branches, pull requests, builds, etc.) across multiple development tools (Bitbucket, GitHub, GitLab, Azure DevOps, etc.).
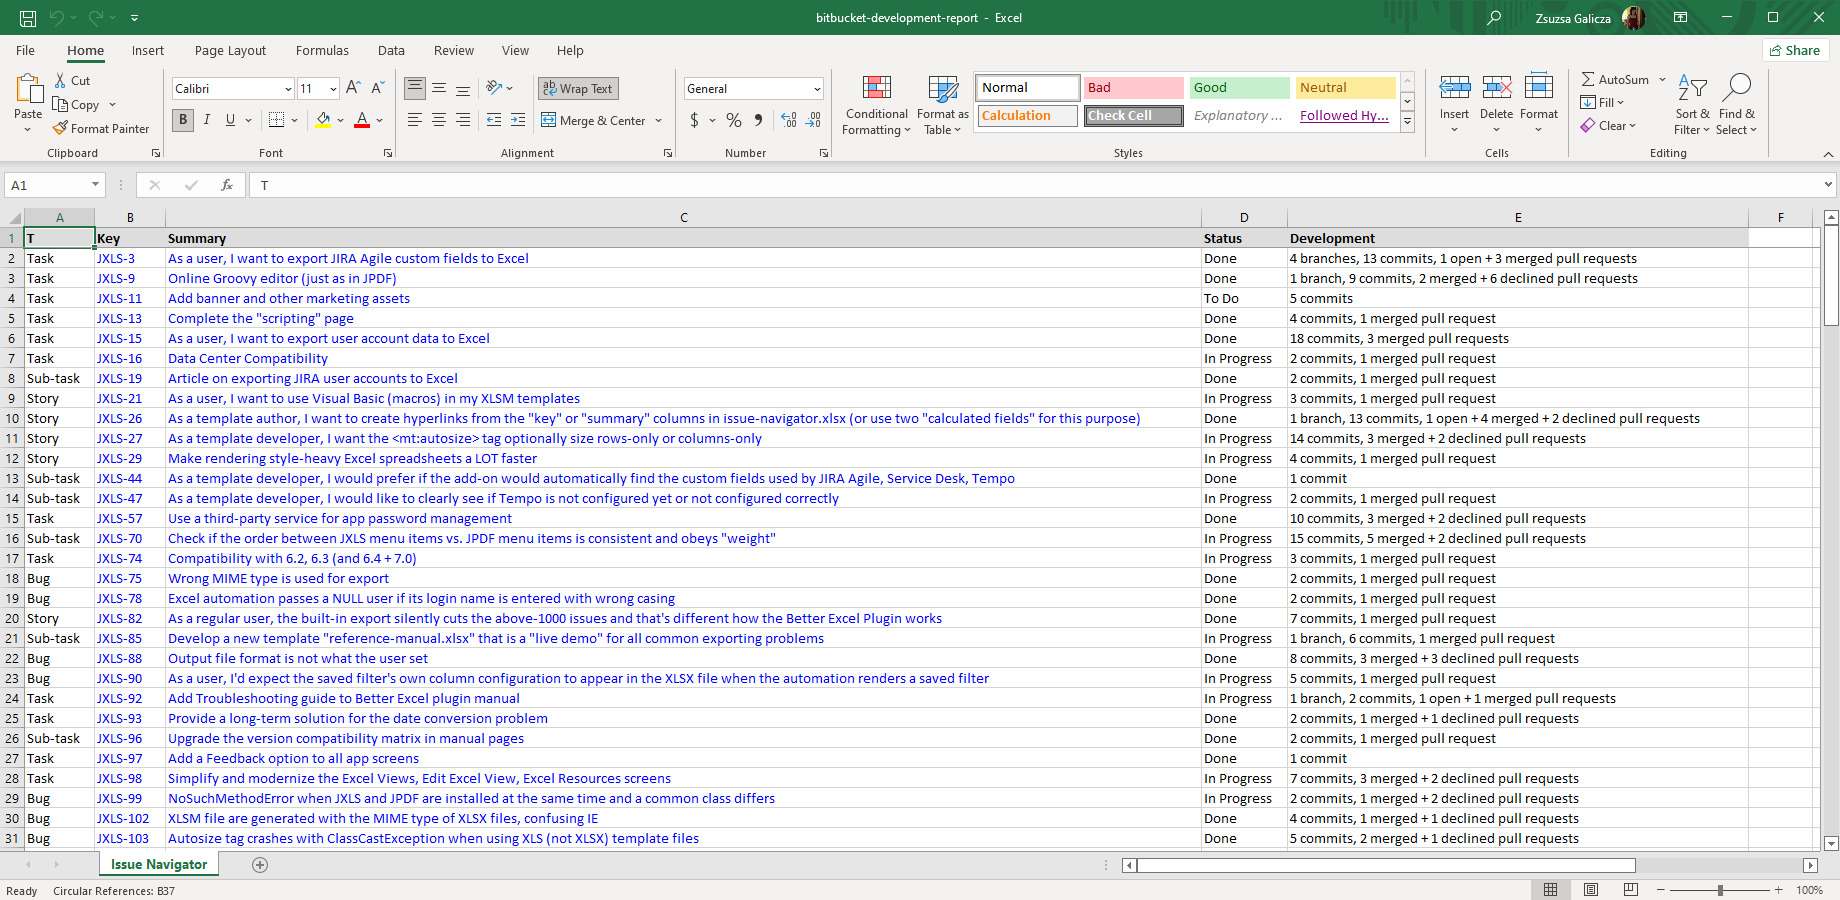
See the export samples or configure the integration and start exporting today!
Support for Jira Misc Custom Fields (JMCF)
Jira Misc Custom Fields (JMCF) offers calculated (scripted) custom fields to display information based on computed values. Those result in more useful issue screens, better search, better filtering, more powerful reports and dashboards. From this version, you can transparently export all the calculated field values to Excel spreadsheets.
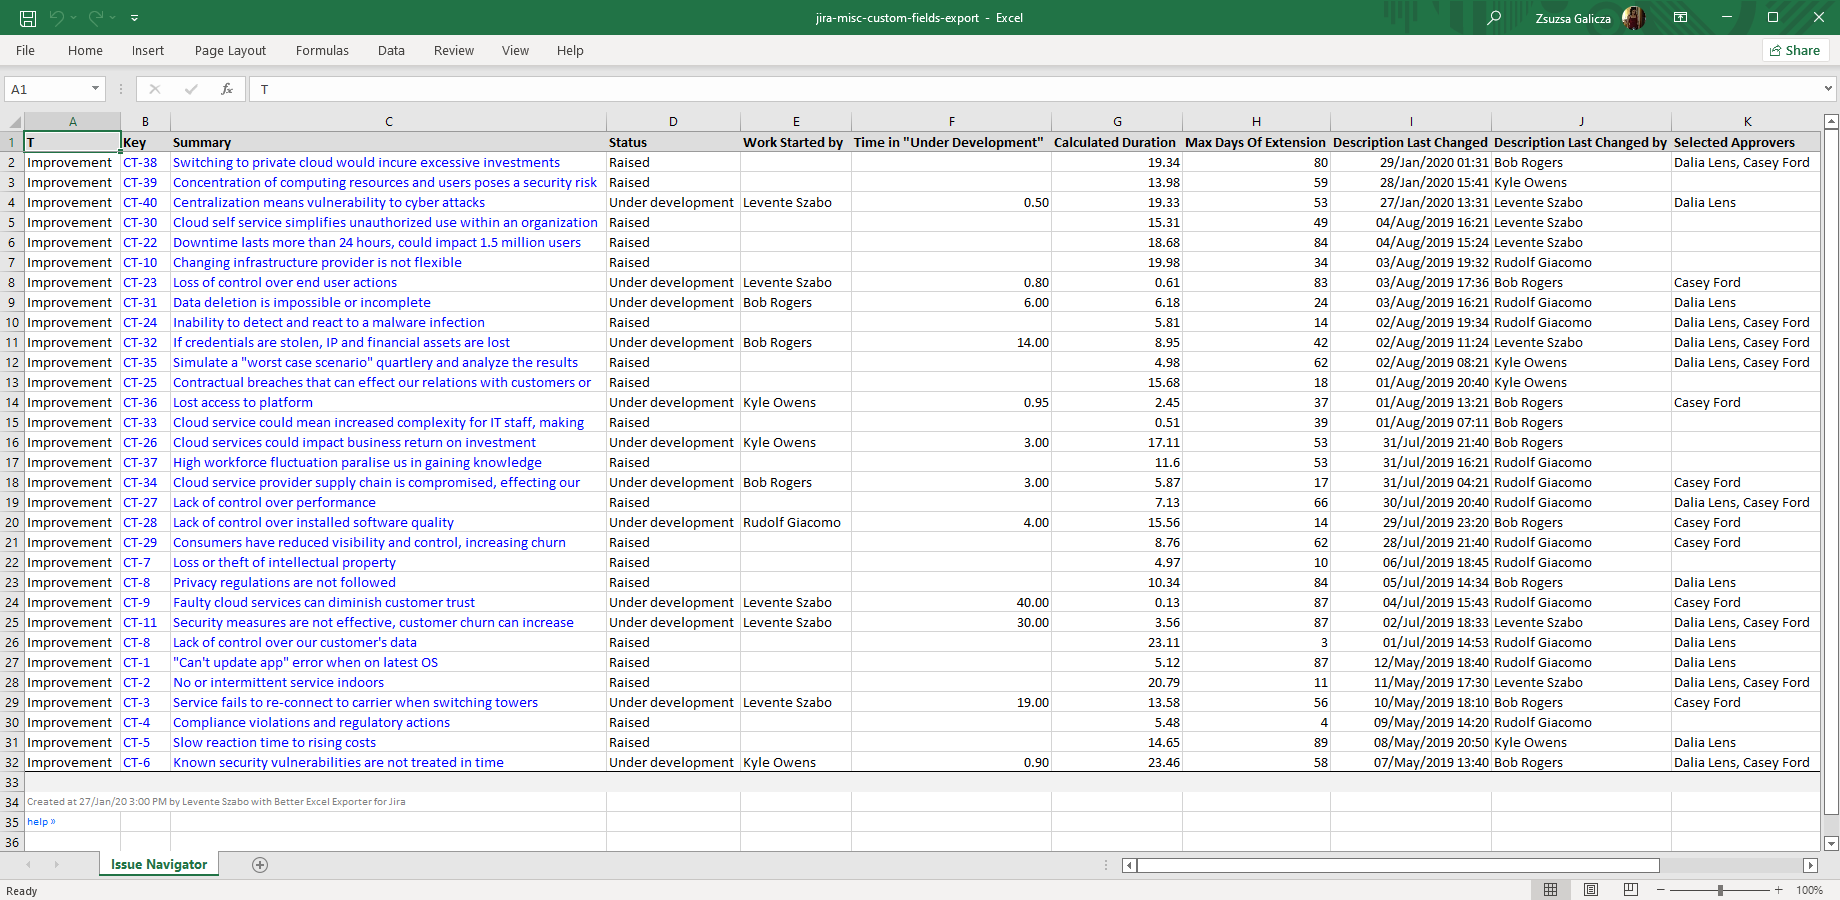
See some sample exports from Jira Misc Custom Fields and learn more about this integration.
Upgrading from 5.0.0
You need to update a single Groovy script. It takes less than a minute.
Steps:
- Download the ZIP that contains the latest template files: better-excel-exporter-for-jira-cloud-5.1.0-templates.zip, and extract it.
- Login to Jira as administrator, go to Apps → Manage your apps → Excel Templates (under Better Excel Exporter).
- Upgrade the field-helper-tool.groovy template file:
- If you haven't made any changes in the original field-helper-tool.groovy file, then just upload the new template (the one you just downloaded) and you are done.
- If you made changes to the original field-helper-tool.groovy, you will need to migrate those to the new template.
- In case of an .xlsx file, check the current modifications made to the previous original version of the template, then re-apply them to the new version.
- In case of a .groovy file:
- Open the file from the directory where you extracted the ZIP.
- If you haven't made any changes in the original file, then just copy-paste the content of the new template (the one you just downloaded) to the editor, save it and you are done.
- If you made changes to the original, you will need to migrate those to the new template. This should be done by comparing the content of your current file with the new one, and merging all changes you made in the former to the latter. Use a visual merge tool (like WinMerge or Eclipse's compare and merge editor), and it should be trivial.
- Enjoy!
5.0.0
This release adds support for Atlassian Government Cloud deployments.
Atlassian Government Cloud
Our app can now operate within dedicated government cloud instances, enabling public sector adoption. While this enables public sector teams to use our apps in their dedicated environment, it is also an important step toward compatibility with Atlassian Isolated Cloud. If you are not yet familiar with these new deployment models, see Atlassian's announcement.
Who is this release relevant for?
- For U.S. government agencies, it is directly applicable today!
- For enterprises, it lays the groundwork for the upcoming Isolated Cloud option.
This update reaffirms our commitment to support all future Atlassian Cloud deployment options with our apps.
Learn more about Atlassian Government Cloud and Atlassian Isolated Cloud
Upgrading from 4.8.0
These changes were silently deployed to all Jira Cloud sites. You don't need to do anything!
4.8.0
This version introduces integration with two new Jira screens, "All work" and "Release". Additionally, it comes with a new feature to export project releases (project versions) to Excel.
Support for the "All work" screen
From this version, you can export work items directly from the "All work" screen within a project to Excel.
Support for the "Release" screen
From this version, you can export work items directly from the "Release" screen within a project to Excel. From the "Releases" screen, you can open a single release. This lets you export work items that reference the release through the "Fix version" field.

Support for versions (releases) exports
The new version-export.xlsx template makes exporting project releases (project versions) to Excel a one-click process.
Find a quick step-by-step guide in this blogpost or view the example export file!
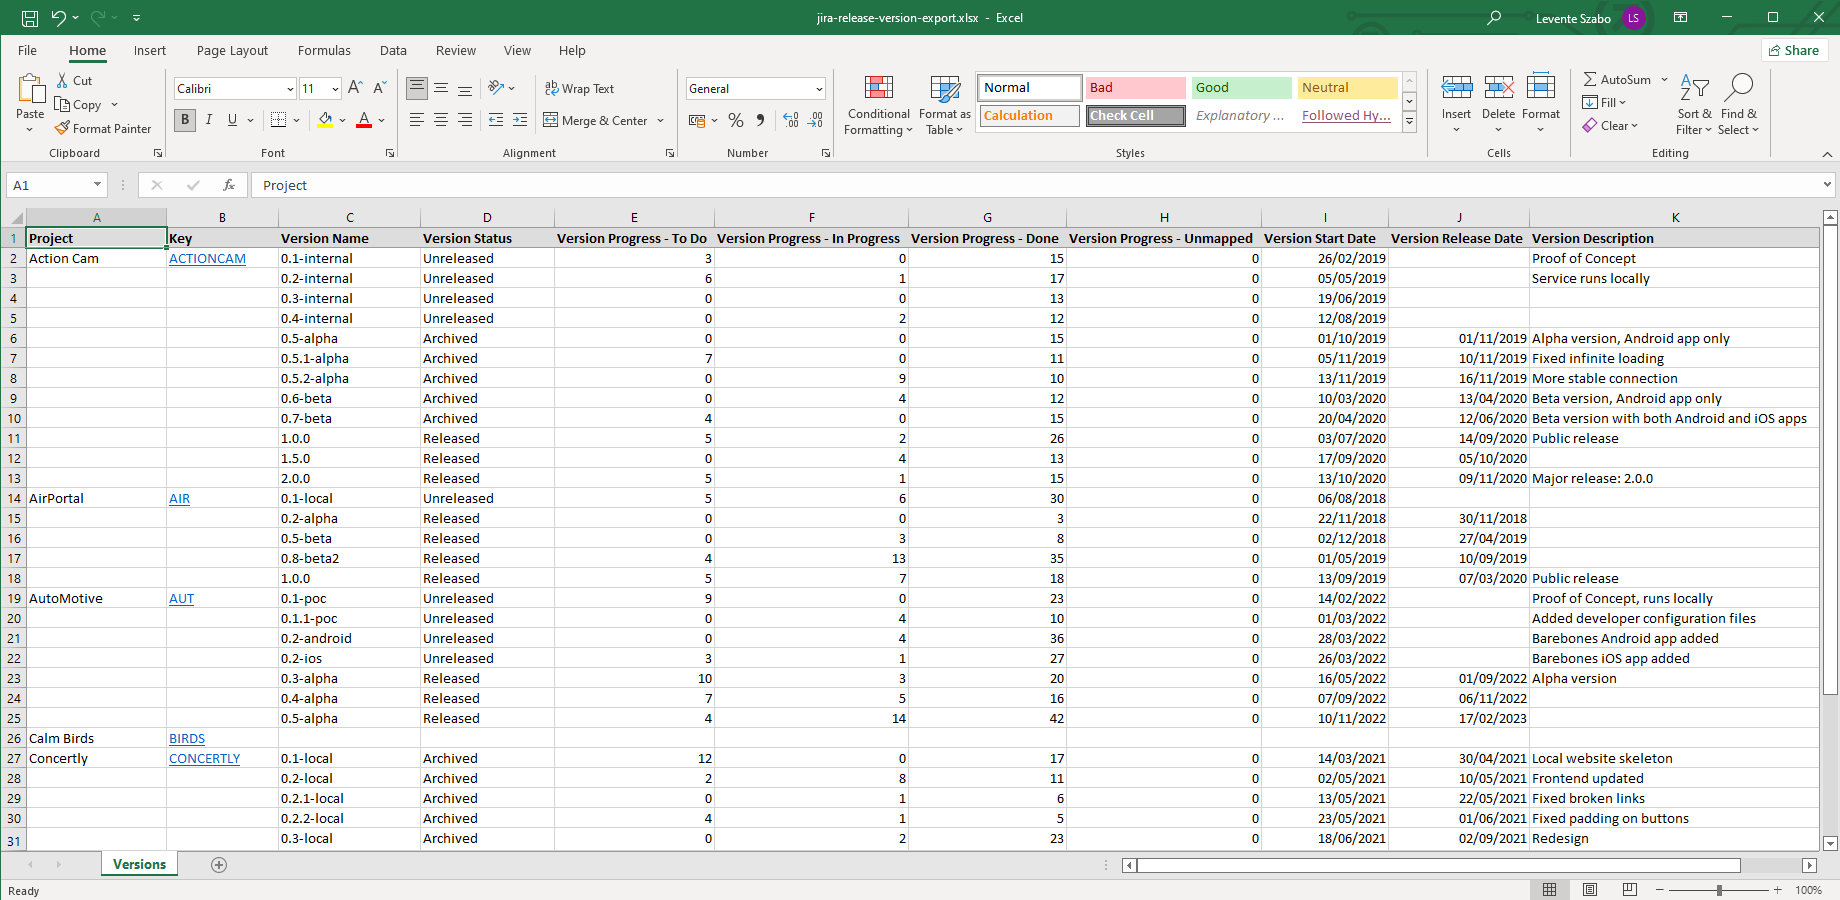
This works in a similar way to the project export template that has been available for a long time.
Upgrading from 4.6.0
In order to get the new versions/releases report, you have to create a new view, a template and a script. Also, due to the changes that the support for the "Release" screen brought to the table, you have to upgrade your Excel views, as well. Please execute the following steps precisely to get all the features introduced in this version.
Steps:
- Download the ZIP that contains the latest template files: better-excel-exporter-for-jira-cloud-4.8.0-templates.zip, and extract it.
- Login to Jira as administrator, go to Apps → Manage your apps → Excel Templates (under Better Excel Exporter).
- Then, create the new file version-export.groovy:
- In Jira, click the Upload button under the Excel Templates list. Find the version-export.groovy file among the unzipped files, and select it.
- Check if the new file has appeared in the template list.
- Repeat the previous step also for the version-export.xlsx file.
- To create a new export option in the Export to Excel dialog:
- Go to Excel views (in the left-side bar) and click Add a new view.
- Enter "Versions" as name, enter "Export all the project versions to an Excel spreadsheet (current issues don't matter!)." as description, check the Issue Navigator context option, select the template file version-export.xlsx, and save it. (Do not select any context if you don't want to activate this view right now. You can activate it any time later by selecting contexts here.)
- Using the arrows, move the new view after "Projects" in the list.
-
To enable views in the Export Excel dialog in the release page:
- Go to Excel views (in the left-side bar) and click the "Excel (Non-Empty Fields)" view.
- Ensure that the "Jira Software Release" checkbox is selected under Contexts.
- Click Save.
- Repeat the previous step for all the views where the "Jira Software Backlog and Board" context is selected.
- Enjoy!
4.6.0
This version introduces support for Xray Test Management for Jira.
Support for Xray
Xray is a complete, end-to-end test management app for Jira. It supports the entire testing and quality assurance lifecycle: test planning, test design, test execution and test reporting.
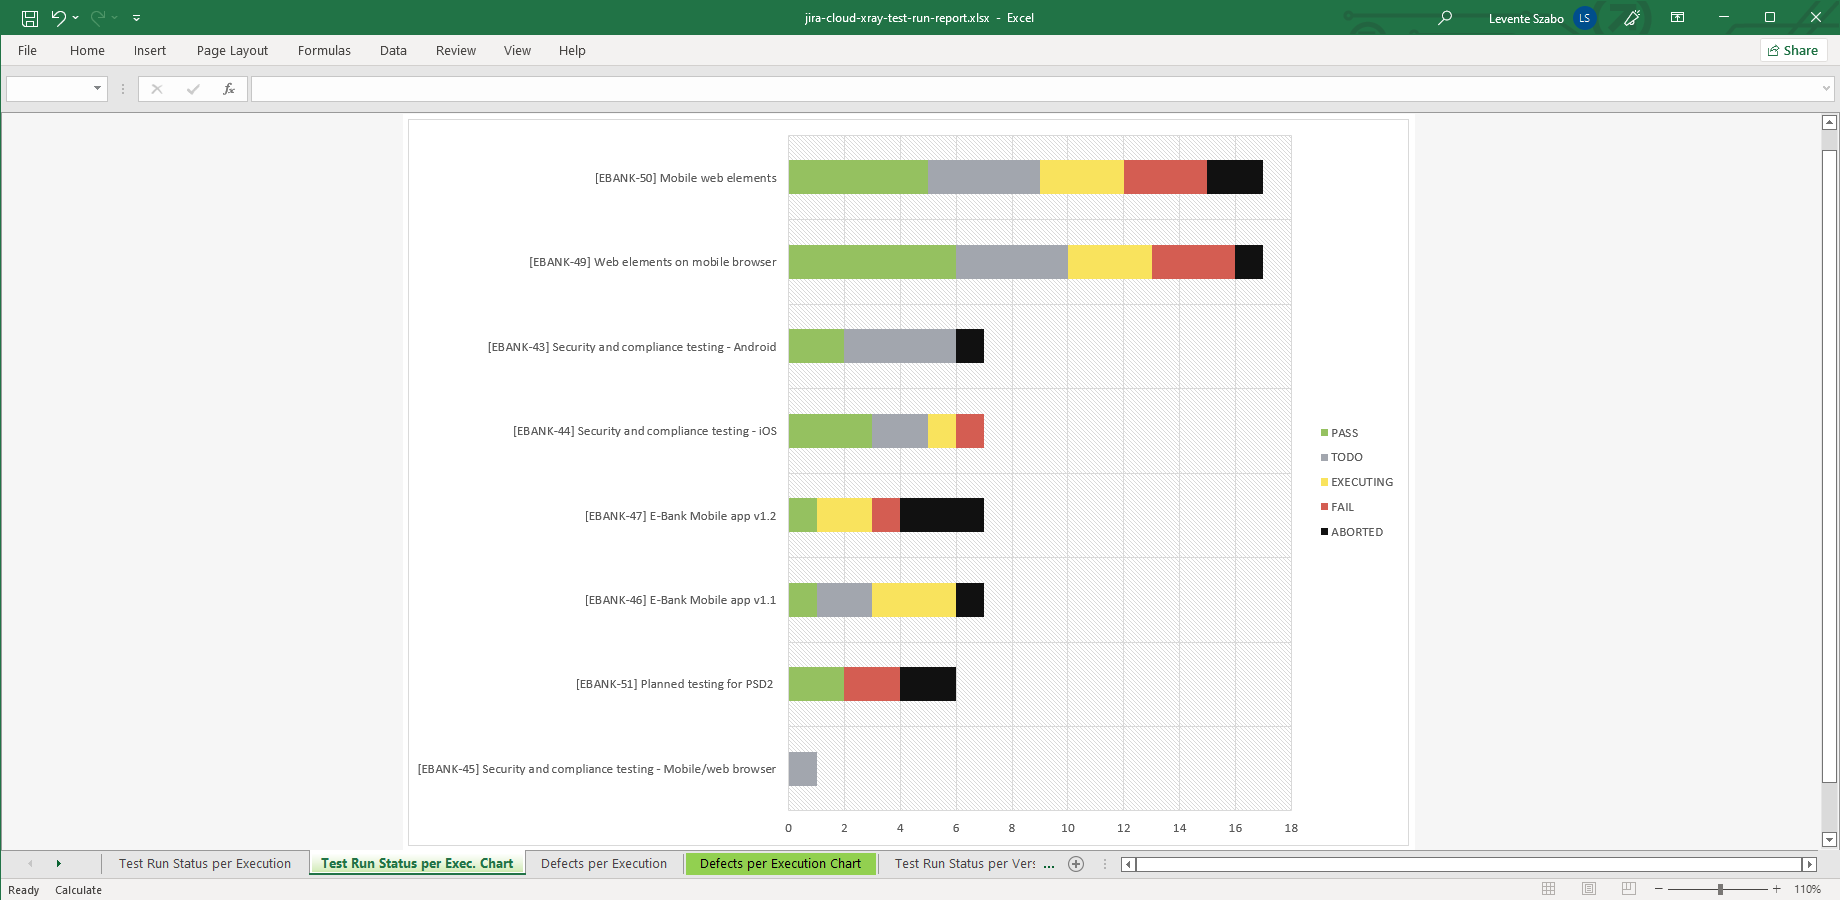
From this version, Better Excel Exporter can export all test data (including tests, preconditions, test sets, test plans, test executions, test runs and coverable issues) to Excel and also provides two report templates that you can use or customize further.
See some sample exports from Xray and learn more about this integration.
Upgrading from 4.5.0
In order to get the new Xray reports, you have to create new views, templates and a script. It takes a couple of minutes, follow the guide below.
Steps:
- Download the ZIP that contains the latest template files: better-excel-exporter-for-jira-cloud-4.6.0-templates.zip, and extract it.
- Login to Jira as administrator, go to Apps → Manage your apps → Excel Templates (under Better Excel Exporter).
- Then, create the new file xray-tool.groovy:
- In Jira, click the Upload button under the Excel Templates list. Find the xray-tool.groovy file among the unzipped files, and select it.
- Check if the new file has appeared in the template list.
-
Repeat the previous step also for the
following files:
- issue-navigator-with-xray-coverable-issues.xlsx
- issue-navigator-with-xray-preconditions.xlsx
- issue-navigator-with-xray-test-executions.xlsx
- issue-navigator-with-xray-test-plans.xlsx
- issue-navigator-with-xray-test-runs.xlsx
- issue-navigator-with-xray-test-sets.xlsx
- issue-navigator-with-xray-test-steps.xlsx
- xray-report.xlsx
- xray-test-run-report.xlsx
- To create a new export option in the Export to Excel dialog:
- Go to Excel views (in the left-side bar) and click Add a new view.
- Enter "Xray Test Steps (Current Fields)" as name, enter "Export tests with their test steps and currently visible fields to an Excel spreadsheet." as description, check the Issue Navigator context option, select the template file issue-navigator-with-xray-test-steps.xlsx, and save it. (Do not select any context if you don't want to activate this view right now. You can activate it any time later by selecting contexts here.)
- Using the arrows, move the new view after "Tempo Team Report" in the list.
-
Repeat the previous step also with the following templates:
- issue-navigator-with-xray-test-steps.xlsx (view name: "Xray Test Steps (Non-Empty Fields)", description: "Export tests with their test steps and all non-empty fields to an Excel spreadsheet.", contexts: Single Issue View, Issue Navigator, Jira Software Backlog and Board)
- issue-navigator-with-xray-test-runs.xlsx (view name: "Xray Test Runs (Current Fields)" for current fields or "Xray Test Runs (Non-Empty Fields)" for non-empty fields; description for current fields: "Export tests with their test runs and currently visible fields to an Excel spreadsheet.", description for non-empty fields: "Export tests with their test steps and all non-empty fields to an Excel spreadsheet."; context for current fields: Issue Navigator, contexts for non-empty fields: Single Issue View, Issue Navigator, Jira Software Backlog and Board)
- issue-navigator-with-xray-preconditions.xlsx (view name: "Xray Preconditions (Current Fields)" for current fields or "Xray Preconditions (Non-Empty Fields)" for non-empty fields; description for current fields: "Export preconditions with their currently visible fields to an Excel spreadsheet.", description for non-empty fields: "Export preconditions with all their non-empty fields to an Excel spreadsheet."; context for current fields: Issue Navigator, contexts for non-empty fields: Single Issue View, Issue Navigator, Jira Software Backlog and Board)
- issue-navigator-with-xray-test-sets.xlsx (view name: "Xray Test Sets (Current Fields)" for current fields or "Xray Test Sets (Non-Empty Fields)" for non-empty fields; description for current fields: "Export test sets with their currently visible fields to an Excel spreadsheet.", description for non-empty fields: "Export test sets with all their non-empty fields to an Excel spreadsheet."; context for current fields: Issue Navigator, contexts for non-empty fields: Single Issue View, Issue Navigator, Jira Software Backlog and Board)
- issue-navigator-with-xray-test-plans.xlsx (view name: "Xray Test Plans (Current Fields)" for current fields or "Xray Test Plans (Non-Empty Fields)" for non-empty fields; description for current fields: "Export test plans with their currently visible fields to an Excel spreadsheet.", description for non-empty fields: "Export test plans with all their non-empty fields to an Excel spreadsheet."; context for current fields: Issue Navigator, contexts for non-empty fields: Single Issue View, Issue Navigator, Jira Software Backlog and Board)
- issue-navigator-with-xray-test-executions.xlsx (view name: "Xray Test Executions (Current Fields)" for current fields or "Xray Test Executions (Non-Empty Fields)" for non-empty fields; description for current fields: "Export test executions with their currently visible fields to an Excel spreadsheet.", description for non-empty fields: "Export test executions with all their non-empty fields to an Excel spreadsheet."; context for current fields: Issue Navigator, contexts for non-empty fields: Single Issue View, Issue Navigator, Jira Software Backlog and Board)
- issue-navigator-with-xray-coverable-issues.xlsx (view name: "Xray Coverable Issues (Current Fields)" for current fields or "Xray Coverable Issues (Non-Empty Fields)" for non-empty fields; description for current fields: "Export coverable issues with their currently visible fields to an Excel spreadsheet.", description for non-empty fields: "Export coverable issues with all their non-empty fields to an Excel spreadsheet."; context for current fields: Issue Navigator, contexts for non-empty fields: Single Issue View, Issue Navigator, Jira Software Backlog and Board)
- xray-report.xlsx (view name: "Xray Test Report", description: "Create a pivot report from the tests per test repository path, priority, test set, test plan and precondition.", contexts: Issue Navigator, Jira Software Backlog and Board)
- xray-test-run-report.xlsx (view name: "Xray Test Run Report", description: "Create a pivot report from the test runs per execution, version, environment and assignee.", contexts: Issue Navigator, Jira Software Backlog and Board)
- If you are using Xray, complete the Xray configuration guide so that the template can access Xray-managed information.
- Enjoy!
4.5.0
Support for Zephyr (formerly Zephyr Scale) and Zephyr Essential
This version introduces support for Zephyr (formerly Zephyr Scale) and Zephyr Essential, while also retaining legacy Zephyr Squad compatibility.
Zephyr has several editions, which can be confusing - so let's break it down. SmartBear currently offers three Zephyr test management solutions for Jira Cloud, each with a different purpose and status:
- Zephyr Squad: The original Zephyr test management app for Jira Cloud, widely adopted for its simplicity and integration with agile workflows. In early 2025, Zephyr Squad has been superseded by Zephyr Essential with no new feature development planned for Squad going forward. Zephyr Squad remains operational on sites where it was previously installed, but new installations will only be able to use Zephyr Essential.
- Zephyr Essential: The modern successor to Zephyr Squad, designed to offer a more robust and scalable test management experience for Jira Cloud. It includes enhanced performance, a refreshed UI, and a forward-looking feature set. Zephyr Essential is actively supported and is recommended for new and existing users alike.
- Zephyr (formerly Zephyr Scale): A separate, enterprise-grade test management solution for Jira Cloud, originally known as Zephyr Scale. It supports advanced test planning, reusability, and structured testing at scale. Zephyr remains an actively maintained and feature-rich option, particularly suited for large or regulated teams.
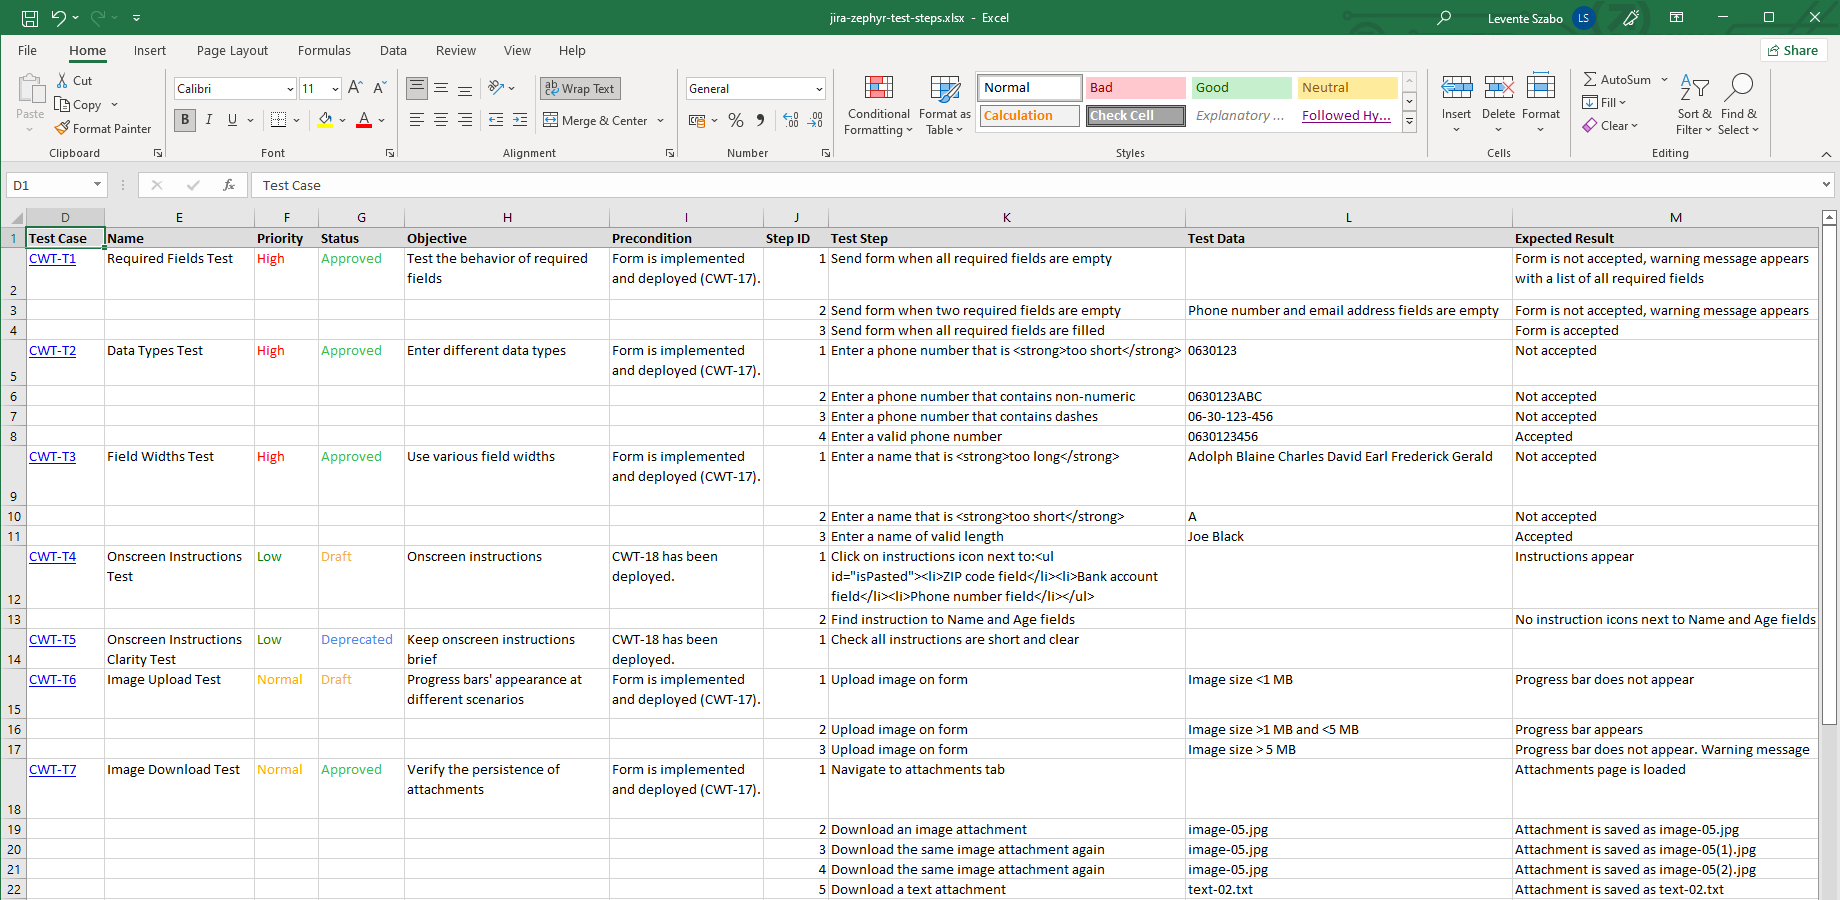
You can now export test cases, test steps, executions, results, test plans, and test cycles from both Zephyr solutions, enabling broader test data extraction and improved reporting flexibility.
See some sample exports from Zephyr (formerly Zephyr Scale) and learn more about this integration. Or, see some sample exports from Zephyr Essential and learn more about this integration.
Upgrading from 4.4.0
You only need to add a few templates, a Groovy script, create a few views and update a Groovy script. It takes just 2 minutes, follow the guide below.
Steps:
- Download the ZIP that contains the latest template files: better-excel-exporter-for-jira-cloud-4.5.0-templates.zip, and extract it.
- Login to Jira as administrator, go to Apps → Manage your apps → Excel Templates (under Better Excel Exporter).
- Upgrade the zephyr-tool.groovy template file:
- If you haven't made any changes in the original zephyr-tool.groovy file, then just upload the new template (the one you just downloaded) and you are done.
- If you made changes to the original zephyr-tool.groovy, you will need to migrate those to the new template.
- In case of an .xlsx file, check the current modifications made to the previous original version of the template, then re-apply them to the new version.
- In case of a .groovy file:
- Open the file from the directory where you extracted the ZIP.
- If you haven't made any changes in the original file, then just copy-paste the content of the new template (the one you just downloaded) to the editor, save it and you are done.
- If you made changes to the original, you will need to migrate those to the new template. This should be done by comparing the content of your current file with the new one, and merging all changes you made in the former to the latter. Use a visual merge tool (like WinMerge or Eclipse's compare and merge editor), and it should be trivial.
- Then, create the new file zephyr-v2-tool.groovy:
- In Jira, click the Upload button under the Excel Templates list. Find the zephyr-v2-tool.groovy file among the unzipped files, and select it.
- Check if the new file has appeared in the template list.
-
Repeat the previous step also for the
following files:
- zephyr-v2-report-tool.groovy
- issue-navigator-with-zephyr-v2-test-executions.xlsx
- issue-navigator-with-zephyr-v2-test-step-results.xlsx
- issue-navigator-with-zephyr-v2-test-steps-and-results.xlsx
- issue-navigator-with-zephyr-v2-test-steps.xlsx
- zephyr-v2-test-execution-history-report.xlsx
- zephyr-v2-tester-report.xlsx
- To create a new export option in the Export to Excel dialog:
- Go to Excel views (in the left-side bar) and click Add a new view.
- Enter "Zephyr v2 Tester Report" as name, enter "Create a pivot report from the test executions per testers." as description, check the Single Issue View, Issue Navigator, Jira Software Backlog and Board context options, select the template file zephyr-v2-tester-report.xlsx, and save it. (Do not select any context if you don't want to activate this view right now. You can activate it any time later by selecting contexts here.)
- Using the arrows, move the new view after "Zephyr Test Execution History Report" in the list.
-
Repeat the previous step also with the following templates:
- zephyr-v2-test-execution-history-report.xlsx (view name: "Zephyr v2 Test Execution History Report", description: "Create a pivot report from the count of test executions over time.")
- issue-navigator-with-zephyr-v2-test-steps.xlsx (view name: "Zephyr v2 Test Steps (Current Fields)" for current fields or "Zephyr v2 Test Steps (Non-Empty Fields)" for non-empty fields; description for current fields: "Export the currently visible fields and the Zephyr (Scale)/Essential test steps.", description for non-empty fields: "Export all the non-empty fields and the Zephyr (Scale)/Essential test steps.")
- issue-navigator-with-zephyr-v2-test-executions.xlsx (view name: "Zephyr v2 Test Executions (Current Fields)" for current fields or "Zephyr v2 Test Executions (Non-E. Fields)" for non-empty fields; description for current fields: "Export the currently visible fields and the Zephyr (Scale)/Essential test executions.", description for non-empty fields: "Export all the non-empty fields and the Zephyr (Scale)/Essential test executions.")
- issue-navigator-with-zephyr-v2-test-step-results.xlsx (view name: "Zephyr v2 Step Results (Current Fields)" for current fields or "Zephyr v2 Step Results (Non-E. Fields)" for non-empty fields; description for current fields: "Export the currently visible fields and the Zephyr (Scale)/Essential test step results.", description for non-empty fields: "Export all the non-empty fields and the Zephyr (Scale)/Essential test step results.")
- issue-navigator-with-zephyr-v2-test-steps-and-results.xlsx (view name: "Zephyr v2 Test Steps + Results (Curr. Fields)" for current fields or "Zephyr v2 Test Steps + Results (Non-E. F.)" for non-empty fields; description for current fields: "Export the currently visible fields and the Zephyr (Scale)/Essential test steps with step results.", description for non-empty fields: "Export all non-empty fields and the Zephyr (Scale)/Essential test steps with step results.")
- Enjoy!
4.4.0
This version introduces support for 3 new Jira custom field types. Also, it calculates the average for 2 Jira Product Discovery custom field types in the footer row.
Improvements
- Support for the Approvers list custom field type (in Jira Service Management).
- Support for the Category custom field type (in Jira Work Management).
- Support for the Responders custom field type (in Jira Service Management).
- The issue-navigator.xlsx template (and all of its variants) shows a calculated average in the footer for the Rating and Slider type Jira Product Discovery custom fields.
Upgrading from 4.3.0
You only need to update two Groovy scripts. It takes just a minute, follow the guide below.
Steps:
- Download the ZIP that contains the latest template files: better-excel-exporter-for-jira-cloud-4.4.0-templates.zip, and extract it.
- Login to Jira as administrator, go to Apps → Manage your apps → Excel Templates (under Better Excel Exporter).
- Upgrade the field-helper-tool.groovy template file:
- If you haven't made any changes in the original field-helper-tool.groovy file, then just upload the new template (the one you just downloaded) and you are done.
- If you made changes to the original field-helper-tool.groovy, you will need to migrate those to the new template.
- In case of an .xlsx file, check the current modifications made to the previous original version of the template, then re-apply them to the new version.
- In case of a .groovy file:
- Open the file from the directory where you extracted the ZIP.
- If you haven't made any changes in the original file, then just copy-paste the content of the new template (the one you just downloaded) to the editor, save it and you are done.
- If you made changes to the original, you will need to migrate those to the new template. This should be done by comparing the content of your current file with the new one, and merging all changes you made in the former to the latter. Use a visual merge tool (like WinMerge or Eclipse's compare and merge editor), and it should be trivial.
- Repeat the previous step also for the issue-navigator.groovy file.
- Enjoy!
4.3.0
This version introduces support for Tempo v4 REST API.
Support for Tempo v4 REST API
In 2023 November, Tempo has deprecated the v3 REST API and has been gradually turning it off in customers' Jira instances. If your instance is affected, you will see an error message in the Excel file whenever you try to export Tempo-related data. With this release, the integration between Better Excel Exporter and Tempo Timesheets has been rewritten to support both the new v4, and the old v3 REST API (as long as it's available in your Jira site).
This release makes the v4 REST API the default one. If you have custom or customized templates that stop working after you applied the update, see the Configuring the Tempo REST API version and Troubleshooting sections for tips.
Upgrading from 4.2.0
You only need to update a single Groovy script. It takes just a few seconds, follow the guide below.
Steps:
- Download the ZIP that contains the latest template files: better-excel-exporter-for-jira-cloud-4.3.0-templates.zip, and extract it.
- Login to Jira as administrator, go to Apps → Manage your apps → Excel Templates (under Better Excel Exporter).
- Upgrade the tempo-tool.groovy template file:
- If you haven't made any changes in the original tempo-tool.groovy file, then just upload the new template (the one you just downloaded) and you are done.
- If you made changes to the original tempo-tool.groovy, you will need to migrate those to the new template.
- In case of an .xlsx file, check the current modifications made to the previous original version of the template, then re-apply them to the new version.
- In case of a .groovy file:
- Open the file from the directory where you extracted the ZIP.
- If you haven't made any changes in the original file, then just copy-paste the content of the new template (the one you just downloaded) to the editor, save it and you are done.
- If you made changes to the original, you will need to migrate those to the new template. This should be done by comparing the content of your current file with the new one, and merging all changes you made in the former to the latter. Use a visual merge tool (like WinMerge or Eclipse's compare and merge editor), and it should be trivial.
- Enjoy!
4.2.0
This version introduces support for Jira Product Discovery and Atlassian teams.
Support for Jira Product Discovery
Jira Product Discovery is Atlassian's latest Jira-based service, built for product teams to prioritize ideas and to align everyone with product roadmaps.
From this release, Better Excel Exporter can export the Jira Product Discovery specific custom fields to Excel spreadsheets.
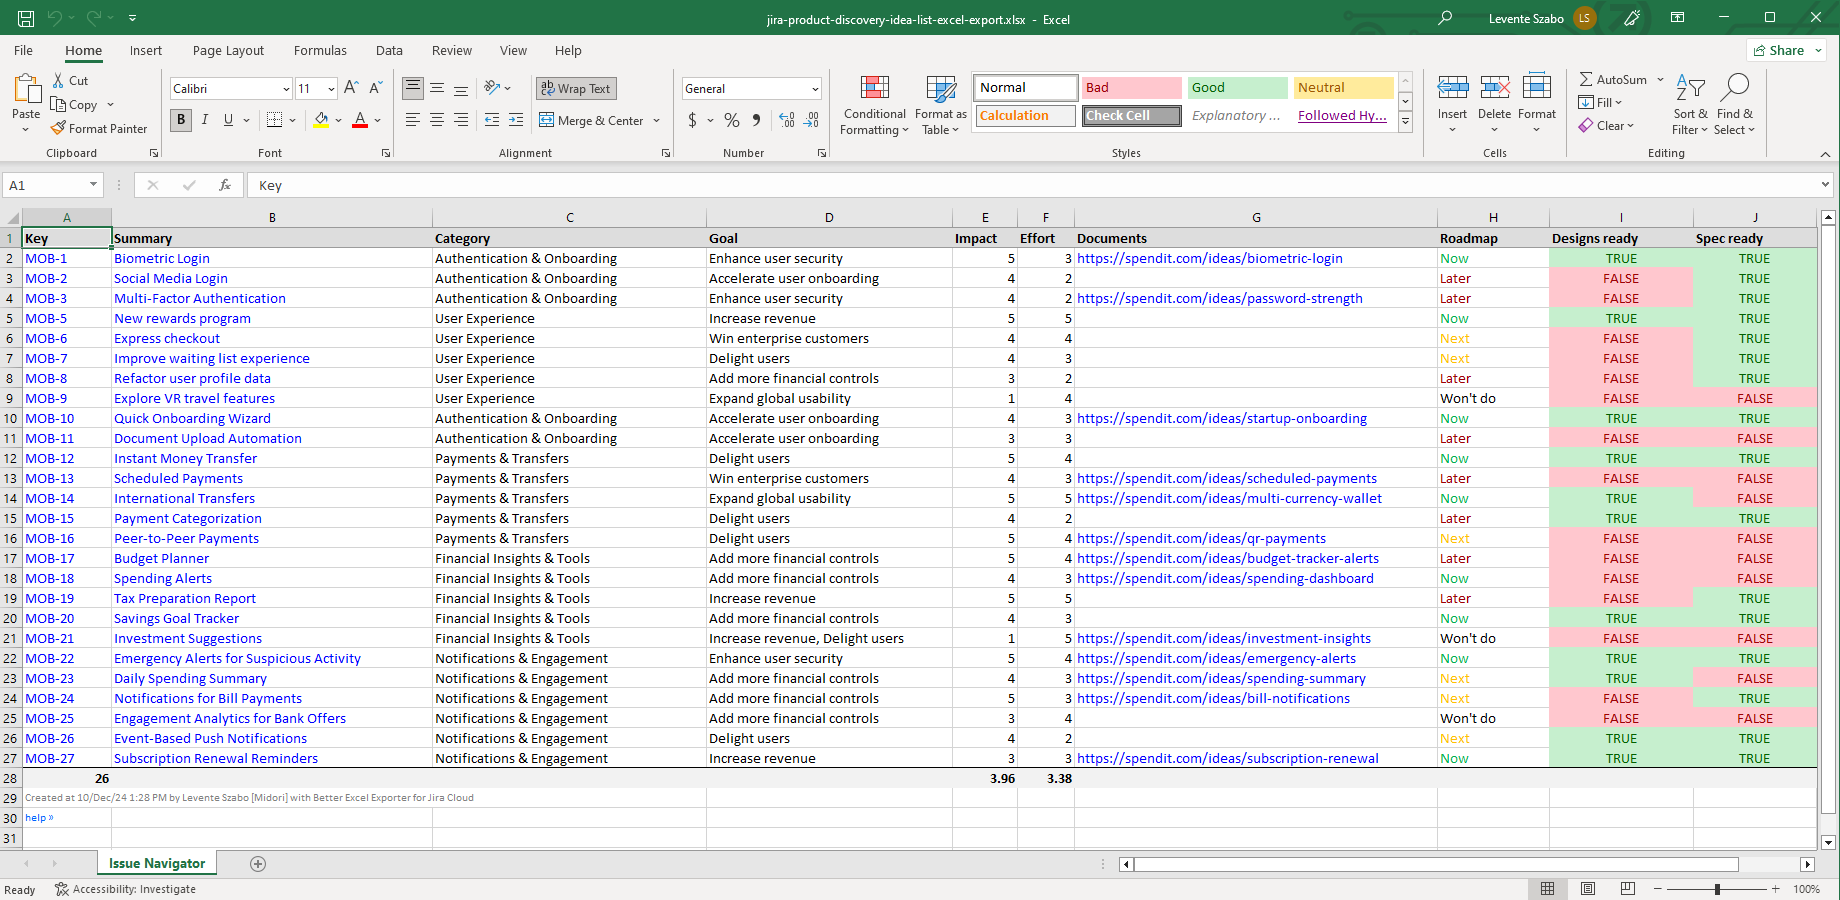
See some sample exports from Jira Product Discovery and learn more about this integration.
Support for Atlassian teams
Recently, Atlassian made the previously Advanced Roadmaps exclusive "Teams" feature available for all Jira Cloud sites. It is now simply called Atlassian teams.
From this release, Better Excel Exporter can export the Atlassian team related custom field to Excel spreadsheets. (The field is called "Team" and has the type "Team Picker (single team)".)
Improvements
- Support for the new cell type boolean.
- Values of "URL Field" type custom fields are now exported as clickable hyperlinks, not as non-clickable plain text.
Bugfixes
- Fixed: When exporting with the project-export.xlsx template, if a project's key is a reserved JQL keyword the export fails with "net.sf.jett.exception.AttributeExpressionException: Null value or expected variable missing in expression "${projectExport.allProjects}".".
Upgrading from 4.0.0
You need to update three Groovy scripts. It takes less than a minute, follow the guide below.
Steps:
- Download the ZIP that contains the latest template files: better-excel-exporter-for-jira-cloud-4.2.0-templates.zip, and extract it.
- Login to Jira as administrator, go to Apps → Manage your apps → Excel Templates (under Better Excel Exporter).
- Upgrade the field-helper-tool.groovy template file:
- If you haven't made any changes in the original field-helper-tool.groovy file, then just upload the new template (the one you just downloaded) and you are done.
- If you made changes to the original field-helper-tool.groovy, you will need to migrate those to the new template.
- In case of an .xlsx file, check the current modifications made to the previous original version of the template, then re-apply them to the new version.
- In case of a .groovy file:
- Open the file from the directory where you extracted the ZIP.
- If you haven't made any changes in the original file, then just copy-paste the content of the new template (the one you just downloaded) to the editor, save it and you are done.
- If you made changes to the original, you will need to migrate those to the new template. This should be done by comparing the content of your current file with the new one, and merging all changes you made in the former to the latter. Use a visual merge tool (like WinMerge or Eclipse's compare and merge editor), and it should be trivial.
-
Repeat the previous step also for the
following files:
- issue-navigator.groovy
- project-export.groovy
- Enjoy!
4.1.0
This version introduces support for Jira Cloud themes.
Support for themes (light and dark mode)
Atlassian recently implemented the so-called dark mode in Jira Cloud. From this version, the Better Excel Exporter app looks great also in dark mode (in every theme, actually)!
This mixed montage demonstrates the dark mode in the left and the light mode in the right:
Note that our implementation is future-proof: it is designed to be compatible with future themes and future changes in existing themes.
Upgrading from 4.0.0
These changes were silently deployed to all Jira Cloud sites. You don't need to do anything!
4.0.0
This major version improves software security with an enhanced sandbox implementation.
Improved sandboxing
Without going into details, the enhanced sandbox implementation restricts the environment in which Excel templates and Groovy scripts are rendered and executed with additional controls. It results in even better isolation between exports and even tighter control over resource access.
This release is a part of Midori's long-term commitment to offer the most feature-rich, most flexible, most scalable, most secure, yet inexpensive exporter apps for Jira Cloud. Please find all our software security related information in the Security and Trust page.
Upgrading from 3.5.0
Just update your app version through the Connected apps screen of your Atlassian site's administration interface.
3.5.0
This version prepares for an important change made on issue fields that Atlassian is rolling out over a longer period of time.
Early compatibility with the deprecation of the "Epic Link", "Parent Link" and other fields
Atlassian decided to deprecate multiple Jira Cloud fields which represent different types of parent-child relations. These include "Epic Link" and "Parent Link", primarily. All these will be replaced with the "Parent" system field.
Atlassian is rolling out this change over a longer period of time, also including a transitional period during which the "old" and the "new" behaviors co-exist. You can learn more about these in the related Development Community topic.
Because our app exports the fields affected by this change, the change indirectly affects the app itself, as well. How do we handle it?
We designed an approach that doesn't make any assumption about the change and the roll-out progress. The principle is that if a value is there in an affected field, we will export it, period. Therefore, the app will work "as expected" before the transitional period, during the transitional period, after the change has been completely rolled out, and even if Atlassian decides to revert the change!
There is a minor change in the format of the "Parent" field value though:
-
In previous versions, it was exported as the parent's issue key only.
Example: "FOO-123". -
Starting from this version, it is exported as the issue key, the summary and type of the parent in brackets.
Example: "FOO-123 Android support (Epic)".
Notes on the new format:
- We decided to include the parent summary in the format, because "Parent" replaces "Epic Link", and "Epic Link" values were exported as the epic name. A reasonable replacement should not lose that piece of information.
- We decided to include the parent type in the format, because it helps to understand what type of parent-child relation it is. For example, an "Epic" type parent suggests that it's an epic-story relation, while a "Task" parent suggests a task-subtask relation.
Also note that Epic-type issues rather confusingly have the "Summary" system field and also the "Epic Name" custom field. Most users enter the same value to both, because there isn't an obvious difference between the two. (In fact, "Epic Name" exists mostly due to historical reasons.) We prefer the summary in exports, because this field will just work for any type of parent. That way, we implicitly assume that you are using identical epic summaries and epic names.
Upgrading from 3.4.0
You need to update two Groovy scripts to be compatible with the deprecation. It takes only a minute, follow the guide below.
Steps:
- Upgrade the app as usual, through the Universal Plugin Manager.
- Download the ZIP that contains the latest template files: better-excel-exporter-for-jira-cloud-3.5.0-templates.zip, and extract it.
- Login to Jira as administrator, go to Apps → Manage your apps → Excel Templates (under Better Excel Exporter).
- Upgrade the field-helper-tool.groovy template file:
- If you haven't made any changes in the original field-helper-tool.groovy file, then just upload the new template (the one you just downloaded) and you are done.
- If you made changes to the original field-helper-tool.groovy, you will need to migrate those to the new template.
- In case of an .xlsx file, check the current modifications made to the previous original version of the template, then re-apply them to the new version.
- In case of a .groovy file:
- Open the file from the directory where you extracted the ZIP.
- If you haven't made any changes in the original file, then just copy-paste the content of the new template (the one you just downloaded) to the editor, save it and you are done.
- If you made changes to the original, you will need to migrate those to the new template. This should be done by comparing the content of your current file with the new one, and merging all changes you made in the former to the latter. Use a visual merge tool (like WinMerge or Eclipse's compare and merge editor), and it should be trivial.
- Repeat the previous step also for the software-report.groovy file.
- Enjoy!
3.4.0
This version introduces a selection of ready-to-use Zephyr Squad reports. Our motivation for this release with Zephyr Squad reports is essentially the same as it was for 3.3.0 with Tempo Timesheets reports. Additionally, there are new views to export the Zephyr Squad test step results together with the corresponding test step details.
Zephyr Squad reports
As you probably know, Better Excel Exporter already supports exporting Zephyr Squad specific information. It includes test steps, test executions, step results and such.
Starting from this version, we provide ready-to-use templates for the most frequent Zephyr Squad reporting needs:
- test results by project, version, test cycle, tester and other fields
- testers' load and performance by project, version, test cycle, result, defects and other fields
- total number of execution-level and step-level defects reported during testing by project, version, test cycle, tester and other fields
- test execution history (test execution log) by project, version, test cycle, results, defects and other fields in year/month/day resolution
As always, you can use these as is, customize them, or use them as starting point to create completely new Zephyr Squad reports.
See some sample exports from Zephyr Squad and learn more about this integration.
New views: Zephyr Squad test step results with test step details
Exporting test step details (step instructions, step data, expected result) and step results (actual result, defects) of Zephyr Squad tests have been available since the beginning, but only to separate exports. In this release we introduced a new template that exports both to the same Excel spreadsheet for the complete picture.
It is available through 2 new default views: exporting the test data with the current fields or with all non-empty fields.
Upgrading from 3.3.0
In order to get the new Zephyr Squad reports, you have to create new views, templates and scripts. It takes only a few minutes, follow the guide below.
Steps:
- Upgrade the app as usual, through the Universal Plugin Manager.
- Download the ZIP that contains the latest template files: better-excel-exporter-for-jira-cloud-3.4.0-templates.zip, and extract it.
- Login to Jira as administrator, go to Apps → Manage your apps → Excel Templates (under Better Excel Exporter).
- Upgrade the zephyr-tool.groovy template file:
- If you haven't made any changes in the original zephyr-tool.groovy file, then just upload the new template (the one you just downloaded) and you are done.
- If you made changes to the original zephyr-tool.groovy, you will need to migrate those to the new template.
- In case of an .xlsx file, check the current modifications made to the previous original version of the template, then re-apply them to the new version.
- In case of a .groovy file:
- Open the file from the directory where you extracted the ZIP.
- If you haven't made any changes in the original file, then just copy-paste the content of the new template (the one you just downloaded) to the editor, save it and you are done.
- If you made changes to the original, you will need to migrate those to the new template. This should be done by comparing the content of your current file with the new one, and merging all changes you made in the former to the latter. Use a visual merge tool (like WinMerge or Eclipse's compare and merge editor), and it should be trivial.
- Note: if you have used Zephyr Squad previously, then even if you haven't made any actual customization to zephyr-tool.groovy, you still entered a Zephyr Squad access key and a shared secret to the script code when enabling this integration. Now, either the access key and shared secret must be migrated to the new script version (just copy over the variable values), or the integration must be re-enabled with a new access key and shared secret.
- Then, create the new file zephyr-report-tool.groovy:
- In Jira, click the Upload button under the Excel Templates list. Find the zephyr-report-tool.groovy file among the unzipped files, and select it.
- Check if the new file has appeared in the template list.
-
Repeat the previous step also for the
following files:
- issue-navigator-with-zephyr-test-steps-and-results.xlsx
- zephyr-defect-report.xlsx
- zephyr-test-execution-history-report.xlsx
- zephyr-test-result-report.xlsx
- zephyr-tester-report.xlsx
- To create a new export option in the Export to Excel dialog:
- Go to Excel views (in the left-side bar) and click Add a new view.
- Enter "Zephyr Test Steps + Results (Curr. Fields)" as name, enter "Export the currently visible fields and the Zephyr Squad test steps with step results." as description, check the Issue Navigator context option, select the template file issue-navigator-with-zephyr-test-steps-and-results.xlsx, and save it. (Do not select any context if you don't want to activate this view right now. You can activate it any time later by selecting contexts here.)
- Using the arrows, move the new view after "Zephyr Step Results (Non-E. Fields)" in the list.
-
Repeat the previous step also with the following templates:
- issue-navigator-with-zephyr-test-steps-and-results.xlsx (view name: "Zephyr Test Steps + Results (Non-E. F.)", description: "Export all non-empty fields and the Zephyr Squad test steps with step results.", contexts: Single Issue View, Issue Navigator, Jira Software Backlog and Board)
- zephyr-test-result-report.xlsx (view name: "Zephyr Test Result Report", description: "Create a pivot report from the test executions per versions and cycles.", contexts: Single Issue View, Issue Navigator)
- zephyr-tester-report.xlsx (view name: "Zephyr Tester Report", description: "Create a pivot report from the test executions per testers.", contexts: Single Issue View, Issue Navigator)
- zephyr-defect-report.xlsx (view name: "Zephyr Defect Report", description: "Create a pivot report from the defects found during test executions.", contexts: Single Issue View, Issue Navigator)
- zephyr-test-execution-history-report.xlsx (view name: "Zephyr Test Execution History Report", description: "Create a pivot report from the count of test executions over time.", contexts: Single Issue View, Issue Navigator)
- Enjoy!
3.3.0
This version introduces a selection of ready-to-use Tempo Timesheets reports. Additionally, the app has been certified as Cloud Fortified by Atlassian. (It is, in short, acknowledged as an enterprise-ready solution.)
Tempo Timesheets reports
As you probably know, Better Excel Exporter already supports exporting Tempo Timesheets-specific custom fields (like Account and Team) and Tempo Timesheets-managed worklogs to Excel. In fact, those have been supported since the very first app version, and it has always been possible to create custom Excel reports from Tempo Timesheets data.
Starting from this version, we provide ready-to-use templates for the most frequent Tempo Timesheets reporting needs:
- total time logged by Tempo account, project, issue type, status, assignee and other fields
- time logged over a time period (day, week, month, year) by Tempo team, Tempo account, project, issue type, status, assignee and other fields
As always, you can use these as is, customize them, or use them as starting point to create completely new Tempo Timesheets reports.
See some sample exports from Tempo Timesheets and learn more about this integration.
Better Excel Exporter is a Cloud Fortified app!
We are proud to announce that Better Excel Exporter for Jira Cloud has been certified as a Cloud Fortified app by Atlassian.
Cloud Fortified is a classification to highlight enterprise-ready cloud apps with the advanced level of security, reliability, and support. In order to achieve this classification, the app participates in all Atlassian-mandated security programs.
These Atlassian-led and self inspections proved that:
- Better Excel Exporter Cloud is compliant with advanced security requirements.
- Incident handling mechanisms have been confirmed to be in place and prepared to respond in a timely fashion.
- Vulnerability detection and review processes are also integrated with Atlassian's for faster recovery and continuous improvement.
Learn more about Atlassian's Marketplace App Trust programs (which include Cloud Fortified).
Upgrading from 3.2.0
In order to get the new Tempo Timesheets reports, you have to create new views, templates and scripts. It takes only a few minutes, follow the guide below.
Steps:
- Upgrade the app as usual, through the Universal Plugin Manager.
- Download the ZIP that contains the latest template files: better-excel-exporter-for-jira-cloud-3.3.0-templates.zip, and extract it.
- Login to Jira as administrator, go to Apps → Manage your apps → Excel Templates (under Better Excel Exporter).
- Upgrade the tempo-tool.groovy template file:
- If you haven't made any changes in the original tempo-tool.groovy file, then just upload the new template (the one you just downloaded) and you are done.
- If you made changes to the original tempo-tool.groovy, you will need to migrate those to the new template.
- In case of an .xlsx file, check the current modifications made to the previous original version of the template, then re-apply them to the new version.
- In case of a .groovy file:
- Open the file from the directory where you extracted the ZIP.
- If you haven't made any changes in the original file, then just copy-paste the content of the new template (the one you just downloaded) to the editor, save it and you are done.
- If you made changes to the original, you will need to migrate those to the new template. This should be done by comparing the content of your current file with the new one, and merging all changes you made in the former to the latter. Use a visual merge tool (like WinMerge or Eclipse's compare and merge editor), and it should be trivial.
- Note: if you have used Tempo Timesheets previously, then even if you haven't made any actual customization to tempo-tool.groovy, you still entered the Tempo Timesheets API access token to the script code when enabling this integration. Now, either the access token must be migrated to the new script version (just copy over the variable value), or the integration must be re-enabled with a new token.
- Then, create the new file tempo-report-tool.groovy:
- In Jira, click the Upload button under the Excel Templates list. Find the tempo-report-tool.groovy file among the unzipped files, and select it.
- Check if the new file has appeared in the template list.
-
Repeat the previous step also for the
following files:
- tempo-report-account.xlsx
- tempo-report-team.xlsx
- To create a new export option in the Export to Excel dialog:
- Go to Excel views (in the left-side bar) and click Add a new view.
- Enter "Tempo Account Report" as name, enter "Create a pivot report from the time logged to each Tempo account." as description, check the Issue Navigator, Jira Software Backlog and Board context options, select the template file tempo-report-account.xlsx, and save it. (Do not select any context if you don't want to activate this view right now. You can activate it any time later by selecting contexts here.)
- Using the arrows, move the new view after "Tempo Worklogs (Non-E. Fields Repeating)" in the list.
-
Repeat the previous step also with the following templates:
- tempo-report-team.xlsx (view name: "Tempo Team Report", description: "Create a pivot report from the time logged by Tempo teams.")
- Enjoy!
3.2.0
This version introduces two important improvements to create better Excel spreadsheets faster.
"Non-empty fields" export mode
Previous app versions supported two export modes:
- "Current fields" mode: in this mode, those fields that you selected in the Issue Navigator are exported to Excel. It is very easy to use, intuitive and practical for most export use cases.
- "All fields" mode: in this mode, all the fields that exist in Jira are exported to Excel! If there exists a large number of custom fields in Jira, this mode may export hard-to-use, super-wide spreadsheets with lots of empty cells. Especially so, if you have unused custom fields or custom fields that are applicable only to a subset of issues (e.g. to certain issue types or to certain projects). Generally speaking, this mode is less practical for "human readers", but useful for data archival or for data migration to external systems.
In this version, we introduced a third mode called "non-empty fields". As the name implies, it exports those fields which have a non-empty value for at least one exported issue. In other words, it is like "all fields", but with the completely empty columns skipped. Or, it is the "noise-reduced" version of "all fields", if you like.
For example, if you export stories from Jira Software, the all-empty column "Customer request type" will not be created as it is specific to Jira Service Management tickets. Similarly, if you export Jira Service Management tickets, "Story points" will not be exported.
We really think that "non-empty fields" works better than "all fields" in most situations, therefore we made it the new default. (Nevertheless, the old "all fields" mode can still be configured.)
Learn more about the non-empty fields mode.
Dynamic (value-based) field formats
Exporting cell values immediately in the precise format that the user expects is critical for productivity. If the format is not optimal, the user needs to waste his time with re-adjusting it in Excel before he could start his real work.
Previous app versions enabled configuring the cell format at the column level (same format for all values in the field), but now we allow configuring it at the cell level (different format depending on the field value)!
For example, previous versions allowed exporting "Due date" in the preferred date format (which is the same for each value in that column), but now the expired due date values are exported in red! Or, as another example, you can export priority values "Highest" and "High" in orange. This can be a game changer for readability, and it is fully customizable!
Learn more about dynamic field formats.
Upgrading from 3.1.0
Due to the changes that "non-empty" mode brought to the table, on top of upgrading your resources, you have to upgrade your views as well. Please execute the following steps precisely to get all the improvements introduced in this version.
Steps:
- Upgrade the app as usual, through the Universal Plugin Manager.
- Download the ZIP that contains the latest template files: better-excel-exporter-for-jira-cloud-3.2.0-templates.zip, and extract it.
- Login to Jira as administrator, go to Apps → Manage your apps → Excel Templates (under Better Excel Exporter).
- Upgrade the field-helper-tool.groovy template file:
- If you haven't made any changes in the original field-helper-tool.groovy file, then just upload the new template (the one you just downloaded) and you are done.
- If you made changes to the original field-helper-tool.groovy, you will need to migrate those to the new template.
- In case of an .xlsx file, check the current modifications made to the previous original version of the template, then re-apply them to the new version.
- In case of a .groovy file:
- Open the file from the directory where you extracted the ZIP.
- If you haven't made any changes in the original file, then just copy-paste the content of the new template (the one you just downloaded) to the editor, save it and you are done.
- If you made changes to the original, you will need to migrate those to the new template. This should be done by comparing the content of your current file with the new one, and merging all changes you made in the former to the latter. Use a visual merge tool (like WinMerge or Eclipse's compare and merge editor), and it should be trivial.
-
Repeat the previous step also for the
following files:
- issue-navigator.groovy
- issue-navigator.xlsx
- issue-navigator-with-comments.xlsx
- issue-navigator-with-history.xlsx
- issue-navigator-with-repeating-history.xlsx
- issue-navigator-with-repeating-tempo-worklogs.xlsx
- issue-navigator-with-repeating-worklogs.xlsx
- issue-navigator-with-tempo-worklogs.xlsx
- issue-navigator-with-worklogs.xlsx
- issue-navigator-with-zephyr-test-executions.xlsx
- issue-navigator-with-zephyr-test-step-results.xlsx
- issue-navigator-with-zephyr-test-steps.xlsx
-
We believe that Excel views using the "non-empty fields" mode will suit your needs better than those created by previous app versions and using "all fields" mode, so we made those the new default.
We have also re-configured and re-ordered the views to provide the most intuitive Excel export options in each context (screen).
So we strongly recommend upgrading your existing views, but instead of going one by one, follow these steps to complete the upgrade faster:
- Go to Apps → Manage your apps → Excel Views (under Better Excel Exporter).
- Open the same page again in another browser tab. The idea is that in the first tab you will be able to see your old Excel views during the upgrade, which include your custom Excel views if you created any in the past. (Obviously, do not reload the first tab until the upgrade is completed!)
- In the second browser tab, click Reset all views under the list. It will delete all existing Excel views (including your custom Excel views), and re-create the default ones. Consequently, it will give you the working "factory defaults".
- Finally, you need to re-create your custom Excel views that were deleted in the previous step. Still in the second browser tab, re-create the custom Excel views that are still visible in the first tab. If you had no custom Excel views, you can skip this step.
- Enjoy!
3.1.0
Better Excel Exporter for Jira Cloud is now generally available on the Atlassian Marketplace!
After a successful Early Access Program and two months in alpha, then beta statuses, we are happy to announce that Better Excel Exporter for Jira Cloud is now ready for production use!
Read our product launch announcement and learn more about the experience of our EAP users.
If you are migrating from Jira Server or Data Center, make sure you explore the Better Excel Exporter migration guide. It explains what steps you need to take to seamlessly switch to the Cloud platform with Better Excel Exporter, as well as the feature differences between the Server and Cloud versions.
Happy reporting!
0.7.0
Early Access Program for Better Excel Exporter Cloud
This version is available for EAP participants only. EAP users are Better Excel Exporter customers currently on Jira Sever or Data Center platforms or Jira Cloud users who indicated their interest early in a professional and reliable Excel reporting and exporting app.