
In this page
The rendering context
Context objects for templates
Context tools for templates
Expressions for templates
Exporting issues
Iterating over issues
Implicit iteration
Explicit iteration
Exporting issue properties
More on expressions
Formatting field values
Basics of fields
Using the $fieldHelper tool
In Issue Navigator
In custom templates
Convenience methods
Usage examples
System fields
Custom fields
Modifying the field value formats
Field format vs. dynamic format
Implementing a new formatting rule
Resources
Next step
The Excel file rendering process
Better Excel Exporter generates Excel spreadsheets by merging Excel template spreadsheets with Jira data.
You create a regular spreadsheet in Excel, containing special placeholder texts (like ${issue.summary}), it is called the template, and upload it to Jira. Then, every time you want to make an export using that template, Jira will merge the current data into the template, by replacing the placeholder texts with actual values. For example, ${issue.summary} will be replaced with the text "Null pointer exception when changing the description". This process is called rendering.
This diagram shows a conceptual drawing about the rendering process:
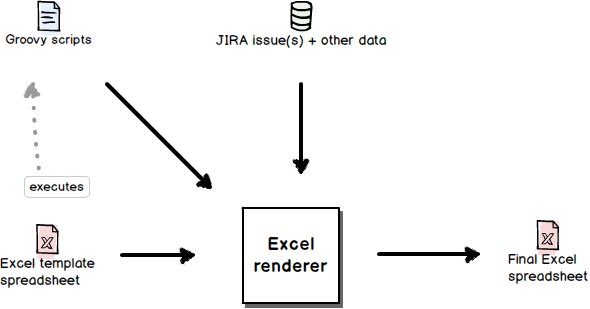
The rendering process has the following inputs:
-
The issues that are to be exported.
Although the issues are the core of the data, it is really just the starting point. Through the issues you also get access to further information in the Jira data model, like projects, people, workflows, versions, sprints. -
The template spreadsheet.
It defines the content and the format of the output, and also controls the rendering process (e.g. by evaluating conditions, running scripts). - Additional resources like scripts, for example.
The rendering context
The rendering context is the set of variables and tools you can use in your Excel templates and in your Groovy scripts (optional, see this later). Every item in the context is identified by a unique name, just like a variable in a programming language. For example, the issues to be exported are available under the name $issues.
Context objects for templates
You can access the following domain objects while rendering the Excel template:
| Domain Object | Description |
|---|---|
| $user | ApplicationUser instance that represents the currently signed-in user, i.e. the user who started the Excel export. |
| $xlsView |
Represents the "export type" which was selected by the user in the UI to start the Excel export. You can access its public properties by the expressions ${xlsView.name}, ${xlsView.description} and ${xlsView.templateName}. |
| $title |
String title for the Excel document. See the file properties page about working with titles. |
| $issues |
The Collection that stores the Issue objects to export.
It contains only one item if the app was invoked from the Issue Details screen (single issue export), or multiple items when the app was invoked from the Issue Navigator (multi issue export). You can iterate through this collection using the <jt:forEach> tag or using the implicit iteration technique. Make sure you read this section for details. |
| $jql |
The JQL query as String that selects the issues to export.
For single issue exports, it contains key=FOO-123 (with the actual issue key). Available only if the Excel file is exported from the Issue Navigator. |
| $searchRequest |
SearchRequest that is available only if the document is generated from a "search":
browsing the issues with the Issue Navigator, executing filters, running free text searches, etc. Not available for single issue exports. |
| $i18n | I18nHelper instance that allows inserting internationalized Jira texts (like field names) to the Excel file content. |
| $requestContext.baseUrl | Jira base URL as String. |
| $currentDate | Date of the Excel file creation. |
You are, of course, not limited to using these objects only. You can access tons of other information by navigating from these starting points in the object graph.
You can, for example, retrieve the number of versions in an issue's project with the following JEXL expression:
${issue.projectObject.versions.size()}
Context tools for templates
You can use the following tools in Excel templates:
| Component / Tool | Description |
|---|---|
| $changeHistoryManager |
ChangeHistoryManager returns the issue field value changes by various criteria. Use this to export issue updates, workflow transition histories or metrics calculated from those. Groovy example: def changeHistories = changeHistoryManager.getChangeHistoriesForUser(issue, user) |
| $commentManager |
CommentManager is used to retrieve the issue comments. Groovy example: def comments = commentManager.getCommentsForUser(issue, user) |
| $componentAccessor |
Can return references to $projectManager, $userManager and other Jira components that are not available in the Velocity context directly.
You may want to use this when developing Excel templates and scripts that require components not listed in this table. Groovy example: def avatarService = componentAccessor.avatarService def applicationProperties = componentAccessor.applicationProperties def constantsManager = componentAccessor.constantsManager def projectManager = componentAccessor.projectManager def userManager = componentAccessor.userManager // ... |
| $customFieldManager |
CustomFieldManager supports working with custom fields. Groovy example: def customFields = customFieldManager.getCustomFieldObjects(issue) |
| $fieldScreenRendererFactory |
FieldScreenRendererFactory allows you to obtain field screen renderers to check which custom fields are added to what screens and tabs. |
| $fieldVisibilityManager |
FieldVisibilityManager returns whether a custom field is visible for an issue. |
| $issueLinkManager |
IssueLinkManager can return the inward / outward issue links (for example, "duplicated by" and "duplicates"). Groovy example: def linkCollection = issueLinkManager.getLinkCollection(issue, user) |
| $jqlSearch |
Searches for issues by executing a JQL query or a saved filter. Groovy examples:
def issues = jqlSearch.searchByJql("project = FOO")
def issues = jqlSearch.searchBySavedFilter(10000)
|
| $remoteIssueLinkManager |
RemoteIssueLinkManager gives access to the links between Jira issues and remote objects in remote applications (most typically pages in a Confluence instance). Groovy example: def issueLinks = remoteIssueLinkManager.getRemoteIssueLinksForIssue(issue)) |
| $tableLayoutFactory |
TableLayoutFactory helps to construct custom column layouts. This is useful if you want to have a dynamically changing column layout in your Excel spreadsheets, identical with the one you currently use see in the Issue Navigator. |
| $userManager |
Returns users by account ID (or all users, although it should be avoided for efficiency reasons). Groovy examples: def users = userManager.getUserByAccountId(1) def users = userManager.getUsersByAccountId([1, 2]]) def users = userManager.getAllApplicationUsers() |
| $worklogManager |
WorklogManager gives access to the "logged work" records. You will use it if you need to process or export work log information. Groovy example: def worklogs = worklogManager.getByIssue(issue) |
| $workRatio |
WorkRatio calculates Jira's special "work ratio" metric. |
| $sorter |
SortTool is to sort collections by any property (or properties) of the contained items. It is super-userful for basic sorting. For more complex sorting, use Groovy comparators. As a third option, you can pre-sort a collection before iterating over its items, directly in the Excel template using the <jt:forEach> tag's orderBy attribute. Groovy example: def sortedIssues = sorter.sort(issues, "key") |
| $stringutils |
StringUtils offers a wide range of useful utility methods for strings. JEXL expression example: ${stringutils.countMatches(issue.summary, ".")}
|
| $xlsContent |
Get the list of comment objects:
def comments = xlsContent.commentsByIssue(issue) Get the list of change history objects: def changeHistories = xlsContent.changeHistoriesByIssue(issue) |
Expressions for templates
These are the best resources to find the template language expressions for your own templates:
- The Expressions Reference Manual gives you categorized expressions for all the frequent needs, that you can just copy to your own templates.
- The code of the default templates shipped with the app are also worth a deeper look. We offer several templates built for real-life use cases, so make sure to check the default templates that export the same data or work similar to your own templates.
Exporting issues
Iterating over issues
The very first thing you will want to do is iterating over the issues that are to be exported. You can iterate over the collection available via $issues in two rather different ways:
- Implicit iteration: this technique is more concise, more readable, but less flexible, therefore it is recommended only for simple cases.
- Explicit iteration using the <jt:forEach> tag: recommended for most real-world use cases.
Implicit iteration
This is super-simple. Let's see a concrete example by creating a template spreadsheet with two rows:
| Key           | Summary           | Assignee                           | Status                       |
| ${issues.key} | ${issues.summary} | ${issues.assigneeUser.displayName} | ${issues.statusObject.name} |
As a good practice, let's freeze the first row and add some styling so that it looks like this in Excel:
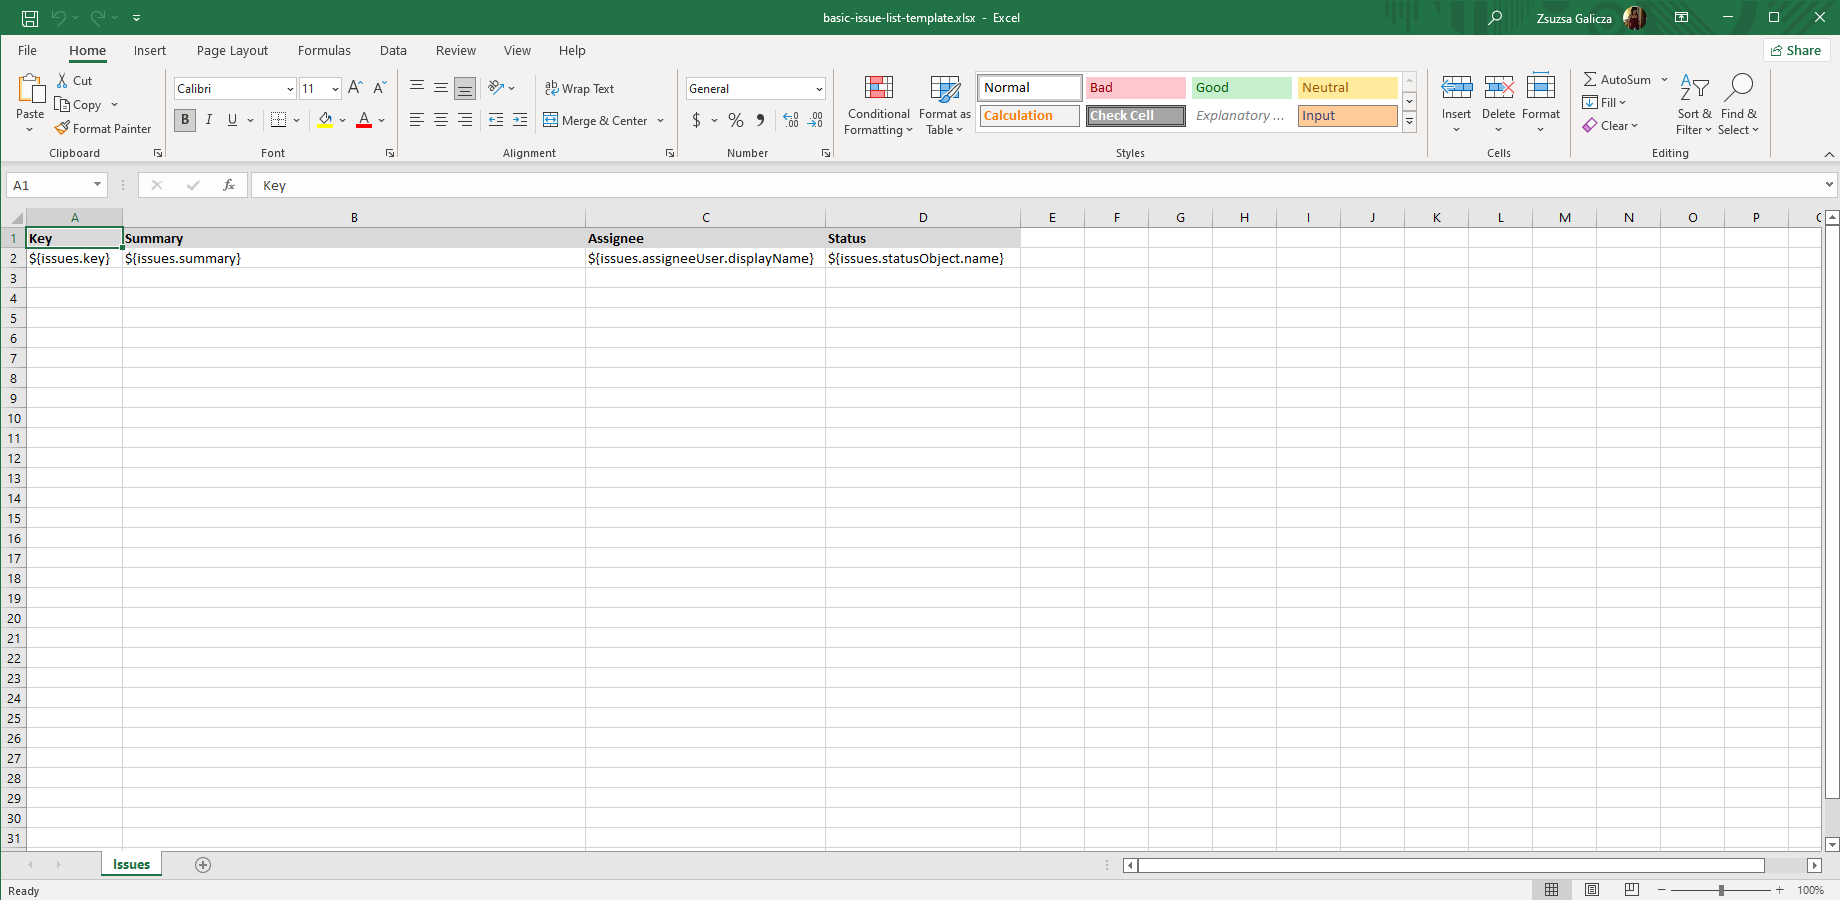
Important: for the implicit iteration, you must use the plural form $issues (i.e. the precise name of the collection) in the expressions!
How this works: the renderer will recognize the collection name, iterate over its items and render each issue into a separate row by duplicating the second row. When evaluating the expressions, the collection name will be "substituted" with the current item.
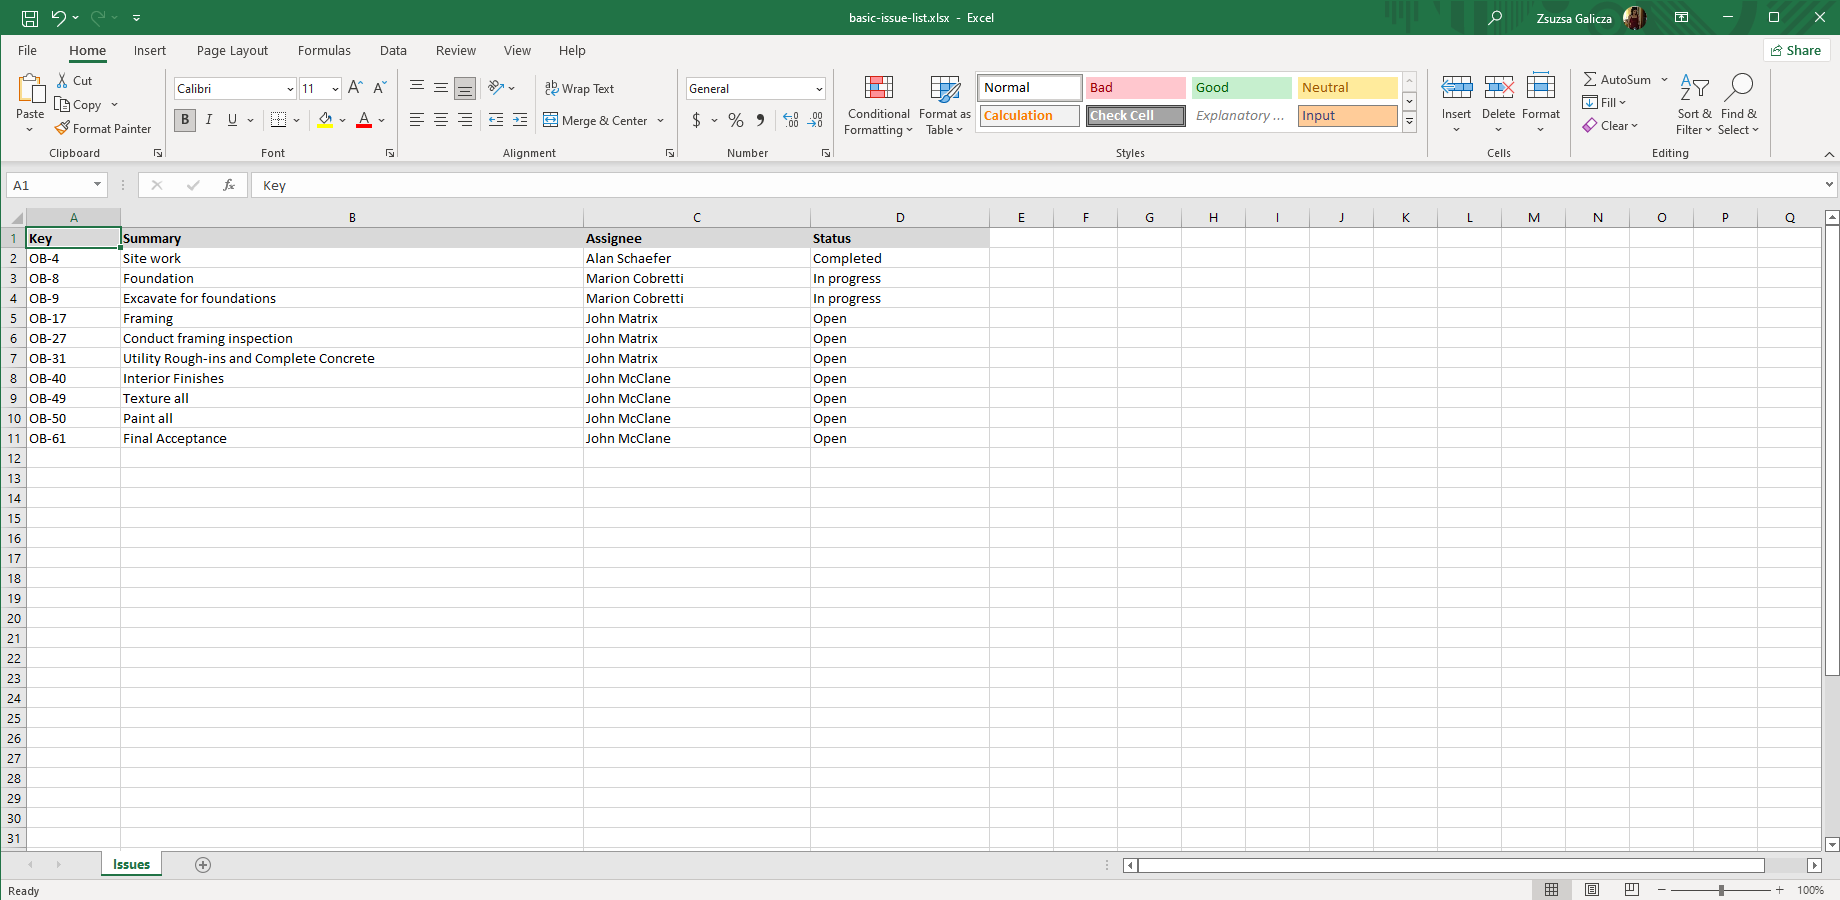
So it will result in this output:
Although implicit iteration is more limited than the other technique (detailed in the next section), its behavior can be configured to some extent. Please read this article about the configuration options.
Explicit iteration
Although implicit processing is easier to use, iterating over the issues using the <jt:forEach> tag is a better choice for non-trivial cases.
Some examples when explicit iteration better fits the bill:
- filtering collection items
- re-ordering collection items
- grouping collection items
- nested iterations (iterating over sub-collections of collections)
- iterating over multiple collections simultaneously
If you are unsure which technique to choose, just use explicit iterations with the <jt:forEach> tag. With that, the previous example would look like this:
| Key                                                    | Summary          | Assignee                           | Status                                  |
| <jt:forEach items="${issues}" var="issue">${issue.key} | ${issue.summary} | ${issues.assigneeUser.displayName} | ${issue.statusObject.name}</jt:forEach> |
Important: you must pass the collection object to the items attribute and must specify another name in var, under which the current item will be available. As a convention, var is the singular form of the collection's name. For example, while you iterate over the collection $issues (plural), you typically want to access the current item as $issue (singular). (This is not a hard rule, you can use any name.)
How this works: the tag will duplicate the second row for each item, as expected. Within the iteration's body, the current item will be accessible as $issue (the variable name specified in var). Therefore all expressions must use the singular form $issue so that the renderer can evaluate each issue in its own row.
What makes this technique more flexible is that within the iteration's body you can do anything you want with the current item's object (even passing to scripts). You can also freely combine the <jt:forEach> with other tags.
To learn more about the <jt:forEach>tag, read the tag documentation. We also recommend studying the default templates shipped with the app for inspiration.
Exporting issue properties
You can access the issue properties using the well-known dot notation, separating the object names with a dot character.
For example, when the Issue class has a getter like this:
IssueType getIssueTypeObject()
then you can call that by omitting the "get" prefix and using the correct lowercase first character:
${issue.issueTypeObject}
Similarly, as the IssueType class has a getter like this:
String getName()
you can easily export the issue's type name with a single expression:
${issue.issueTypeObject.name}
Some more examples:
| Issue summary:           | ${issue.summary}                  |
| Assignee's full name:    | ${issue.assigneeUser.displayName} |
| Enclosing project's key: | ${issue.projectObject.key}        |
When working with the Jira data model objects, your primary source of information will be the Jira Javadocs.
More on expressions
The expressions introduced in the previous section are written in the JEXL language. JEXL stands for Java Expression Language, and it is the expression language used by Better Excel Exporter internally.
Please consider reading the following pages for more information on the JEXL language and its syntax:
- JEXL syntax reference (description of language elements and grammar)
- JEXL examples (how to define arithmetic expressions, call methods, access properties and work with data structures)
Formatting field values
Jira and Excel represent values differently. In practice, this means that when you get an issue field's value as a Java object, and insert that into an Excel cell, its format in Excel won't always be optimal.
Why? Without telling this what to do, the renderer will just call the toString() method on the value object, and insert the resulted string to the cell. This works perfect for text type fields, but not for a multi-user picker type custom field, for instance.
You should use the $fieldHelper tool in the Excel templates to bridge this gap. It basically transforms the field values from the Java objects returned by Jira to the optimal value to be inserted into Excel.
In our previous example, a multi-user picker type custom field returns a list of user objects as value in Jira, but $fieldHelper transforms that to a comma-separated list of user display names. Similarly, time values (ex: Original estimate) are stored in milliseconds in Jira, but as Excel expects them as hours, this tool does the conversion.
This tool will be an invaluable asset when developing Excel templates, and it is super easy to use, just read on.
Basics of fields
For a solid understanding of how the exporter works, a few of the underlying concepts must be clarified. This information is critical if you plan to modify or extend the $fieldHelper tool, but might be useful otherwise, too.
There are three field categories used by the Better Excel Exporter app:
- Jira system fields: Jira fields that are inherent parts of all issues, like summary, assignee
- Jira custom fields: added to issues by the user, with configurable types, names, layout, etc.
- Calculated fields: special fields, whose values are calculated on-the-fly during the export
Each of these field categories has three important properties that the rendering engine needs to know:
- Value: the actual data to display in the Excel cell (can be altered later by the format property)
- Cell type: Excel cell type, one of string, number, boolean or date, that represents the kind of the data the best
- Format: Excel cell format code, only applicable to number and date cell types
Using the $fieldHelper tool
In Issue Navigator
The templates developed for Issue Navigator are typically using the $issueNavigator tool. That delegates all formatting to $fieldHelper. Thus you don't have to do anything extra to take advantage of $fieldHelper in these templates.
In custom templates
To use $fieldHelper in custom templates, execute the tool's script like this before anything else:
<mt:execute script="field-helper-tool.groovy"/>
Don't forget that this tag must be processed before the first actual use of the tool. A good practice is to insert this to the first or the last cell in the first Excel row.
After the script was executed, the object $fieldHelper becomes available in the rendering context. It provides a dead simple API:
/**
 * Returns the system-, custom- or calculated field value for the issue.
 * Note: the returned value is strongly typed (String, Date, etc.).
 *
 * @param fieldId is either the ID of a system field (e.g. "assignee"),
 * 				ID of a custom field (e.g. "customfield_10123"),
 * 				or the ID of a calculated field (e.g. "Excel parent key").
 * @param columnLayoutItem (optional) should be passed when the value is
 *				to be obtained in an Issue Navigator context.
 */
public def getFieldValue(issue, String fieldId, columnLayoutItem = null)
public def getFieldValue(issue, field, columnLayoutItem = null)

/**
 * Returns the Excel cell type for the issue field.
 * It is one of "string", "number", "boolean" or "date".
 */
public def getFieldCellType(String fieldId)
public def getFieldCellType(field)

/**
 * Returns the format specifier string (ex: "dd/mmm/yyyy") for the issue field.
 * The format specifier is typically used for number- or date type fields.
 */
public def getFieldFormat(String fieldId)
public def getFieldFormat(field)
As you see, it has basically three public functions to get a field's value, a field's cell type and a field's format. Each function comes with two signatures: one receives the ID of the field as argument, while the other receives the field object itself.
Convenience methods
Although we encourage accessing fields by their identifiers (that never changes), as suggested in the previous section, there are additional convenience methods to retrieve custom field values by the custom field's name.
Getting field values by field names is supported by custom fields only, because system fields ("assignee") and calculated field ("Excel parent key") have identifiers that are identical in any Jira instance. Custom fields, in contrary, have identifiers that vary from Jira to Jira (e.g. a custom field "Story Points" can have the ID "customfield_10123" in one Jira and "customfield_10245" in another). Because these vary, templates that rely on custom fields would require you to configure the custom field IDs to the ones in your Jira, prior to using the template.
So, identifying custom fields by their names in the template can make your life easier in the following ways:
- These allow creating templates that work immediately without requiring you to search for and enter custom field IDs to the template. For instance, a template can assume that the Tempo Timesheets-managed custom field is called "Account" and get its value by the name, and you don't need to search for its numerical ID.
- If you assume that the same custom field is called the same in your staging and production Jira, then you can easily transfer the template between them and that will work without any configuration work.
The only caveat is that your template will break if the custom field is renamed, obviously.
So, the primary convenience method is this:
/**
 * This convenience method is only to be used if you want to get a field value by the field name.
 * The getFieldValue(issue, String fieldId, columnLayoutItem = null) method is generally a safer
 * option, because that accepts the immutable field ID (e.g. "customfield_10123"), not the name.
 * This is more convenient because it can work out of the box without configuring the custom field
 * IDs in the templates, but breaks when the custom field is renamed.
 */
public def getFieldValueByName(issue, String fieldName, columnLayoutItem = null)
We offer a more bullet-proof variant of this convenience method, that allows enumerating multiple potential custom field names! For instance, if your custom field is called "Invoice Number" in one Jira, but "Recipe No." in another, or if it will be renamed from "Bug owner" to "Owner" in the next week, you can enumerate all options, and the value will be returned from the first existing custom field.
So this can handle situations when the name is not guaranteed, but there is a small number of possible options:
/**
 * This convenience method is similar to the previous one, but tolerates custom field renamings
 * by receiving multiple name variants.
 *
 * @param fieldNameVariants is an array with multiple custom field names.
 * 				The value of the first existing custom field name will be returned.
 */
public def getFieldValueByName(issue, String[] fieldNameVariants, columnLayoutItem = null)
Usage examples
Don't forget to put the field identifier between quotation marks!
// - standard methods ---------------------------------------------------------

// for system fields
${fieldHelper.getFieldValue(issue, "assignee")}

// for custom fields (by ID)
${fieldHelper.getFieldValue(issue, "customfield_10015")}

// for calculated fields
${fieldHelper.getFieldValue(issue, "User is active")}

// - convenience methods ------------------------------------------------------

// for custom fields (by name)
${fieldHelper.getFieldValueByName(issue, "Sprint")}

// for custom fields (by multiple potential names)
${fieldHelper.getFieldValueByName(issue, [ "Time to resolution", "Time to closing" ])}
System fields
This is the list of the system field identifiers to be passed to $fieldHelper:
| Field Identifier | Description |
|---|---|
| aggregateprogress | Progress percentage (aggregated from sub-tasks) |
| aggregatetimeestimate | Remaining estimated time (aggregated from sub-tasks) |
| aggregatetimeoriginalestimate | Original estimated time (aggregated from sub-tasks) |
| aggregatetimespent | Spent time (aggregated from sub-tasks) |
| assignee | Assignee |
| attachment | Attachments (don't use directly) |
| comment | Comments (don't use directly) |
| components | Components |
| created | Creation date |
| creator | Creator |
| description | Description |
| duedate | Due date |
| environment | Environment |
| fixVersions | Fix versions |
| issuekey | Issue key |
| issuelinks | Linked issues (don't use directly) |
| issuetype | Issue type |
| labels | Labels |
| lastViewed | Last viewed (don't use directly) |
| number | Issue number |
| priority | Priority |
| progress | Progress percentage |
| project | Enclosing project |
| reporter | Reporter |
| resolution | Resolution |
| resolutiondate | Resolution date |
| security | Security level |
| status | Status |
| subtasks | Sub-tasks (don't use directly) |
| summary | Summary |
| timeestimate | Remaining estimated time |
| timeoriginalestimate | Original estimated time |
| timespent | Spent time |
| timetracking | Time tracking data (don't use directly) |
| thumbnail | Attachment image thumbnails (don't use directly) |
| updated | Update date |
| versions | Affects versions |
| voter | Voters |
| votes | Number of votes |
| watcher | Watchers |
| watches | Number of watchers |
| worklog | Worklogs (don't use directly) |
| workratio | Work ratio |
Custom fields
Custom field IDs are always in the format customfield_12345. The text prefix is always customfield_, but the number after the underscore is changing.
Assuming you know the custom field's name, to find out the ID:
- Login to Jira as administrator.
- Go to Administration → Issues → Custom Fields.
- Find the custom field by its name.
- Click the cog icon "⚙", move your cursor above one of the View, Configure, Edit or Translate links in the dropdown menu.
- The URL will end with something like ...?customFieldId=10001 or ...?id=10001. This is the number you are looking for!
Modifying the field value formats
Exporting cell values immediately in the way how the user expects those is critical for productivity. If the output is not optimal, the user needs to waste his time with re-working the cells in Excel before he could start his real work.
If you want to modify the output for certain fields globally (in all templates using $fieldHelper), you are welcome to modify the code in field-helper-tool.groovy. Examples can be changing the user picker custom fields to export the users' login names instead of the users' display names, or changing the preferred date format from "dd/mmm/yyyy".
field-helper-tool.groovy is nicely written, easy to read and modify. The most important methods that you may want to modify are:
private def getSystemFieldValue(issue, fieldId)
private def getCustomFieldValue(issue, customField, columnLayoutItem)
private def getCalculatedFieldValue(issue, customField)

private def getSystemFieldCellType(fieldId)
private def getCustomFieldCellType(customField)
private def getCalculatedFieldCellType(customField)

private def getSystemFieldFormat(fieldId)
private def getCustomFieldFormat(customField)
private def getCalculatedFieldFormat(customField)

private def getSystemFieldDynamicFormat(issue, fieldId)
private def getCalculatedFieldDynamicFormat(issue, fieldName)
private def getCustomFieldDynamicFormat(issue, customField)
The method names exactly describe what the methods do. (Note: a system field is a field that is neither a custom field, nor a calculated field. Examples: Status, Resolution or Summary.)
Field format vs. dynamic format
As already mentioned above, field formatting is based on the standard Excel cell format code feature. There are two ways to specify the field format:
-
(Static) format: it depends only on the field itself.
Therefore, the same format is applied to all values of the field.
For example, you can apply the same "yyyy/mm/dd" format to all resolution dates.
The implementation of static formatting rules can be found in the get...FieldFormat() methods. -
Dynamic format: it depends on the field and also on the field value.
Therefore, different formats can be applied to different values of the field.
For example, you can export those due dates that are already passed in red, while the rest in black.
The implementation of dynamic formatting rules can be found in the get...FieldDynamicFormat() methods.
The precedence of the two formats is simple: if a field has both a static and a dynamic format implemented, what is legal although rarely useful, then the dynamic one will be used. Consequently, before adding or modifying the static format of a field, remember to check if it has a dynamic format implemented. If it has one, then your changes on the static format will have zero effect, for obvious reasons.
As for performance, static formatting works faster than dynamic formatting. You should use dynamic formats only if the formatting rule is actually based on the field value.
Implementing a new formatting rule
In this example, we will add a formatting rule to export the "Highest" priority value in red.
Because Priority is a system field and the format depends on the field value (i.e. it is a dynamic format), you will need to add your logic to the getSystemFieldDynamicFormat() method.
The logic is simple: return the "[RED]" format code from the method if the value is "Highest", otherwise return null which means "no custom format".
private def getSystemFieldDynamicFormat(issue, fieldId) {
	switch (fieldId) {
		// your custom code block starts here
		case "priority":
			(issue?.priority?.name == "Highest") ? "[RED]" : null
			break
		// your custom code block ends here
Find the format codes for the available colors in the last column of the Excel Color Chart (e.g. [Color45] or [Cyan]).
Resources
![]() basic-issue-list-template.xlsx — a sample Excel template to generate basic task lists. Use this as starting point for your own templates.
basic-issue-list-template.xlsx — a sample Excel template to generate basic task lists. Use this as starting point for your own templates.
Next step
Use formulas and functions to export values calculated from the issue properties.
Questions?
Ask us any time.